Starter
依赖包
<dependency>
    <groupId>org.springframework</groupId>
    <artifactId>spring-orm</artifactId>
</dependency>
<dependency>
    <groupId>org.springframework</groupId>
    <artifactId>spring-aspects</artifactId>
</dependency>
<dependency>
    <groupId>org.springframework</groupId>
    <artifactId>spring-context-support</artifactId>
</dependency>

<dependency>
    <groupId>org.aspectj</groupId>
    <artifactId>aspectjrt</artifactId>
</dependency>
<dependency>
    <groupId>cglib</groupId>
    <artifactId>cglib-nodep</artifactId>
</dependency>
<dependency>
    <groupId>javax.inject</groupId>
    <artifactId>javax.inject</artifactId>
</dependency>
测试依赖包:
<dependency>
    <groupId>junit</groupId>
    <artifactId>junit</artifactId>
</dependency>
<dependency>
    <groupId>org.springframework</groupId>
    <artifactId>spring-test</artifactId>
</dependency>
使用
beans.xml:<beans xmlns="http://www.springframework.org/schema/beans" xmlns:xsi="http://www.w3.org/2001/XMLSchema-instance" xmlns:aop="http://www.springframework.org/schema/aop" xmlns:tx="http://www.springframework.org/schema/tx" xmlns:context="http://www.springframework.org/schema/context" xsi:schemaLocation=" http://www.springframework.org/schema/beans http://www.springframework.org/schema/beans/spring-beans-3.2.xsd http://www.springframework.org/schema/aop http://www.springframework.org/schema/aop/spring-aop-3.2.xsd http://www.springframework.org/schema/tx http://www.springframework.org/schema/tx/spring-tx-3.2.xsd http://www.springframework.org/schema/context http://www.springframework.org/schema/context/spring-context-3.2.xsd"> //... </beans>本地应用:
 public static void main(String[] args)
 {
     BeanFactory beanFactory=new ClassPathXmlApplicationContext("beans.xml");
     MyTest myTest=(MyTest)beanFactory.getBean("myTest");
     System.out.printIn(myTest.isDoCheck());
 }
web应用(配置web.xml):
 <listener>
     <listener-class>org.springframework.web.context.ContextLoaderListener</listener-class>
 </listener>
 <context-param>
     <param-name>contextConfigLocation</param-name>
     <param-value>classpath*:beans.xml</param-value>
 </context-param>
单元测试:
 @RunWith(SpringJUnit4ClassRunner.class)
 @ContextConfiguration("classpath:beans.xml")
 public class ReqSupplierTest
 {
     @Inject
     private MyTest myTest;

     @Test
     public void testIsDoCheck(){
         System.out.printIn(myTest.isDoCheck());
     }
 }
IOC
IOC: inversion of control 控制反转DI:Dependency Injection 依赖注入 (IOC实现方式)- 基本条件:所有的类都要被spring管理
- 注入方式:
- set注入
- construct注入
- 配置方式:
- xml
- Annotation
bean:由Spring容器初始化、装配及被管理的对象,scope作用域:singleton:默认,每次调用getBean的时候返回相同的实例prototype:每次调用getBean的时候返回不同的实例
Spring IOC容器根据配置,对应用中各个对象bean进行实例化、配置以及组装,而非对象本身管理。
Spring Bean加载销毁顺序
Bean实例化顺序
- 构造函数注入(Constructor Injection):
public A()construct - 属性注入(Setter Injection):
setXxx()property - 接口注入(Interface Injection)
setBeanName(String name)[A implements BeanNameAware]setBeanFactory(BeanFactory factory)[A implements BeanFactoryAware]setApplicationContext(ApplicationContext context)[A implements ApplicationContextAware]
@postConstructafterPropertiesSet()[ A implements InitializingBean ]init-methodfunction [set in bean configuration file]
Bean销毁顺序
@PreDestroydestroy()[A implements DisposableBean]destroy-methodfunction [set in bean configuration file]
XML配置装载Bean
Java类定义:
public MyTest{
    private String searchFilter;
    private ContextSource contextSource;

    public MyTest(String searchFilter,ContextSource contextSource){
        this.searchFilter=searchFilter;
        this.contextSource=contextSource;
    }

    private boolean doCheck;
    private List<String> extensions;
    private MailSender mailSender;
    private AccessManager accessManager;

    public boolean isDoCheck(){return this.doCheck;}
    @Inject
    public void setDoCheck(boolean doCheck){this.doCheck=doCheck;}

    public List<String> getExtensions(){return this.extensions;}
    public void setExtensions(List<String> extensions){this.extensions=extensions;}

    publis MailSender getMailSender(){return this.mailSender;}
    @Inject
    public void setMailSender(MailSender mailSender){this.mailSender=mailSender}

    publis AccessManager getAccessManager(){return this.accessManager;}
    @Inject
    public void setAccessManager(AccessManager accessManager){this.accessManager=accessManager}
}
xml配置由Spring管理此类:
<bean id="myTest" class="xxx">
    <!-- 构造方法,即new时就注入某个对象 -->
    <constructor-arg name="searchFilter" value="none"/>
    <constructor-arg name="contextSource" ref="ldapServer"/>
    <!-- 构造后,自动调用setXXX方法注入对应对象,在类中必须定义setXXX方法-->
    <property name="doCheck" value="true"/>
    <property name="extensions">
        <list>
            <value>.txt</value>
            <value>.mail</value>
        <list>
    <property>
    <property name="mailSender" ref="mailSender"/>
    <property name="accessManager">
        <bean class="...">...</bean>
    </property>
</bean>
Annotation配置装载Bean
Bean注解 (加在类上)
@Service标记类是Service层类@Controller标记类是Controller层类@Repository标记类是DAO层类@Component泛指@Scope("xxx")作用域,可为singleton(default),prototype
属性注入注解(可加在属性定义或set方法上)
@Autowired自动注入,默认按类型(byType)装配 (使用@Qulifier则byName)@Resource默认先按名称(byName)装配,再按类型(byType)装配@Inject等价于默认的@Autowired@Value(value = "SpEL表达式")注入*.properties文件中的配置值,eg:- bean.xml中:
<context:property-placeholder location="classpath:prod.properties"/> - bean类中:
@Value("${deploy.url}")private String systemUrl
- bean.xml中:
AOP
面向切面编程Aspect-Oriented-Programming
- 是对面向对象的思维方式的有力补充
- 可以动态的添加和删除在切面上的逻辑而不影响原来的执行代码
- 实现方式:
- 静态代理:在程序运行前,代理类的.class文件就已经存在了
- 动态代理:在程序运行时,运用反射机制动态创建代理类
- JDK
- CGLIB
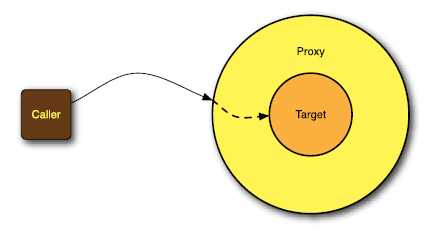
静态代理
PS: 使用静态代理带来的最大问题,需要为每一个类都加入与业务逻辑无关的横切代码
使用示例:
- Target
public interface Manager { public void modify(); } public class ManagerImpl implements Manager { @Override public void modify() { System.out.println("*******modify()方法被调用"); } } - Proxy
public class ManagerHandler implements Manager { private Manager target; public ManagerHandler(Manager target){ this.target=target; } @Override public void modify() { System.out.println("do something before method"); //执行target方法 target.modify(); System.out.println("do something after method"); } } - 测试
 public static void main(String[] args) {
     ManagerHandler proxy = new ManagerHandler(new ManagerImpl());
     proxy.modify();
 }
JDK动态代理
PS: JDK的动态代理机制只能代理实现了接口的类
主要涉及到java.lang.reflect包中的两个类:
interface InvocationHandler:通过实现该接口定义横切逻辑,通过反射机制调用目标类的代码,动态的将横切逻辑和业务逻辑编织在一起class Proxy为InvocationHandler实现类动态的创建一个符合某一接口的代理实例
使用步骤:
- 创建动态代理类:
InvocationHandler实现类- 在代理类中创建相应的要代理的对象(以后创建对象就完全通过这个代理类来进行创建)
- 在重载方法
public Object invoke(Object proxy, Method method, Object[] args)中编写横切逻辑
- 通过代理类创建对象
使用示例:
- Target
public interface Manager { public void modify(); } public class ManagerImpl implements Manager { @Override public void modify() { System.out.println("*******modify()方法被调用"); } } - Dynamic InvocationHandler
public class BusinessHandler implements InvocationHandler { private Object target = null; /** * 绑定委托对象并返回一个代理类 * @param target * @return */ public Object bind(Object target) { this.target = target; //取得代理对象 return Proxy.newProxyInstance(target.getClass().getClassLoader(), target.getClass().getInterfaces(), this); //要绑定接口(这是一个缺陷,cglib弥补了这一缺陷) } @Override public Object invoke(Object proxy, Method method, Object[] args) throws Throwable { System.out.println("do something before method"); //执行target方法 Object ret = method.invoke(this.target, args); System.out.println("do something after method"); return ret; } } - 测试
 public static void main(String[] args) {
     BusinessHandler proxy = new BusinessHandler();
     Manager manger = (Manager) proxy.bind(new ManagerImpl());
     manger.modify();
 }
Cglib动态代理
PS: cglib是针对类来实现代理的 (对目标类生成一个子类,覆盖其中方法实现增强),所以不能对final修饰的类进行代理
使用示例:
- Target
public interface Manager { public void modify(); } public class ManagerImpl implements Manager { @Override public void modify() { System.out.println("*******modify()方法被调用"); } } - Dynamic InvocationHandler
public class BusinessHandler implements MethodInterceptor { private Object target = null; /** * 创建代理对象 * @param target * @return */ public Object getInstance(Object target) { this.target = target; Enhancer enhancer = new Enhancer(); enhancer.setSuperclass(this.target.getClass()); // 回调方法 enhancer.setCallback(this); // 创建代理对象 return enhancer.create(); } @Override public Object intercept(Object obj, Method method, Object[] args, MethodProxy proxy) throws Throwable { System.out.println("do something before method"); Object ret = proxy.invokeSuper(obj, args); System.out.println("do something after method"); return ret; } } - 测试
 public static void main(String[] args) {
     BusinessHandler proxy = new BusinessHandler();
     Manager manger = (Manager) proxy.getInstance(new ManagerImpl());
     manger.modify();
 }
Spring AOP
Spring AOP 使用动态代理的方式,将一些横切性的问题(例如:日志管理,权限控制)提取出来成为一个模块,在运行的时候根据需要切入到原有正常代码中
一些基本概念:
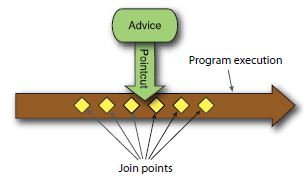
- Joinpoint 连接点 : 可加入位置
- Pointcut 切入点: 约定一个范围,Jointpoint集合(使用表达式匹配连接点)
- Advice 通知:在约定的连接点上执行的增强的方法
- before
- after returning
- after throwing
- after (finally)
- around
- Aspect 切面:切入点模块化(Advice和Pointcut的组合)
- TargetObject 目标对象:原始对象,会被切面处理的对象
- weave 织入:将Advice应用目标对象TargetObject某个方法JoinPoint的过程(运行期动态执行)
切入点(Pointcut)表达式:
execution:用于匹配执行方法的连接点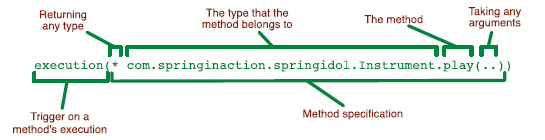
//任意公共方法的执行 execution(public * *(..)) //任何一个以“set”开始的方法的执行 execution(* set*(..)) //AccountService 接口的任意方法的执行 execution(* com.xyz.service.AccountService.*(..)) //在service包里的任意方法的执行 execution(* com.xyz.service.*.*(..)) //在service包或者子包里的任意方法的执行 execution(* com.xyz.service..*.*(..))within:限定匹配特定类型的连接点//在service包里的任意连接点 within(com.xyz.service.*) //在service包或者子包里的任意连接点 within(com.xyz.service..*)@within: 限定匹配特定类型的连接点,其中连接点所在类型已指定注解//任何一个目标对象声明的类型有一个 @Transactional 注解的连接点: @within(org.springframework.transaction.annotation.Transactional)this:限定匹配特定的连接点,其中bean reference(Spring AOP 代理)是指定类型的实例//实现了 AccountService 接口的代理对象的任意连接点 this(com.xyz.service.AccountService)target:限定匹配特定的连接点,其中目标对象(被代理的appolication object)是指定类型的实例(Spring AOP中只能匹配方法执行的连接点)//实现了 AccountService 接口的目标对象的任意连接点 target(com.xyz.service.AccountService)@target:限定匹配特定的连接点,其中执行的对象的类已经有指定类型的注解// 有一个 @Transactional 注解的目标对象中的任意连接点: @target(org.springframework.transaction.annotation.Transactional)args:限定匹配特定的连接点,其中参数是指定类型的实例
  //任何一个只接受一个参数,且在运行时传入的参数实现了 Serializable 接口的连接点
  args(java.io.Serializable)
PS: 这里不同于
execution(* *(java.io.Serializable))args只有在动态运行时候传入参数是可序列化的(Serializable)才匹配execution在传入参数的签名声明的类型实现了 Serializable 接口时候匹配@args: 限定匹配特定的连接点,其中实际传入参数的运行时类型有指定类型的注解//任何一个接受一个参数,并且传入的参数在运行时的类型实现了 @Classified annotation的连接点: @args(com.xyz.security.Classified)@annotation: 限定匹配特定的连接点,其中连接点的主题有某种给定的注解//任何一个执行的方法有一个 @Transactional annotation的连接点: @annotation(org.springframework.transaction.annotation.Transactional)
PS: Spring支持使用逻辑运算符(&&,||,!)来组合切入点表达式
spring对AOP的支持:
- JDK动态代理:默认使用(TargetObject必须实现某接口)
- CGLIB动态代理:需手动配置(TargetObject可以不实现某接口)
- spring会自动在JDK动态代理和CGLIB之间转换
- 在xml中打开aop的自动检索
<aop:aspectj-autoproxy proxy-target-class="true"/>
- 在xml中打开aop的自动检索
spring AOP使用示例:
xml方式
 import org.aspectj.lang.JoinPoint;
 public class SecurityHandler
 {
     //可以通过Advice中添加一个JoinPoint参数,这个值会由spring自动传入,从JoinPoint中可以取得参数值、方法名等
     private void checkSecurity(JoinPoint joinPoint)
     {
         Object[] args = joinPoint.getArgs();
         for (int i = 0; i < args.length; i++)
             System.out.println(args[i]);
         System.out.println(joinPoint.getSignature().getName());
         System.out.println("----------checkSecurity()---------------");
     }
 }
<bean id="securityHandler" class="com.myspring.first.aop.SecurityHandler"/> <aop:config> <aop:aspect id="security" ref="securityHandler"> <aop:pointcut id="allAddMethod" expression="execution(* show*(..)) || execution(* add*(..)) "/> <aop:before method="checkSecurity" pointcut-ref="allAddMethod"/> </aop:aspect> </aop:config>Annotation方式
 import org.aspectj.lang.annotation.AfterReturning;
 import org.aspectj.lang.annotation.Aspect;
 import org.aspectj.lang.annotation.Before;
 import org.aspectj.lang.annotation.Pointcut;

 /*
 采用Aspect定义切面
 在Aspect定义Pointcut和Advice
 注意:在这种方法定义中,切入点的方法是不被执行的,
 它存在的目的仅仅是为了重用切入点,即Advice中通过方法名引用这个切人点
 */
 @Aspect
 public class LogAspect
 {

     //定义Pointcut,Pointcut的名称即为logMethod,此方法不能有返回值和参数,该方法只是一个标识
     //注意:在这种方法定义中,切入点的方法是不被执行的,它存在的目的仅仅是为了重用切入点
     //即Advice中通过方法名引用这个切人点
     //execution([可见性] 返回类型 [声明类型]方法名称(参数类型) [异常类型])
     @Pointcut("execution(* com.myspring.first.bo.GuestbookBo.show*(..))")
     public void logMethod()
     {}

     //定义Advice,标识在那个切入点Pointcut何处织入此方法
     @Before(value="logMethod()")
     public void logBeforeMethod()
     {
         System.out.println("=================Function beginning=================");
     }

     @AfterReturning(value="logMethod()")
     public void logAfterMethod()
     {
         System.out.println("=================Function ending=================");
     }
 }
<!-- 启用AspectJ对Annotation的支持 --> <aop:aspectj-autoproxy proxy-target-class="true"/>
Spring Context
ServletContext
获取ServletContext:
- 在javax.servlet.Filter中直接获取
ServletContext context = config.getServletContext(); - 在HttpServlet中直接获取
this.getServletContext(); - 在其他方法中,通过HttpRequest获得
request.getSession().getServletContext(); - Spring 环境下:
- 方式一:通过注解形式
@Autowired private ServletContext servletContext; - 方式二:
implements ServletContextAwarepublic void setServletContext(ServletContext sc) { this.servletContext=sc; //System.out.println("项目的绝对路径为:"+servletContext.getRealPath("/")); }
- 方式一:通过注解形式
通过servletContext对象读取资源文件:
- 第一种:使用
getResourceAsStream方法:返回资源文件的读取字节流InputStream in = this.getServletContext().getResourceAsStream("/resources/uploads/images/1.png"); - 第二种:使用
getRealPath方法,获得文件的完整绝对路径pathString path = this.getServletContext().getRealPath("/resources/uploads/images/1.png"); - 第三种:使用
getResource方法,获得一个url对象URL url = this.getServletContext().getResource("/resources/uploads/images/1.png"); InputStream in = url.openStream();
PS: 非servlet程序中可使用类装载器读取文件(文件不能太大,否则极易导致内存溢出),例如:
//方式一:使用getResourceAsStream
InputStream in = this.getClass().getClassLoader().getResourceAsStream("db.properties");

//方式二:使用getResource
 URL url = this.getClass().getClassLoader().getResource("db.properties");
 String path = url.getPath(); //获得资源文件名称
 FileInputStream in = new FileInputStream(path);
ApplicationContext
使用
WebApplicationContextUtils工具类获取 (在web项目中使用,缺点依赖于Servlet容器)ApplicationContext ctx = WebApplicationContextUtils.getRequiredWebApplicationContext(request.getSession().getServletContext()); //获取所有Spring中的所有bean String [] names = ctx.getBeanDefinitionNames(); for(int i=0;i<names.length;i++){ System.out.println("上下文实例:"+names[i]); } //根据名称获取单个bean LoginAction action=(LoginAction)ctx.getBean("action");使用
ClassPathXmlApplicationContext工具类(实际只适合测试时候使用,需要读配置文件)implements ApplicationContextAware
使用properties配置值
加载单独一份properties文件
<!-- 默认order是Integer.MAX_VALUE:0x7fffffff,越大越往后 -->
<context:property-placeholder location= "classpath:jdbc.properties" />
加载多份properties文件
- 方式一
<context:property-placeholder location= "classpath:jdbc.properties" order="1"  ignore-unresolvable="true"/>
<context:property-placeholder location="classpath:application.properties" order= "2" ignore-unresolvable ="true"/>
方式二
<context:property-placeholder
  location="classpath:dao.properties,
    classpath:services.properties,
    classpath:user.properties"
    ignore-unresolvable="true"/>

<!-- 或者如下方式书写-->
<bean id="propertyConfigurer" class="org.springframework.beans.factory.config.PropertyPlaceholderConfigurer">
  <property name="locations">
      <list>
          <value>classpath:dao.properties</value>
          <value>classpath:services.properties</value>
          <value>classpath:user.properties</value>
      </list>
  </property>
  <property name="ignoreUnresolvablePlaceholders" value="true"/>
</bean>
- 方式一
设置使用默认值(当找不到资源文件时)
<util:properties id= "applicationProps" >
 <prop key ="cron.expression"> 0 0/5 * * * ?</ prop>
 <prop key ="cron.active">true</ prop>
</util:properties >
<context:property-placeholder
 location= "classpath:application.properties"
 order ="2"
 ignore-resource-not-found= "true"
 ignore-unresolvable ="true"
 properties-ref="applicationProps"
/>
调用配置值(
${key},#{propId[key]})- 配置文件中
<task:scheduled-tasks>
     <!-- <task:scheduled ref="smsBackTask" method="alarmThreadState" cron="#{applicationProps['cron.expression']}" /> -->
     <!-- <task:scheduled ref="smsBackTask" method="alarmThreadState" cron="${cron.expression}"  /> -->
     <task:scheduled ref ="smsBackTask" method="alarmThreadState" cron= "0 0/20 * * * ?"  />
</task:scheduled-tasks >
代码类中
@Value( "#{applicationProps['cron.active']}")
private boolean isActive;
@Value("#{applicationProps['cron.expression']}")
private String cronExp;

@Value("${cron.active}")
private boolean isActive;
@Value("${cron.expression}")
private String cronExp;
- 配置文件中