简介
WebService 用于异构平台之间的交互
JAVA 中共有三种WebService 规范:
- JAXM&SAAJ
- JAX-WS(JAX-RPC)
- JAX-RS
有很多框架可以帮助实现:
JAX-WS- Java API Xml for WebService (JDK 1.6后)
- JDK1.6以前,RMI方式,以SOAPMessage encode方式传递消息
CXF(60%)Apache CXF = Celtix + Xfire(即Object Web Celtix和Codehaus XFire 合并而成)- 是一种可插拨的架构
- 既可以支持 XML ,也可以支持非 XML 的类型绑定
- 比如:JSON 和 CORBA
- 基于SOAP通讯(REST也可),在
Jax-ws基础上扩展- JAX-WS 和JAX-RS 规范我们采用Apache CXF 作为实现
- 本身就和Spring整合
- 配置bean.xml,web.xml(CXFServlet)
- 核心是
org.apache.cxf.Bus(总线,类似Spring 的ApplicationContext),由BusFactory 创建(默认的BUS ID 为cxf)
- 可通过Interceptor代替Handler的处理
Axis(20%)Metro
专有名词介绍:
SEI(Service Endpoint Interface) 服务端提供的接口(公开为Web服务的接口)SIB(Service Implemention Bean) 服务实现类- 注意: 如果还实现了其他的接口,需在
@WebService注解的endpointInterface属性中指定哪个接口是SEI(全类名)
- 注意: 如果还实现了其他的接口,需在
JaxB 编排与反编排:
marshal编排:object->stream(xml)unmarshal反编排:stream(xml)->object
WebService 有个专门控制安全的协议:WS-Security
WebService 通讯方式:
- 基于SOAP的通讯方式
- 基于jax-ws的通讯方式(已经帮助封装了SOAP消息)
- 基于CXF的通讯方式
- 基于REST的通讯方式
WSDL
以XML的形式描述方法签名:返回值 方法名(传入参数)
<?xml version="1.0" encoding="UTF-8" standalone="no"?>
<wsdl:definitions xmlns:soap="http://schemas.xmlsoap.org/wsdl/soap/"
    xmlns:tns="http://ws.cj.com/student"
    xmlns:wsdl="http://schemas.xmlsoap.org/wsdl/"
    xmlns:xsd="http://www.w3.org/2001/XMLSchema"
    name="OperationWsService"
    targetNamespace="http://ws.cj.com/student">

    <!-- type:定义访问类型 -->
    <!-- message:定义消息,用来传递信息 -->
    <!-- portType:指明接口名称和接口中的服务 -->
    <!-- binding:绑定接口,指定消息传递和呈现所使用的格式 -->
    <!-- service :指定服务发布的一些信息 -->

</wsdl:definitions>
type
定义访问类型 (complexType:复杂type定义,即对“tns”的对象进行定义)
<wsdl:types>
    <xsd:schema targetNamespace="http://www.example.org/student/">
        <xsd:element name="addUser" type="tns:addUser"/>
        <xsd:element name="addUserResponse" type="tns:addUserResponse"/>
        <xsd:element name="listUser" type="tns:listUser"/>
        <xsd:element name="listUserResponse" type="tns:listUserResponse"/>
        <xsd:element name="UserException" type="tns:UserException"/>
        <xsd:element name="licenseInfo" type="tns:licenseInfo"/>

        <!-- 复杂类型定义 -->
        <xsd:complexType name="user">
            <xsd:sequence>
                <xsd:element name="id" type="xsd:int"/>
                <xsd:element name="username" type="xsd:string"/>
                <xsd:element name="password" type="xsd:string" />
            </xsd:sequence>
        </xsd:complexType>

        <xsd:complexType name="addUser">
            <xsd:sequence>
                <xsd:element name="user" type="tns:user"/>
            </xsd:sequence>
        </xsd:complexType>
        <xsd:complexType name="addUserResponse">
            <xsd:sequence>
                <xsd:element name="id" type="xsd:int"/>
            </xsd:sequence>
        </xsd:complexType>

        <xsd:complexType name="listUser">
            <xsd:sequence/>
        </xsd:complexType>
        <xsd:complexType name="listUserResponse">
            <xsd:sequence minOccurs="0" maxOccurs="unbounded">
                <xsd:element name="user" type="tns:user"/>
            </xsd:sequence>
        </xsd:complexType>

        <xsd:complexType name="UserException">
            <xsd:sequence>
                <xsd:element name="message" type="xsd:string"/>
            </xsd:sequence>
        </xsd:complexType>

        <xsd:complexType name="licenseInfo">
            <xsd:sequence>
                <xsd:element name="registerUser" type="tns:user"/>
            </xsd:sequence>
        </xsd:complexType>

    </xsd:schema>
</wsdl:types>
可定义在外部文件xsd中然后再wsdl中引用
<wsdl:types>
    <!-- 引入xsd,没有搭建web服务器时使用wsimport会找不到xsd文件 -->
    <!--方法一
    <xsd:schema>
        <xsd:import namespace="http://ws.cj.com/student/" schemaLocation="student.xsd"/>
    </xsd:schema>-->

    <!-- 方法二 -->
    <xsd:schema targetNamespace="http://ws.cj.com/student/">
        <xsd:include schemaLocation="operation.xsd"/>
    </xsd:schema>
</wsdl:types>
xsd文件:
<xsd:schema xmlns:xsd="http://www.w3.org/2001/XMLSchema"
    targetNamespace="http://ws.cj.com/student"
    xmlns:tns="http://ws.cj.com/student"
    elementFormDefault="unqualified"> <!-- 默认为 qualified -->
    ...
</xsd:schema>
message
定义消息,用来传递信息 (SOPA协议通过Soap Message来传递)
公布了多少服务就有2倍于服务的消息 :
- request(in)
- response(out)
<wsdl:message name="addUser">
    <wsdl:part element="tns:addUser" name="addUser"/>
</wsdl:message>
<wsdl:message name="addUserResponse">
    <wsdl:part element="tns:addUserResponse" name="addUserResponse"/>
</wsdl:message>
<wsdl:message name="listUser">
    <wsdl:part element="tns:listUser" name="listUser"/>
</wsdl:message>
<wsdl:message name="listUserResponse">
    <wsdl:part element="tns:listUserResponse" name="listUserResponse"/>
</wsdl:message>
<!-- Exception message -->
<wsdl:message name="UserException">
    <wsdl:part element="tns:UserException" name="UserException"/>
</wsdl:message>
<!-- Header message -->
<wsdl:message name="licenseInfo">
    <wsdl:part element="tns:licenseInfo" name="licenseInfo"/>
</wsdl:message>
portType
portType:指明接口名称和接口中的服务
通过operation指定接口中的方法(服务),绑定相应的in和out的消息 (其中input表示参数,output表示返回值)
<wsdl:portType name="IUserWsService">
    <wsdl:operation name="addUser">
          <wsdl:input message="tns:addUser"/>
          <wsdl:output message="tns:addUserResponse"/>
          <!-- Exception fault-->
          <wsdl:fault name="UserException" message="tns:UserException"/>
    </wsdl:operation>
    <wsdl:operation name="listUser">
          <wsdl:input message="tns:listUser"/>
          <wsdl:output message="tns:listUserResponse"/>
    </wsdl:operation>
</wsdl:portType>
binding
绑定接口,指定消息传递和呈现所使用的格式
两种风格:
- document
- rpc
两种传递方式:
- encode(早期,jdk6以前)
- literal(jdk1.6以后)
<wsdl:binding name="UserWsServiceSOAP" type="tns:IUserWsService">
    <soap:binding style="document" transport="http://schemas.xmlsoap.org/soap/http"/>
    <wsdl:operation name="addUser">
        <wsdl:input>
            <soap:body use="literal"/>
            <!-- Header -->
            <soap:header use="literal" part="licenseInfo" message="tns:licenseInfo"/>
        </wsdl:input>
        <wsdl:output>
            <soap:body use="literal"/>
        </wsdl:output>
        <wsdl:fault name="UserException">
            <soap:fault name="UserException" use="literal"/>
        </wsdl:fault>
    </wsdl:operation>

    <wsdl:operation name="listUser">
        <wsdl:input>
            <soap:body use="literal"/>
        </wsdl:input>
        <wsdl:output>
            <soap:body use="literal"/>
        </wsdl:output>
    </wsdl:operation>
</wsdl:binding>
service
指定服务发布的一些信息
<wsdl:service name="UserWsService">
    <wsdl:port binding="tns:UserWsServiceSOAP" name="UserWsServicePort">
      <soap:address location="http://localhost:9090/us"/>
    </wsdl:port>
</wsdl:service>
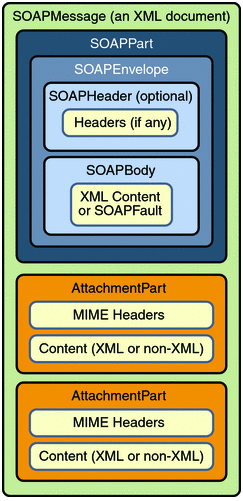
SOAP
SOAP (Simple Object Access Protocal)简单对象访问协议 通过xml存储对象,通过element元素组装信息,通过Soap Message传递信息
通过SOAP协议进行消息传递
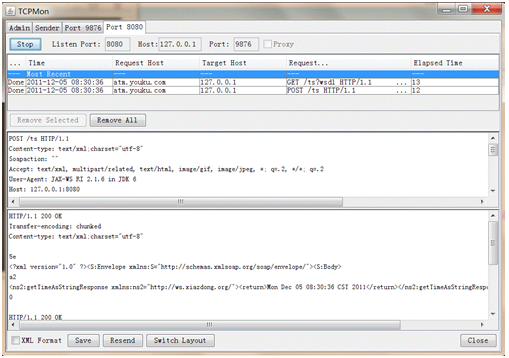
Eclipse工具
通过Eclipse中J2EE视图下的“Launch the Web Services Explore“功能调用webservice
例如:
输入wsdl地址:http://localhost:8888/ns?wsdl,查看Status下的Source,得到如下:
SOAP Request Envelope:
<soapenv:Envelope xmlns:soapenv="http://schemas.xmlsoap.org/soap/envelope/"     xmlns:q0="http://first.ws.my.cj.com/" xmlns:xsd="http://www.w3.org/2001/XMLSchema"     xmlns:xsi="http://www.w3.org/2001/XMLSchema-instance">
 <soapenv:Body>
     <q0:minus>
           <a>50</a>
           <b>30</b>
       </q0:minus>
 </soapenv:Body>
</soapenv:Envelope>
SOAP Response Envelope:
<S:Envelope xmlns:S="http://schemas.xmlsoap.org/soap/envelope/" xmlns:SOAP-    ENV="http://schemas.xmlsoap.org/soap/envelope/">
 <S:Body>
     <ns2:minusResponse xmlns:ns2="http://first.ws.my.cj.com/">
           <minusResult>20</minusResult>
       </ns2:minusResponse>
   </S:Body>
</S:Envelope>
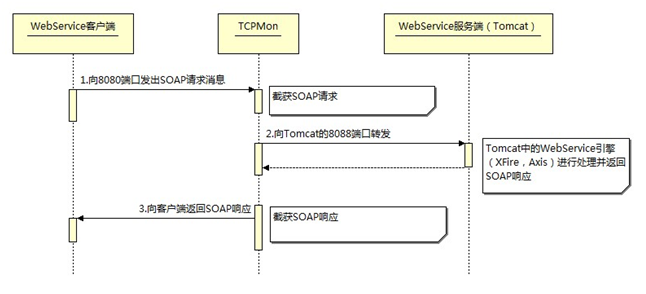
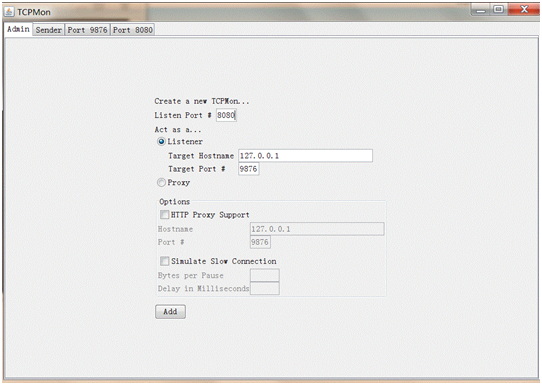
Apache TCPMon工具
- 下载地址
- 运行:解压后进去
build目录,双击tcpmon.bat就可以执行 - 实际上是个代理,起一个消息转发的作用,监视的是转发出去的消息
- 这样就可以截获转发在WebService服务器和客户机之间会传递的SOAP消息,帮助查看调试
- 最终消息还是要送到具体的地址和端口,它的前后都应该配置正确才行,否则响应就不正确了
使用举例:
运行结果:
Jax-ws (wsimport命令)
根据wsdl文件生成Java平台的webservice接口(JDK1.6及以后,都包含此命令)
wsimport -d d:/webservice/01/ -keep -verbose http://localhost:8888/ns?wsdlwsimport -d d:/webservice/01/ -p test –verbose http://localhost:8888/ns?wsdl- 参数说明:
- -d 指定生成目录
- -p 指定生成的包 eg: -p com.cj.sms.first.client
- -keep 指定是否生成.java的源文件
- -verbose 显示生成的详细信息
- 最后指定wsdl文件位置:可以是网络中的,也可以是本地文件

Jax-ws (Server端)
- 代码优先:先编写接口,由接口生成wsdl
- 契约优先:先编写wsdl,由wsdl生成接口
(wsdl即契约)
PS: 使用代码优先会破坏方法原有的结构,而使用契约优先可以定制wsdl,将一些验证信息置于SOAPHeader中,然后通过Handler预处理或者修改接口类显示声明来获取处理
代码优先
编写WebService接口(加Annotation)
- @WebService
- @WebMethod
- @WebResult
- @WebParam
编写WebService实现类(加Annotation )
@WebService(endpointInterface="指定webservice接口-包名加类名",targetNamespace="")发布服务(会自动生成wsdl)
契约优先(推荐)
发布的服务是根据编写的wsdl文件生成的,wsdl文件变化,服务即变化
- 编写wsdl文件
- 在类路径下创建 META-INF/wsdl下
- 在tomcat中发布服务需置于WEB-INF/wsdl/下
- 根据wsdl生成WebService接口类
- 使用
wsimport命令根据wsdl文件生成 - 生成的Interface接口类将作为Server端的WebService接口,如
@WebService(name = "IUserWsService", targetNamespace = "http://www.my.org/user")
public interface IUserWsService {...}
- 使用
- 实现WebService接口(指定 wsdlLocation)
@WebService(endpointInterface="com.cj.my.ws.thrid.IUserWsService" ,targetNamespace="http://www.my.org/user" //,wsdlLocation="/WEB-INF/wsdl/user.wsdl" //在tomcat中发布服务 ,wsdlLocation="META-INF/wsdl/user.wsdl" ,serviceName="UserWsService" ,portName="UserWsServicePort") public class UserWsService implements IUserWsService - 发布服务
发布服务(Application中)
- 默认命名空间targetNamespace为倒置包名(eg: http://first.sms.cj.com)
- 可以重新制定命名空间
- 注意:需要在实现类中也重新指定命名空间(
@WebService(targetNamespace="http://www.cj.test/"))
public class ServerApp{
    public static void main(String[] args){
        //wsdl文件发布地址
        String address="http://localhost:8888/ns";
        Endpoint.publish(address, new OperationWsServiceImpl()); //IOperationWsService实现类
    }
}
发布服务(Web中)
- 将wsdl文件置于WEB-INF下
- 修改服务实现类注解中的wsdlLocation属性(eg:
wsdlLocation="/WEB-INF/wsdl/user.wsdl") - 编写
sun-jaxws.xml置于WEB-INF下<?xml version="1.0" encoding="UTF-8"?> <endpoints xmlns="http://java.sun.com/xml/ns/jax-ws/ri/runtime" version="2.0"> <endpoint name="UserWsService" implementation="com.cj.my.ws.thrid.UserWsService" url-pattern="/us"/> </endpoints> - 发布服务
发布独立的JAX-WS端点
通过Spring独立发布
加入依赖包:
<dependency>
    <groupId>com.sun.xml.ws</groupId>
    <artifactId>jaxws-rt</artifactId>
    <version>2.2.9-b14002</version>
</dependency>
web.xml中添加(在配置Spring基础上):
 <!--发布WebService到Web容器中(需配置在SpringListener之前) -->
 <listener>
     <listener-class>
         com.sun.xml.ws.transport.http.servlet.WSServletContextListener
     </listener-class>
 </listener>

 <servlet>
     <!--和sun-jaxws.xml中的name一致 -->
     <servlet-name>UserWsService</servlet-name>
     <servlet-class>com.sun.xml.ws.transport.http.servlet.WSServlet</servlet-class>
 </servlet>
 <servlet-mapping>
     <servlet-name>UserWsService</servlet-name>
     <url-pattern>/us</url-pattern>
 </servlet-mapping>
beans.xml
 <beans xmlns="http://www.springframework.org/schema/beans"
         xmlns:xsi="http://www.w3.org/2001/XMLSchema-instance"
         xmlns:aop="http://www.springframework.org/schema/aop"
         xmlns:tx="http://www.springframework.org/schema/tx"
         xmlns:context="http://www.springframework.org/schema/context"
         xsi:schemaLocation="...">
     <context:annotation-config/>
     <context:component-scan base-package="com.cj.my.ws" />
     <aop:aspectj-autoproxy proxy-target-class="true"/>

     <bean class="org.springframework.remoting.jaxws.SimpleJaxWsServiceExporter">
         <property name="baseAddress" value="http://localhost:8080/ss/"></property>
     </bean>
 </beans>
发布兼容JAX-WS端点的Web
通过jax-spring整合
加入依赖包:
<dependency>
  <groupId>org.jvnet.jax-ws-commons.spring</groupId>
  <artifactId>jaxws-spring</artifactId>
  <version>1.9</version>
</dependency>
web.xml中添加(在配置Spring基础上):
 <!-- 使用WSSpringServlet来管理-->
 <servlet>
     <servlet-name>UserWsService</servlet-name>
     <servlet-class>com.sun.xml.ws.transport.http.servlet.WSSpringServlet</servlet-class>
 </servlet>
 <servlet-mapping>
     <servlet-name>UserWsService</servlet-name>
     <url-pattern>/us</url-pattern>
 </servlet-mapping>
beans.xml
 <beans xmlns="http://www.springframework.org/schema/beans"
         xmlns:xsi="http://www.w3.org/2001/XMLSchema-instance"
         xmlns:aop="http://www.springframework.org/schema/aop"
         xmlns:tx="http://www.springframework.org/schema/tx"
         xmlns:context="http://www.springframework.org/schema/context"
         xmlns:ws="http://jax-ws.dev.java.net/spring/core"
         xmlns:wss="http://jax-ws.dev.java.net/spring/servlet"
         xsi:schemaLocation="...
     http://jax-ws.dev.java.net/spring/core http://jax-ws.dev.java.net/spring/core.xsd
     http://jax-ws.dev.java.net/spring/servlet http://jax-ws.dev.java.net/spring/servlet.xsd">

     <context:annotation-config/>
     <context:component-scan base-package="com.cj.my.ws" />
     <aop:aspectj-autoproxy proxy-target-class="true"/>

     <!-- 让userWsService被Spring管理 -->
     <wss:binding url="/us">
         <wss:service>
             <ws:service bean="#userWsService"> <!-- 指明webservice的注入对象,注意需加个# -->
                 <!-- 将wsdl的外部xsd文件加入 -->
                 <ws:metadata>
                     <value>/WEB-INF/wsdl/user.xsd</value>
                 </ws:metadata>
             </ws:service>
         </wss:service>
     </wss:binding>

     <!-- 建议在配置文件中手动注入,若使用Annotation:@Service("userWsService")可能会找不到-->
     <bean id="userWsService" class="com.cj.my.ws.thrid.UserWsService" />
 </beans>
Jax-ws (Client端)
基于SOAP的通讯方式(直接传递SOAP消息)
- Message方式:格式化为xml进行消息传递
Dispatch<SOAPMessage> dispatch=service.createDispatch( new QName(this.ns,"MyServiceImplPort"), SOAPMessage.class, Service.Mode.MESSAGE); SOAPMessage message=MessageFactory.newInstance().createMessage(); ... SOAPMessage response=dispatch.invoke(message); ... - Payload方式:格式化为String(将对象编排与反编排)进行消息传递
  Dispatch<Source> dispatch=service.createDispatch(
      new QName(this.ns,"MyServiceImplPort"),
      Source.class,
      Service.Mode.PAYLOAD);
  ...
  StreamSource rs=new StreamSource(new StringReader(payload));
  Source response=dispatch.invoke(rs);
  ...
PS:通过Dispatch发送
Message方式(xml)
格式化为xml进行处理
// ClientTest:
@Test
public void test02(){
    try{
        //1.创建服务Service
        URL url = new URL(this.wsdl);
        QName qname = new QName(this.ns,"MyServiceImplService");
        Service service=Service.create(url, qname);

        //2.创建Dispatch(基于Message方式:格式化为xml进行处理)
        QName pname=new QName(this.ns,"MyServiceImplPort");
        //createDispatch(portName,classType,mode)
        Dispatch<SOAPMessage> dispatch=service.createDispatch(pname,
            SOAPMessage.class,Service.Mode.MESSAGE);

        //3.创建SOAPMessage
        SOAPMessage message=MessageFactory.newInstance().createMessage();
        SOAPEnvelope envelope=message.getSOAPPart().getEnvelope();
        SOAPBody body=envelope.getBody();

        //4.创建QName即节点以指定消息中传递的数据
        QName ename=new QName(this.ns,"minus","ns");
        SOAPBodyElement bodyElement=body.addBodyElement(ename);
        bodyElement.addChildElement("a").setValue("50");
        bodyElement.addChildElement("b").setValue("30");
        message.writeTo(System.out);
        System.out.println();

        //5.通过Dispatch传递消息,会返回响应消息
        SOAPMessage response=dispatch.invoke(message);
        response.writeTo(System.out);
        System.out.println();

        //将响应的消息转换为dom对象(可通过Xpath等多种方式完成对响应数据的处理)
        SOAPBody responseBody=response.getSOAPPart().getEnvelope().getBody();
        Document doc=responseBody.extractContentAsDocument();
        String str=doc.getElementsByTagName("minusResult").item(0).getTextContent();
        System.out.println(str);

    }catch (Exception e){
        System.out.println(e.getMessage());
    }
}
发送的消息如下:
<SOAP-ENV:Envelope xmlns:SOAP-ENV="http://schemas.xmlsoap.org/soap/envelope/">
    <SOAP-ENV:Header/>
    <SOAP-ENV:Body>
        <ns:minus xmlns:ns="http://first.ws.my.cj.com/">
            <a>50</a>
            <b>30</b>
        </ns:minus>
    </SOAP-ENV:Body>
</SOAP-ENV:Envelope>
得到响应消息如下:
<S:Envelope xmlns:S="http://schemas.xmlsoap.org/soap/envelope/">
    <S:Header/>
    <S:Body>
        <ns2:minusResponse xmlns:ns2="http://first.ws.my.cj.com/">
            <minusResult>20</minusResult>
        </ns2:minusResponse>
    </S:Body>
</S:Envelope>
Payload方式(String)
通过字符串(将对象编排与反编排)进行消息的传递,会自动对字符串进行编码
发送(payload):
<ns:addStudent xmlns:ns="http://first.ws.my.cj.com/">
    <ns2:student xmlns:ns2="http://first.ws.my.cj.com/">
        <age>18</age>
        <id>0</id>
        <name>Lucy</name>
        <sex>Female</sex>
    </ns2:student>
</ns:addStudent>
// ClientTest:
@Test
public void test03(){
    try{
        //1.创建服务Service
        URL url = new URL(this.wsdl);
        QName qname = new QName(this.ns,"MyServiceImplService");
        Service service=Service.create(url, qname);

        //2.创建Dispatch(基于Payload,通过源数据Source的方式传递)
        QName dname=new QName(this.ns,"MyServiceImplPort");
        Dispatch<Source> dispatch=service.createDispatch(dname,
        Source.class,Service.Mode.PAYLOAD);

        //3. 创建对象
        Student student=new Student();
        student.setId(5);
        student.setName("Lucy");
        student.setAge(18);
        student.setSex(Gender.FEMALE);

        //4. 使用Marshaller编排对象:根据对象组建xml字符串
        JAXBContext ctx=JAXBContext.newInstance(AddStudent.class);
        AddStudent addStudent=new AddStudent();
        addStudent.setStudent(student);
        QName sname=new QName(this.ns,"addStudent");
        JAXBElement<AddStudent> element=new JAXBElement<AddStudent>(sname,AddStudent.class,addStudent);

        Marshaller mar=ctx.createMarshaller();
        //fragement 默认为false,会创建头信息:<?xml version="1.0" encoding="UTF-8" standalone="yes"?>
        mar.setProperty(Marshaller.JAXB_FRAGMENT,true);
        StringWriter writer= new StringWriter();
        mar.marshal(element, writer);

        String payload=writer.toString();
        System.out.println("payload:"+payload);

        //6.通过Dispatch传递payload
        StreamSource rs=new StreamSource(new StringReader(payload));
        Source response=dispatch.invoke(rs);

        //7.处理响应信息
        System.out.println(response instanceof StAXSource);

        //使用Transformer对象将Source转换为dom对象
        Transformer trans=TransformerFactory.newInstance().newTransformer();
        DOMResult result=new DOMResult();
        trans.transform(response, result);

        //通过XPath处理相应信息
        XPath xpath=XPathFactory.newInstance().newXPath();
        NodeList nodeList=(NodeList)xpath.evaluate("//student",
            result.getNode(),XPathConstants.NODESET);

        //使用Unmarshaller反编排:将xml节点转换回对象
        //Student stu=(Student)ctx.createUnmarshaller().unmarshal(nodeList.item(0));
        JAXBElement<Student> resultElement=ctx.createUnmarshaller()
                            .unmarshal(nodeList.item(0), Student.class);
        Student stu=resultElement.getValue();
        System.out.println(stu.getId()+"|"+stu.getName()+"|"+stu.getAge()+"|"+stu.getSex());
    }catch (Exception e){
        System.out.println("Exception:"+e.getMessage());
        e.printStackTrace();
    }
}
扩展:增加消息头
//创建SOAPHeader
SOAPHeader header=envelope.getHeader();
if(header==null)
    header=envelope.addHeader();
QName hName=new QName(this.ns,"authInfo","ns");
header.addHeaderElement(hName).setValue("auth:tom");
创建的消息(Result)如下:
<SOAP-ENV:Envelope xmlns:SOAP-ENV="http://schemas.xmlsoap.org/soap/envelope/">
    <SOAP-ENV:Header>
        <ns:authInfo xmlns:ns="http://first.ws.my.cj.com/">auth:tom</ns:authInfo>
    </SOAP-ENV:Header>
    <SOAP-ENV:Body>
        <ns:list xmlns:ns="http://first.ws.my.cj.com/"/>
    </SOAP-ENV:Body>
</SOAP-ENV:Envelope>
基于Jax-ws的通讯方式(封装了SOAP消息)
- 使用wsimport命令根据wsdl(不依赖于平台)生成客户端代码
- 将生成的java类导入到client端项目中
- 注意:这里生成的interface是Client根据wsdl生成的,与Server端的不是同一个
- 创建Service,调用发布的方法
据wsdl中的service创建Service
wsdl文件中:
<wsdl:service name="OperationWsService">
    <wsdl:port name="OperationWsServicePort" binding="tns:OperationWsServiceSOAP" >
        <soap:address location="http://localhost:8888/ns"/>
    </wsdl:port>
</wsdl:service>
public static void main(String[] args){
    OperationWsService service=new OperationWsService ();
    IOperationWsService operationWsService=service.getOperationWsServicePort();
    //调用实现方法
    System.out.println(operationWsService.plus(34, 56));
}
据wsdl中的definitions创建Service
<wsdl:definitions xmlns:soap="http://schemas.xmlsoap.org/wsdl/soap/"
        xmlns:tns="http://ws.cj.com/student"
        xmlns:wsdl="http://schemas.xmlsoap.org/wsdl/"
        xmlns:xsd="http://www.w3.org/2001/XMLSchema"
        name="OperationWsService"
        targetNamespace="http://ws.cj.com/student">
public static void main(String[] args) throws MalformedURLException{
    URL url=new URL("http://localhost:8888/ns?wsdl");
    //命名Qname(命名空间,服务名称)
    QName qname=new QName("http://ws.cj.com/student","OperationWsService");
    //相当于创建了<OperationWsService xmln=”http://ws.cj.com/student”>节点

    OperationWsService service=new OperationWsService(url, qname);
    IOperationWsService operationWsService=service.getPort(IOperationWsService.class);

    //调用实现方法
    System.out.println(operationWsService.plus(34, 56));
}
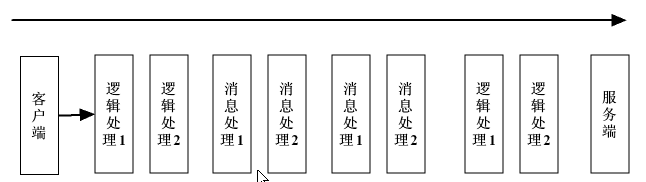
Jax-ws (Handler)
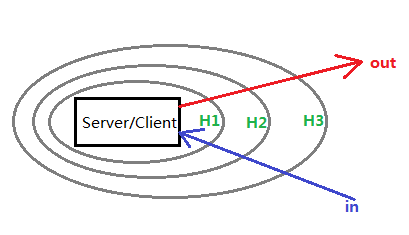
Handler处理SOAP消息 (类似过滤器):
- 逻辑处理器
LogicalHandler:只能获取SOAPBody的信息 - 消息处理器
SOAPHandler:可以获取SOAPMessage的信息 - Out处理顺序:先逻辑处理器再消息处理器
自定义SOAPHandler
implements SOAPHandler<SOAPMessageContext>
@Override handleMessage方法- 可处理
in和out消息 (out消息必须 return true,否则Exception) return true:- 交由下一个Handler处理
in消息最终到达Server端WebService实现类处理;out消息最终将响应消息发送到Client端。
return false:in消息被阻断,交由handleFault方法处理;out消息引发Exception
- 可处理
@Override handleFault方法:- 可捕获处理
SOAPException(对WebService而言,相当于Exception) - 无法捕获处理
SOAPFaultException(对WebService而言,相当于RuntimeException,必须在Client端调用处捕获) return true:交由下一个Handler处理;return false:阻断
- 可捕获处理
示例:
public class XxxHandler implements SOAPHandler<SOAPMessageContext>
    @Override
    public boolean handleMessage(SOAPMessageContext context){
        Boolean out=(Boolean)context.get(MessageContext.MESSAGE_OUTBOUND_PROPERTY);
        if(out)
            System.out.println("XxxHandler out");
        else
            System.out.println("XxxHandler in");
        return true;
    }

    @Override
    public boolean handleFault(SOAPMessageContext context){
        System.out.println("XxxHandle Fault");
        try{
            SOAPMessage message =context.getMessage();
            SOAPEnvelope envelope=message.getSOAPPart().getEnvelope();
            SOAPFault fault=envelope.getBody().getFault();
            if(fault!=null)
                System.out.println("Handle1 Fault:"+fault.getFaultString());
        } catch (SOAPException e){
            e.printStackTrace();
        } catch (IOException e){
            e.printStackTrace();
        }catch(SOAPFaultException e)//不会触发此异常!
        {
            System.out.println("Handler1 Fault catch SOAPFaultException");
        }
        return true;
    }

    @Override
    public void close(MessageContext context)
    {}

    @Override
    public Set<QName> getHeaders(){
        return null;
    }
}
配置使用
- 配置Handler过滤链文件 (eg:
handler-chain.xml, 置于classpath下)<?xml version="1.0" encoding="UTF-8" standalone="yes"?> <javaee:handler-chains xmlns:javaee="http://java.sun.com/xml/ns/javaee" xmlns:xsd="http://www.w3.org/2001/XMLSchema"> <javaee:handler-chain> <javaee:handler> <javaee:handler-class>com.cj.my.ws.handler.LicenseHandler</javaee:handler-class> </javaee:handler> </javaee:handler-chain> </javaee:handler-chains> - 在WebService实现类上添加@HandlerChain注解(eg:
@HandlerChain(file="handler-chain.xml")
PS: 在下面介绍的CXF中,可通过其他方式加载使用Handler,还可以使用Inteceptor代替Handler
CXF
基于CXF的通讯方式 (Apache CXF官网)
- 基于jax-ws,开发方式和jax-ws基本类似,仅仅是为jax-ws增加了一些功能
- 可以使用Interceptor替代SOAPHandler
- 生命周期(阶段):

- 有多种Interceptor拦截器,用的比较多的是:
- extends AbstractPhaseInterceptor
- extends AbstractSoapInterceptor
- extends AbstractPhaseInterceptor
依赖包
<dependency>
    <groupId>org.apache.cxf</groupId>
    <artifactId>cxf-rt-frontend-jaxws</artifactId>
    <version>${cxf.version}</version>
</dependency>
<dependency>
    <groupId>org.apache.cxf</groupId>
    <artifactId>cxf-rt-transports-http</artifactId>
    <version>${cxf.version}</version>
</dependency>
<!-- 使用jetty容器时才需要此包-->
<dependency>
    <groupId>org.apache.cxf</groupId>
    <artifactId>cxf-rt-transports-http-jetty</artifactId>
    <version>${cxf.version}</version>
</dependency>
生成代码
示例:使用契约优先的方式
- 编写wsdl
- 使用wsimport命令生成sourcecode
- Server端
- 拷贝wsimport命令生成的interface(eg: IUserWsService)到Server端(去除@XmlSeeAlso注解)
- wsdl放置到WEB-INF(web项目)或META-INF(local项目)下
- 编写服务实现类(eg:
public class UserWsService implements IUserWsService) - 发布服务
- Client端
- 拷贝wsimport命令生成的所有代码到Client端
- 调用服务
使用
Server端
方式一:使用JaxWs API 发布服务
Endpoint.publish("http://localhost:9090/my/us", new UserWsService());
方式二:使用服务发布工厂JaxWsServerFactoryBean发布服务(默认使用“代码优先”)
JaxWsServerFactoryBean serverFactory=new JaxWsServerFactoryBean();
serverFactory.setAddress("http://localhost:9090/my/us");
serverFactory.setServiceBean(new UserWsService());
serverFactory.setServiceClass(IUserWsService.class);

//为访问增加相应的Interceptor来处理in/out消息
serverFactory.getInInterceptors().add(new LoggingInInterceptor());
serverFactory.getOutInterceptors().add(new LoggingOutInterceptor());

//需要设置以下参数才能基于“契约优先”发布(会自动对应外部xsd文件)
serverFactory.setWsdlLocation("META-INF/wsdl/user.wsdl");
serverFactory.setServiceName(new QName("http://www.my.org/user","UserWsService"));

//增加自定义Handler
//serverFactory.getHandlers().add(new LicenseHandler());
//可使用Interceptor代替Handler
serverFactory.getInInterceptors().add(new LicenseInInterceptor());

serverFactory.create();
Client端
方式一:使用 JaxWs API 进行客户端调用
UserWsService service=new UserWsService();
IUserWsService userService=service.getUserWsServicePort();
System.out.println(userService.addTest(23, 45));
方式二:使用代理工厂JaxWsProxyFactoryBean进行客户端调用
JaxWsProxyFactoryBean factory = new JaxWsProxyFactoryBean();
factory.setAddress("http://localhost:9090/my/us");
factory.setServiceClass(IUserWsService.class);

//为访问增加相应的Interceptor来处理in/out消息
factory.getInInterceptors().add(new LoggingInInterceptor());
factory.getOutInterceptors().add(new LoggingOutInterceptor());

//增加SOAPHandler
//factory.getHandlers().add(new LicenseHandler());
//可以使用Interceptor代替Handler
factory.getOutInterceptors().add(new LicenseOutInterceptor());

IUserWsService userService=(IUserWsService)factory.create();
System.out.println(userService.addTest(23, 45));
结合Spring
使用Spring管理
Server端
发布WebService到Web容器中,并通过Spring管理WebService
配置
web.xml<!-- 添加CXF的servlet监听请求 --> <servlet> <servlet-name>CXFServlet</servlet-name> <servlet-class>org.apache.cxf.transport.servlet.CXFServlet</servlet-class> </servlet> <servlet-mapping> <servlet-name>CXFServlet</servlet-name> <url-pattern>/service/*</url-pattern> </servlet-mapping>配置
beans.xml<beans xmlns="http://www.springframework.org/schema/beans" xmlns:xsi="http://www.w3.org/2001/XMLSchema-instance" xmlns:aop="http://www.springframework.org/schema/aop" xmlns:tx="http://www.springframework.org/schema/tx" xmlns:context="http://www.springframework.org/schema/context" xmlns:jaxws="http://cxf.apache.org/jaxws" xsi:schemaLocation=" ... http://cxf.apache.org/jaxws http://cxf.apache.org/schemas/jaxws.xsd"> <context:annotation-config/> <context:component-scan base-package="com.cj.my.ws.service" /> <aop:aspectj-autoproxy proxy-target-class="true"/> <!-- 导入cxf--> <import resource="classpath:META-INF/cxf/cxf.xml"/> <import resource="classpath:META-INF/cxf/cxf-extension-jaxws.xml"/> <import resource="classpath:META-INF/cxf/cxf-servlet.xml"/> <!-- 发布服务--> </beans>- 发布方式一:使用
<jaxws:endpoint><bean id="userWsService" class="com.cj.my.ws.cxf.UserWsService" /> <jaxws:endpoint id="userWS" implementor="#userWsService" address="/us"> <jaxws:inInterceptors> <bean id="ipInInterceptor" class="com.cj.my.ws.cxf.interceptor.IpInInterceptor"/> </jaxws:inInterceptors> <!-- <jaxws:outFaultInterceptors> <bean id="loggerOutInterceptor" class="org.apache.cxf.interceptor.LoggingOutInterceptor"/> <bean id="faultOutInterceptor" class="org.apache.cxf.interceptor.FaultOutInterceptor"/> </jaxws:outFaultInterceptors> --> <jaxws:handlers> <bean id="backWsLogHandler" class="com.cj.my.ws.cxf.handler.BackWsLogHandler"></bean> <!-- <bean id="licenseHandler" class="com.cj.my.ws.cxf.handler.LicenseHandler"></bean> --> </jaxws:handlers> </jaxws:endpoint> - 发布方式二:使用
<jaxws:server><jaxws:server id="userWS" serviceClass="com.cj.my.ws.cxf.IUserWsService" address="/us"> <jaxws:serviceBean> <bean class="com.cj.my.ws.cxf.UserWsService"/> </jaxws:serviceBean> </jaxws:server> - 其实
<jaxws:server>和<jaxws:endpoint>是等效的,都用于发布Web 服务- JAX-WS 规范中使用EndPoint 发布Web 服务,CXF 为了和JAX-WS 对应,提供了这个与
<jaxws:server>功能一样的配置元素<jaxws:endpoint>
- JAX-WS 规范中使用EndPoint 发布Web 服务,CXF 为了和JAX-WS 对应,提供了这个与
- 发布方式一:使用
Client端
通过Spring注入WebService Client
使用<jaxws:client>:
<beans xmlns="http://www.springframework.org/schema/beans"
        xmlns:xsi="http://www.w3.org/2001/XMLSchema-instance"
        xmlns:aop="http://www.springframework.org/schema/aop"
        xmlns:tx="http://www.springframework.org/schema/tx"
        xmlns:context="http://www.springframework.org/schema/context"
        xmlns:jaxws="http://cxf.apache.org/jaxws"
        xmlns:cxf="http://cxf.apache.org/core"
        xsi:schemaLocation="
            http://cxf.apache.org/jaxws http://cxf.apache.org/schemas/jaxws.xsd
            http://cxf.apache.org/core http://cxf.apache.org/schemas/core.xsd">

<context:component-scan base-package="com.cj.my.ws"/>

<jaxws:client id="userWsService"
        serviceClass="com.cj.my.ws.cxf.client.IUserWsService"
        address="http://localhost:9090/my/service/us" >
    <!-- <jaxws:handlers>
        <ref bean="licenseHandler"/>
    </jaxws:handlers> -->
</jaxws:client>
测试:
@RunWith(SpringJUnit4ClassRunner.class)
@ContextConfiguration("classpath:beans.xml")
public class ClientSpringTest
{
    @Inject
    private IUserWsService userWsService=null;

    @Test
    public void testAddTest(){
        System.out.println(userWsService.addTest(23, 45));
    }
}
拦截器
自定义拦截器
CXF中有一些常用的拦截器(例如:LoggingOutInterceptor,LoggingInInterceptor)
也可自定义拦截器,例如:
public class TestOutInterceptor extends AbstractSoapInterceptor{
    private String ns="http://www.my.org/user";
    public TestOutInterceptor(){
        super(Phase.WRITE);
    }

    @Override
    public void handleMessage(SoapMessage message) throws Fault{
        System.out.println("TestOutInterceptor------------");
        try{
            DataBinding dataBinding=new JAXBDataBinding(String.class);
            QName qname=new QName(this.ns,"testInfo");
            Header header=new Header(qname, "test 88", dataBinding);
            message.getHeaders().add(header);
        } catch (JAXBException e){
            e.printStackTrace();
        }
    }
}
添加拦截器
方法一:JaxWsServerFactoryBean
Server端:
JaxWsServerFactoryBean serverFactory=new JaxWsServerFactoryBean();
...
serverFactory.getInInterceptors().add(new LicenseInInterceptor());
Client端:
JaxWsProxyFactoryBean factory = new JaxWsProxyFactoryBean();
...
factory.getOutInterceptors().add(new LicenseOutInterceptor());
方法二:Annotation
Server端:
@InInterceptors(interceptors={"com.cj.my.ws.cxf.interceptor.LicenseInInterceptor"})
public class UserWsService implements IUserWsService
Client端:
@OutInterceptors(interceptors={
        "com.cj.my.ws.cxf.interceptor.TestOutInterceptor",
        "com.cj.my.ws.cxf.interceptor.LicenseOutInterceptor",
        "org.apache.cxf.interceptor.LoggingOutInterceptor"})
public interface IUserWsService
方法三:基于Spring,在Spring配置文件(eg: beans.xml)中添加
- 全局配置(使用
<cxf:bus>)- 即作为Client端和Server端都有效(即:对你访问第三方的WebService接口和别人访问你发布出去的WebService接口,都起到拦截作用 )
<cxf:bus>
  <cxf:outInterceptors>
      <ref bean="loggingOutInterceptor"/>
  </cxf:outInterceptors>
  <cxf:inInterceptors>
      <ref bean="loggingInInterceptor"/>
  </cxf:inInterceptors>
</cxf:bus>
<bean id="loggingOutInterceptor" class="org.apache.cxf.interceptor.LoggingOutInterceptor"/>
<bean id="loggingInInterceptor" class="org.apache.cxf.interceptor.LoggingInInterceptor"/>
- 即作为Client端和Server端都有效(即:对你访问第三方的WebService接口和别人访问你发布出去的WebService接口,都起到拦截作用 )
- 局部(针对某个WebService):
- Server端:配置在
<jaxws:server>或<jaxws:endpoint>中 - Client端:配置在
<jaxws:client>中,例如:<jaxws:client id="userWsService" serviceClass="com.cj.my.ws.cxf.client.IUserWsService" address="http://localhost:9090/my/service/us" > <jaxws:handlers> <ref bean="licenseHandler"/> </jaxws:handlers> </jaxws:client> <bean id="licenseHandler" class="com.cj.my.ws.cxf.handler.LicenseHandler"/>
- Server端:配置在
扩展应用
Upload附件
二进制MTOM
- 字节数组
byte[]放于SOAPBody不好,若太大,会有内存溢出异常 - 使用MTOM二进制处理(优化过)
@MTOM:以附件AttachmentPart传送,即以流的方式传送wsdl文件中:
 <xsd:complexType name="uploadFile">
     <xsd:sequence>
         <xsd:element name="file" type="xsd:base64Binary" nillable="true" minOccurs="0"/>
     </xsd:sequence>
 </xsd:complexType>
Server端WebService实现类
 @MTOM
 public class UserWsService implements IUserWsService{
     ...
     @Override
     public boolean uploadFile(byte[] file){
         SimpleDateFormat sdf=new SimpleDateFormat("yyyymmddhhMMss");
         String fileName=sdf.format(new Date());
         FileOutputStream fos = null;
         System.out.println(file);
         try {
             fos = new FileOutputStream("d:/webservice/"+fileName+".jpg");
             fos.write(file);
             fos.flush();
             return true;
         } catch (Exception e) {
             return false;
         } finally {
             try {
                 fos.close();
             } catch (IOException e) {
                 return false;
             }
         }
     }
 }
Client端调用测试
 @Before
 public void init() throws MalformedURLException{
     URL url=new URL(this.wsdl);
     QName qname = new QName(this.ns, "UserWsService");
     this.service=new UserWsService(url,qname);
     //this.userService=service.getUserWsServicePort();
     this.userService=service.getUserWsServicePort(new MTOMFeature());
 }

 @Test
 public void testUploadFile(){
     try {
         byte[] file = FileUtils.readFileToByteArray(new File("E:\\picture\\123.jpg"));
         boolean result=userService.uploadFile(file);
         System.out.println(result);
     } catch (IOException e) {
         e.printStackTrace();
     }
 }
消息头处理
wsdl文件中:
<!-- 创建消息头元素 -->
<xsd:element name="licenseInfo" type="xsd:string" />

<!-- 创建消息头信息 -->
<wsdl:message name="licenseInfo">
      <wsdl:part name="licenseInfo" element="tns:licenseInfo" />
</wsdl:message>

<!-- 为某个特定的方法绑定消息头(也可不加,作为全局,通过Handler统一判断处理)-->
<wsdl:binding name="OperationWsServiceSOAP" type="tns:IOperationWsService">
    <soap:binding style="document" transport="http://schemas.xmlsoap.org/soap/http"/>
    <wsdl:operation name="divide">
        <wsdl:input>
            <soap:body use="literal"/>
            <soap:header use="literal" part="licenseInfo" message="tns:licenseInfo" />
        </wsdl:input>
        <wsdl:output>
            <soap:body use="literal"/>
            </wsdl:output>
    </wsdl:operation>
</wsdl:binding>
显示处理
Server端声明(显示的声明一个参数获取头部信息 ):
public interface IOperationWsService{
    ...

    //添加接口,用于显示获取licenseInfo
    @WebMethod
    @WebResult(name = "divideResult", targetNamespace = "")
    @RequestWrapper(localName = "divide", targetNamespace = "http://www.example.org/student/",     className = "com.cj.my.ws.second.client.Divide")
    @ResponseWrapper(localName = "divideResponse", targetNamespace = "http://www.example.org/student/",     className = "com.cj.my.ws.second.client.DivideResponse")
    public int divide(
    @WebParam(name = "a", targetNamespace = "") int a,
    @WebParam(name = "b", targetNamespace = "") int b,
    @WebParam(name="licenseInfo",header=true) String licenseInfo);
}
Client端调用:
public class ClientApp{
    public static void main(String[] args){
    OperationWsService service=new OperationWsService ();
    IOperationWsService operationWsService=service.getOperationWsServicePort();
    System.out.println(operationWsService.divide(30, 0,"123"));
    }
}
通过SOAPHandler处理
Server端自定义SOAPHandler:LicenseHandler (in 时使用)
public class LicenseHandler implements SOAPHandler<SOAPMessageContext>{
    @Override
    public boolean handleMessage(SOAPMessageContext context){
        try{
            Boolean out=(Boolean)context.get(MessageContext.MESSAGE_OUTBOUND_PROPERTY);
            if(!out){
                SOAPMessage message=context.getMessage();
                SOAPEnvelope envelope=message.getSOAPPart().getEnvelope();
                SOAPBody body=envelope.getBody();

                String partName=body.getChildNodes().item(0).getLocalName();
                if("list".equals(partName) || "addUser".equals(partName)){
                SOAPHeader header=envelope.getHeader();
                if(header==null || header.getFirstChild()==null){
                    //将错误信息加入SOAPBody中
                    SOAPFault fault=body.addFault();
                    fault.setFaultString("头部信息不能为空");
                    //return false;
                    throw new SOAPFaultException(fault);
                }

                /*
                //此方法会将头信息detach分离出来,接下来的程序就不能再取到了
                @SuppressWarnings("unchecked")
                Iterator<SOAPHeaderElement> it =header.extractAllHeaderElements();
                while(it.hasNext()){
                    System.out.println("header:"+it.next().getTextContent());
                }*/

                NodeList nodeList=header.getChildNodes();
                //NodeList nodeList=header.getElementsByTagName("ns:licenseInfo");
                System.out.println("header--"+nodeList.item(0).getTextContent());
                }
            }
        } catch (SOAPException e){
            e.printStackTrace();
        } catch (IOException e){
            e.printStackTrace();
        }
        return true;
    }

    @Override
    public boolean handleFault(SOAPMessageContext context){
        return false;
    }
}
Client端自定义SOAPHandler:LicenseHandler (out 时使用)
public class LicenseHandler implements SOAPHandler<SOAPMessageContext>{
    private String wsdl="http://localhost:9090/us?wsdl";
    private String ns="http://www.my.org/user";

    @Override
    public boolean handleMessage(SOAPMessageContext context){
        try{
            Boolean out=(Boolean)context.get(MessageContext.MESSAGE_OUTBOUND_PROPERTY);
            if(out){
                SOAPMessage message=context.getMessage();
                SOAPEnvelope envelope=message.getSOAPPart().getEnvelope();
                SOAPBody body=envelope.getBody();
                String partName=body.getFirstChild().getLocalName();
                System.out.println("partName:"+partName);
                if(!"addUser".equals(partName))
                    return true;

                SOAPHeader header=envelope.getHeader();
                if(header==null)
                    header=envelope.addHeader();

                User regUser=new User();
                regUser.setId(18);
                regUser.setUsername("RegisterUser");
                regUser.setPassword("888");
                LicenseInfo licenseInfo=new LicenseInfo();
                licenseInfo.setRegisterUser(regUser);

                JAXBContext ctx=JAXBContext.newInstance(LicenseInfo.class);
                QName sname=new QName(this.ns,"licenseInfo");
                JAXBElement<LicenseInfo> element=new JAXBElement<LicenseInfo>(sname,LicenseInfo.class,licenseInfo);

                Marshaller mar=ctx.createMarshaller();
                mar.setProperty(Marshaller.JAXB_FRAGMENT,true);
                mar.setProperty(Marshaller.JAXB_ENCODING, "UTF-8");
                mar.marshal(element, header);

                message.writeTo(System.out);
                System.out.println();
            }
        } catch (SOAPException e){
            e.printStackTrace();
        } catch (JAXBException e){
            e.printStackTrace();
        }catch (IOException e){
            e.printStackTrace();
        }
        return true;
    }

    @Override
    public boolean handleFault(SOAPMessageContext context){
        try{
            SOAPMessage message=context.getMessage();
            message.writeTo(System.out);
            System.out.println();
        } catch (SOAPException e){
            e.printStackTrace();
        } catch (IOException e){
            e.printStackTrace();
        }
        return false;
    }

}
通过SoapInterceptor处理
Server端In Interceptor
public class LicenseInInterceptor extends AbstractSoapInterceptor{
    public LicenseInInterceptor(){
        super(Phase.POST_UNMARSHAL);
    }
    @Override
    public void handleMessage(SoapMessage message) throws Fault{
        QName qname=new QName("http://www.my.org/user","licenseInfo");
        Header header=message.getHeader(qname);
        if(header!=null){
            Object obj=header.getObject();
            if(obj instanceof  Node){
                Element e=(Element) obj;
                NodeList nodeList=e.getChildNodes();
                //System.out.println(nodeList.item(0).getTextContent());
                Node node=nodeList.item(0);
                if(node==null || !node.getTextContent().equals("RegisterUser888"))
                    throw new Fault(new Exception("licenseInfo isn't correct!"));
            }
        }
    }
}
Client端Out Interceptor
public class LicenseOutInterceptor extends AbstractSoapInterceptor{
    private String ns="http://www.my.org/user";
    public LicenseOutInterceptor(){
        super(Phase.WRITE);
    }

    @Override
    public void handleMessage(SoapMessage message) throws Fault{
        try{
            User regUser=new User();
            regUser.setId(18);
            regUser.setUsername("RegisterUser");
            regUser.setPassword("888");
            LicenseInfo licenseInfo=new LicenseInfo();
            licenseInfo.setRegisterUser(regUser);

            DataBinding dataBinding=new JAXBDataBinding(LicenseInfo.class);
            QName qname=new QName(this.ns,"licenseInfo");

            Header header=new Header(qname, licenseInfo, dataBinding);
            message.getHeaders().add(header);

        }
        catch (JAXBException e){
            e.printStackTrace();
        }
    }
}
Exception异常处理
使用非运行期异常
wsdl文件中(将异常对象封装成一个Message):
<!-- 创建异常对象 -->
<xsd:element name="StudentException" type="tns:StudentException"/>
<xsd:complexType name="StudentException">
<xsd:sequence>
<xsd:element name="message" type="xsd:string" />
</xsd:sequence>
</xsd:complexType>

<!-- 创建异常消息 -->
<wsdl:message name="StudentException">
      <wsdl:part name="StudentException" element="tns:StudentException" />
</wsdl:message>

<!-- 声明某接口(服务)的异常消息 -->
<wsdl:portType name="IOperationWsService">
    <wsdl:operation name="plus">
      <wsdl:input message="tns:plus"/>
      <wsdl:output message="tns:plusResponse"/>
      <wsdl:fault name="StudentException" message="tns:StudentException"/>
    </wsdl:operation>
</wsdl:portType>

<!-- 为特定方法绑定异常形式 -->
<wsdl:binding name="OperationWsServiceSOAP" type="tns:IOperationWsService">
   <soap:binding style="document" transport="http://schemas.xmlsoap.org/soap/http"/>
    <wsdl:operation name="plus">
      <wsdl:input>
        <soap:body use="literal"/>
      </wsdl:input>
      <wsdl:output>
        <soap:body use="literal"/>
      </wsdl:output>
      <wsdl:fault name="StudentException">
        <soap:fault name="StudentException" use="literal"/>
      </wsdl:fault>
    </wsdl:operation>
</wsdl:binding>
Server端处理
- Server端发生Exception,被JAX截获:判断wsdl中是否有定义此异常
- 无则向上抛出Exception;
- 有则表明此Exception需抛到Client端,将此异常信息封装为SOAPFault放于SOAPBody中反馈给Client端,由Client端捕获此异常。
- 注意:此时Server端不会报异常(因为已经被封装成Soap消息了)。
模拟:
Server端 (WebService实现类):
@Override
public boolean isExist(Integer id) throws StudentException{
    if(id<0)
        throw new StudentException("illegal input param:"+id);
    for(Student student:studentList){
        if(student.getId()==id)
            return true;
    }
    return false;
}
Client端调用:
//调用实现方法isExist,获取StudentException(wsimport命令自动生成的是:StudentException_Exception)
try{
boolean result = myService.isExist(-1);
System.out.println(result);
System.out.println("--------------------------");
}
catch (StudentException_Exception e){
    System.out.println(e.getMessage());
}
异步调用
CXF支持如下两种形式的异步调用模式:
轮询方法(Polling approach)
- 调用一个特殊的无参方法,返回一个
javax.xml.ws.Response实例 - 通过轮询该 Response 对象来检查是否有应答消息到达
Response implements java.util.concurrency.Future<T>Non-blocking polling(非阻塞轮询)- 尝试获得结果之前,调用非阻塞方法
Response<T>.isDone()来检查响应消息是否到达Response<StartResponse> rs=backService.startAsync(); while(!rs.isDone()){ Thread.sleep(100); System.out.println("Non-blocking polling(无阻塞轮询)-------"); } StartResponse startResponse = rs.get(); System.out.println(startResponse.getResult());
- 尝试获得结果之前,调用非阻塞方法
Blocking polling(阻塞轮询)- 立即调用
Response<T>.get(),阻塞至响应到达(可以指定一个超时时长作为可选项)Response<StartResponse> rs=backService.startAsync(); StartResponse startResponse=rs.get(5L, java.util.concurrent.TimeUnit.SECONDS); System.out.println(startResponse.getResult());
- 立即调用
- 调用一个特殊的无参方法,返回一个
回调方法(Callback approach)
- 调用另外一个特殊的方法:使用一个回调对象的引用作为一个参数(
javax.xml.ws.AsyncHandler类型) - 只要有应答消息到达客户端,CXF运行时就会回调该
AsyncHandler 对象,并将应答消息的内容传给它
- 调用另外一个特殊的方法:使用一个回调对象的引用作为一个参数(
使用示例:
新建
binding.xml文件(打开异步调用特性,进行绑定声明)<?xml version="1.0" encoding="UTF-8"?> <bindings xmlns:xsd="http://www.w3.org/2001/XMLSchema" xmlns:wsdl="http://schemas.xmlsoap.org/wsdl/" wsdlLocation="http://localhost:9090/sms/comm/service/bs?wsdl" xmlns="http://java.sun.com/xml/ns/jaxws"> <!-- 只想对一个端口“iHelloWorld”生成异步方法,可以在绑定声明中指定 <bindings node="wsdl:definitions/wsdl:portType[@name='iHelloWorld']"> --> <!-- 把node设为“wsdl:definitions”,表示对整个WSDL契约起作用 --> <bindings node="wsdl:definitions"> <enableAsyncMapping>true</enableAsyncMapping> </bindings> </bindings>生成相应的带异步支持的stub代码
- 方式一:使用wsdl2java命令
wsdl2java -b binding.xml hello.wsdl - 方式二:使用wsimport命令
wsimport -d d:/webservice/sms -keep http://localhost:9090/sms/comm/service/bs?wsdl -p com.cj.sms.client.back -b d:/webservice/binding.xml - 服务接口类的方法多出两个方法声明
例如
destroy()方法,会多出:/** * 异步调用的轮询方式 * @return returns javax.xml.ws.Response<com.cj.sms.client.back.DestroyResponse> */ @WebMethod(operationName = "destroy") @RequestWrapper(localName = "destroy", targetNamespace = "http://ws.sms.cj.com/back", className = "com.cj.sms.client.back.Destroy") @ResponseWrapper(localName = "destroyResponse", targetNamespace = "http://ws.sms.cj.com/back", className = "com.cj.sms.client.back.DestroyResponse") public Response<DestroyResponse> destroyAsync(); /** * 异步调用的回调方式 * @param asyncHandler * @return returns java.util.concurrent.Future<? extends java.lang.Object> */ @WebMethod(operationName = "destroy") @RequestWrapper(localName = "destroy", targetNamespace = "http://ws.sms.cj.com/back", className = "com.cj.sms.client.back.Destroy") @ResponseWrapper(localName = "destroyResponse", targetNamespace = "http://ws.sms.cj.com/back", className = "com.cj.sms.client.back.DestroyResponse") public Future<?> destroyAsync( @WebParam(name = "asyncHandler", targetNamespace = "")AsyncHandler<DestroyResponse> asyncHandler);
- 方式一:使用wsdl2java命令
测试
- 测试轮询方式
public void testStart(){
  try{
      Response<StartResponse> rs=backService.startAsync();
      while(!rs.isDone()){
              Thread.sleep(100);
              System.out.println("Non-blocking polling(无阻塞轮询)-------");
         }
      //如果没有前面isDone的检测,此处就退化为阻塞式轮询
      StartResponse startResponse = rs.get();
      //也可设置一个超时时长做为选项
      //StartResponse startResponse=rs.get(5L, java.util.concurrent.TimeUnit.SECONDS);
      System.out.println(startResponse.getResult());
  }catch(SOAPFaultException e){
      System.out.println(e.getMessage());
  }catch (InterruptedException e){
      e.printStackTrace();
  } catch (ExecutionException e){
      e.printStackTrace();
  }
}
测试回调方式
@Test
public void testDestroy(){
  try{
      //destroyHandler=new WsDestroyAsyncHandler();

      //返回的 Future<?> 对象只是用来检测一个响应是否已经到达
      //响应消息的值只在回调对象WsDestroyAsyncHandler中可得
      Future<?> future=backService.destroyAsync(destroyHandler);
      while(!future.isDone()){
              Thread.sleep(10000);
              System.out.println("异步方法(回调)--------------");
          }
      System.out.println(destroyHandler.getResponseText());
  }catch(SOAPFaultException e){
      System.out.println(e.getMessage());
  }catch (InterruptedException e){
      e.printStackTrace();
  }
}
//自定义回调类 public class WsDestroyAsyncHandler implements AsyncHandler<DestroyResponse>{ private DestroyResponse destroyResponse; @Override public void handleResponse(Response<DestroyResponse> res){ try{ //获取响应数据,并把它存放到成员变量destroyResponse中 destroyResponse=res.get(); System.out.println("result:"+destroyResponse.getResult()); } catch (InterruptedException e){ e.printStackTrace(); } catch (ExecutionException e){ e.printStackTrace(); } } //方便从响应中提炼出主要的输出参数 public String getResponseText(){ return destroyResponse.getResult(); } }
- 测试轮询方式