Maven 模块化依赖管理
- 两个核心:插件+仓库
- 可以在不同模块之间有效的进行管理项目(解决Ant项目依赖管理比较难操作的问题)
- Maven官方有两个插件列表:
- org.apache.maven.plugins 这里的插件最为成熟
- org.codehaus.mojo 这里的插件没有那么核心,但也有不少十分有用
- 仓库管理:
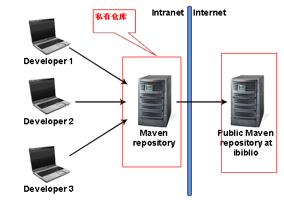
- 本地仓库(个人,本机)+ 本地仓库 + ... --> 私有仓库(团队/公司,局域网服务器)--> 中心/中央仓库(远程,互联网广域网上)
- 推荐:
- 许晓斌博客《Maven 实战》
- 孔浩的Maven视频教程
Maven Starter
安装Maven
- 下载zip解压到
D:\soft\maven - 配置环境变量path,添加
D:\soft\maven\bin; - 验证:cmd下执行
mvn -version - 配置本地仓库
- 修改
D:\soft\maven\conf\setting.xml(修改该文件会对所有项目都起作用),配置:<localRepository>E:\maven\myRepository</localRepository> - 新建
E:\maven\myRepository,拷贝D:\soft\maven\conf\setting.xml到E:\maven中
- 修改
PS: 若不配置本地仓库,Maven会默认自动下载所需文件到 C:\Users\cj\.m2下的 repository目录下
Maven初体验
搭建骨架,cmd下在执行
mvn archetype:generate,生成如下目录结构:pom.xml src/ main/ java(存放源代码) resources(存放源代码的资源文件,例如xml配置文件) webapp(web项目有,相当于webContent,即webroot,且需添加scope为provided 的servlet-api依赖包) test/ java(存放测试代码) resources(存放测试代码的资源文件) target (编译后自动生成,存放生成的目标文件)编写pom.xml文件
 <?xml version="1.0" encoding="UTF-8"?>
 <project xmlns="http://maven.apache.org/POM/4.0.0"
          xmlns:xsi="http://www.w3.org/2001/XMLSchema-instance"
          xsi:schemaLocation="http://maven.apache.org/POM/4.0.0 http://maven.apache.org/maven-v4_0_0.xsd">
     <modelVersion>4.0.0</modelVersion>

     <groupId>cn.edu.zttc.hello</groupId>
     <artifactId>hello-first</artifactId>
     <version>SNAPSHOT-0.0.1</version>

     <dependencies>
         <dependency>
             <groupId>junit</groupId>
             <artifactId>junit</artifactId>
             <version>4.10</version>
             <scope>test</scope>
         </dependency>
     </dependencies>
 </project>
执行(cmd下进入pom.xml文件所在目录)
mvn clean运行清理操作(会默认把target文件夹中的数据清理)mvn clean compile先运行清理之后运行编译,会见代码编译到target文件夹中mvn clean test运行清理和测试mvn clean package运行清理和打包(自动完成编译compile,测试test,打jar包)mvn clean install运行清理和安装,会将打好的包安装到本地仓库中,以便其他的项目可以调用(自动完成package,并上传到本地仓库中,以供其他模块项目使用)mvn clean deploy运行清理和发布(发布到私服上面,即发布到私有仓库中)
pom.xml文件说明:
<groupId>项目名称,同包名<artifactId>项目模块名,建议使用:项目名称-模块名称<version>项目版本- 版本管理:总版本号(框架的变动).分支版本号(增加了一些功能).小版本号(在分支版本上面进行bug的修复)-里程碑版本(SNAPSHOT-->alpha-->beta-->release-->GA)
<packaging>打包方式: pom, jar(默认) , war<dependencies>加入依赖包,会通过GAV坐标(groupId,artifactId,version)从仓库中定位所需包(若仓库中不存在则自动从网上中央仓库下载)- 所有的依赖都是通过坐标来进行存储的,有一些网上的仓库提供了坐标的查询:
<scope>依赖范围:test,compile(默认),provided,runtimetest:测试范围有效,在编译和打包时都不会使用这个依赖compile(默认):编译范围有效,在编译和打包时都会将依赖存储进去provided:编译和测试的过程有效,最后生成war包时不会加入,诸如:servlet-api,因为servlet-api,tomcat等web服务器已经存在了,如果再打包会冲突runtime:运行的时候依赖,在编译的时候不依赖
Eclipse下创建Maven项目
Eclipse安装maven ( 默认STS和myeclipse都自带了maven的支持, 如果是eclipse需要安装m2eclipse )
 Windows->Preference->Maven
         ->Installations 添加自己的Maven安装路径:D\soft\maven
         ->User Settings 设置本地仓库的settings.xml : E:\maven\settings.xml (设置后会自动设定本地仓库路径)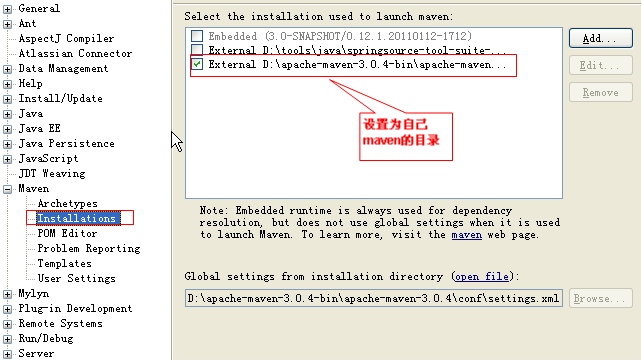
新建Maven项目
 New->Maven->Maven Project-> maven-archetype-quickstart(普通Java项目)
                  -> maven-archetype-webapp(Web项目)
 Next-> 输入groupId,artifactId,package等
配置项目
选中项目-> Properties -> Project Facets -> Depoyment Assebly- 运行
选中项目的pom.xml文件->鼠标右击->Run as->Maven build...->Goals:xxxx
私有仓库Nexus介绍
安装
- 下载zip解压到
D:\Soft\nexus - 配置环境变量path,添加
D:\Soft\nexus\nexus-2.5.1-01\bin; - 验证:cmd下执行
nexus - 安装到服务管理中:
nexus install - 启动:
nexus start - 访问私有仓库:
http://localhost:8081/nexus/- jetty的默认端口为8081,nexus是发布到jetty服务器下,extjs2.0框架
- 默认登录用户名密码:admin admin123
PS: 若出现“The nexus service was launched,but failed to start.”则:
修改配置文件 D:\Soft\nexus-2.2-01-bundle\nexus-2.2-01\bin\jsw\conf\wrapper.conf, 将 wrapper.java.command=java 修改为 Java命令所在路径 D:\Soft\Java\bin\java
功能
- 接收developer发布信息;
- 与中心仓库通讯 -> 减轻负载
- 资源(依赖包,插件等)通过私有仓库下载,会同时保存在私有仓库和本地仓库
本地仓库(个人,本机)+ 本地仓库 + ... => 私有仓库(团队/公司,局域网服务器)=> 中心/中央仓库(远程,互联网广域网上)
仓库类型
hosted:存放内部发布项目的仓库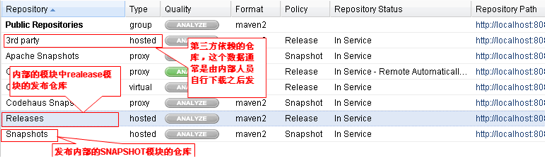
Releases存放内部realease版模块的仓库Snapshots存放内部snapshots版(快照版)模块的仓库3rd party存放第三方依赖包的仓库 -> 中央仓库无法提供的资料(通常存放由内部人员自行下载或开发,设置发布上去的包 )- 其他自定义仓库等
proxy:存放从远程中央仓库下载的资料的仓库 (Apache Snapshots,Central,Codehaus Snapshots,...)
group:组仓库,用来方便开发人员设置virtual:虚拟仓库 Central M1 shadow 针对于Maven1的转接仓库 -> 无用
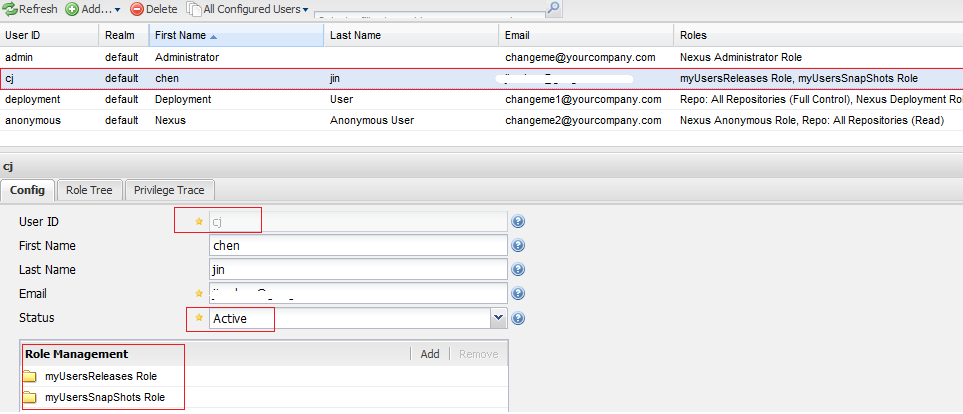
用户
nexus默认提供了三个用户:
admin:administration管理员,最大权限 (pwd:admin123)deployment:可以发布信息(pwd:deployment123)anonymous:可以访问页面,工厂,但是不能发布信息,添加信息
仓库索引
- Nexus是使用索引进行管理,所有项目先是有对应的索引存储下来,然后再下载具体包
- 索引有助于查找Search依赖包,定位GAV,即可通过nexus搜索,而不必登录外部工厂下载(点击nexus左工具栏的“Artifact Search”进行搜索)
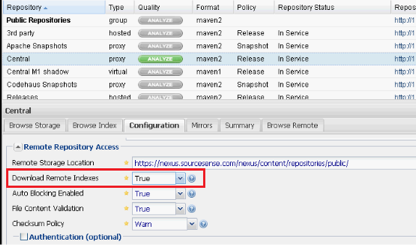
下载更新Central仓库的索引:
Reponsitory:Central->Configuration->Download Remote Indexes设为True->Save- 在
Administration->Scheduled Tasks下可以看到正在下载index的任务 :Running(实际是用Lucene写的索引, 下载到D:\soft\nexus-2.2-01-bundle\sonatype-work\nexus\indexer) - 下载完成后,可在
Reponsitory:Central->Browse Index下看到所有index(右下角的Maven Information中可以看到对应的GAV配置) - 更新索引:右击
Reponsitory:Central进行Update Index
私有仓库Nexus应用
配置Maven使用私有仓库nexus
通过私有仓库与中心仓库通讯下载管理资源,maven默认仓库配置:
//D:\soft\maven\lib\maven-model-builder-3.1.0.jar下org\apache\maven\model\pom-4.0.0.xml
<repositories>
    <repository>
      <id>central</id>
      <name>Central Repository</name>
      <url>http://repo.maven.apache.org/maven2</url>
      <layout>default</layout>
      <snapshots>
        <enabled>false</enabled>
      </snapshots>
    </repository>
</repositories>
仓库配置
- 方式一:针对某项目(修改项目的pom.xml文件)
  <!--从指定url查找依赖,且项目各版本会发布到此仓库(在未对其指定镜像的情况下) -->
  <repositories>
      <repository>
              <id>nexus</id>
              <name>Nexus Repository</name>
              <url>http://localhost:8081/nexus/content/groups/public/</url>
              <releases>
                 <enabled>true</enabled>
              </releases>
              <snapshots>
                <enabled>true</enabled>
              </snapshots>
      </repository>
  </repositories>
方式二:针对本地所有项目(本地仓库的setting.xml,这里为 E:\maven\setting.xml)
  <profiles>
      <profile>
          <id>private-repos</id>
              <repositories>
                  <repository>
                  <id>central-repos</id>
                          <name>nexus Repository</name>
                          <url>http://localhost:8081/nexus/content/groups/public/</url> <!-- 配置了镜像后,此url无用-->
                      <releases><enabled>true</enabled></releases>         <!-- 打开对realease版本的依赖,默认打开-->
                      <snapshots><enabled>true</enabled></snapshots>        <!-- 打开对快照版本的依赖,默认未打开-->
                      </repository>
              </repositories>
          </profile>
  </profiles>

  <!-- 激活配置的profile-->
  <activeProfiles>
      <activeProfile>private-repos</activeProfile>
  </activeProfiles>
- 方式一:针对某项目(修改项目的pom.xml文件)
镜像配置 (设置镜像后,
指定的仓库会从此镜像指定的 下载资料,这里配置E:\maven\setting.xml) <!--不管访问什么工厂,都从此镜像指定的url定位下载--> <mirrors> <mirror> <id>mirrorId</id> <mirrorOf>*</mirrorOf> <!-- 表示所有的工厂都加镜像,也可以专指:<mirrorOf>nexus,某repository的Id</mirrorOf>,建议使用*,表示所有--> <name>Human Readable Name for this Mirror.</name> <url>http://localhost:8081/nexus/content/groups/public/</url> </mirror> </mirrors>
在Nexus中创建项目工厂
在私有仓库Nexus中创建项目工厂
Repository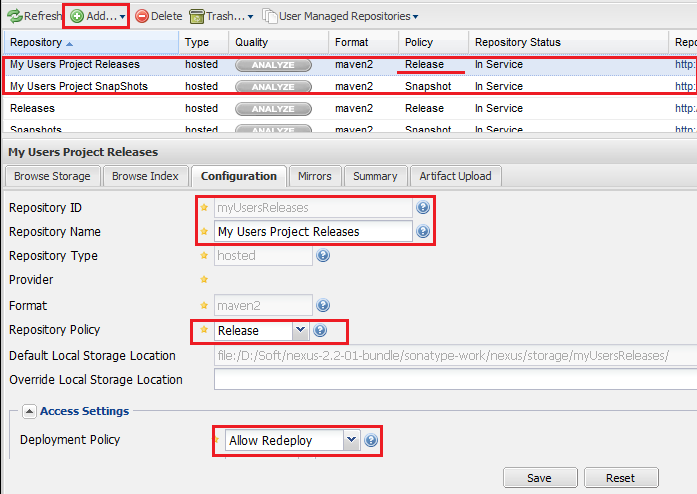 (hosted类型的项目Release工厂和SnapShots工厂 )
设置创建的项目工厂的权限
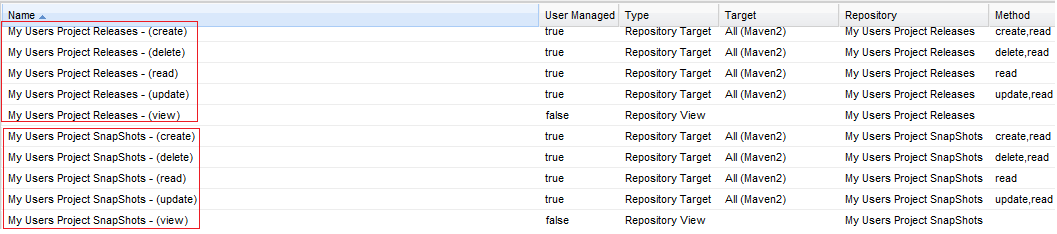
Privileges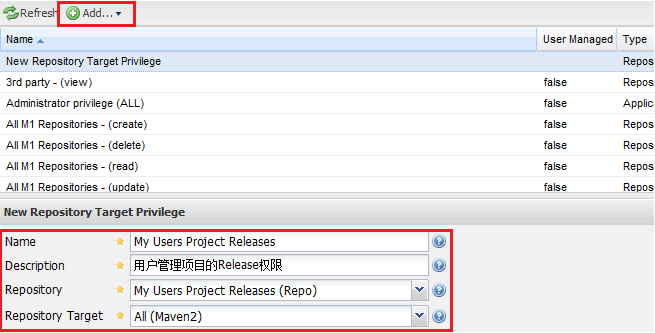 (分别对新建的myUserReleases工厂和myUserSnapshots工厂建立权限)
这里建立的Privileges:
创建角色并分配权限
Role-Privileges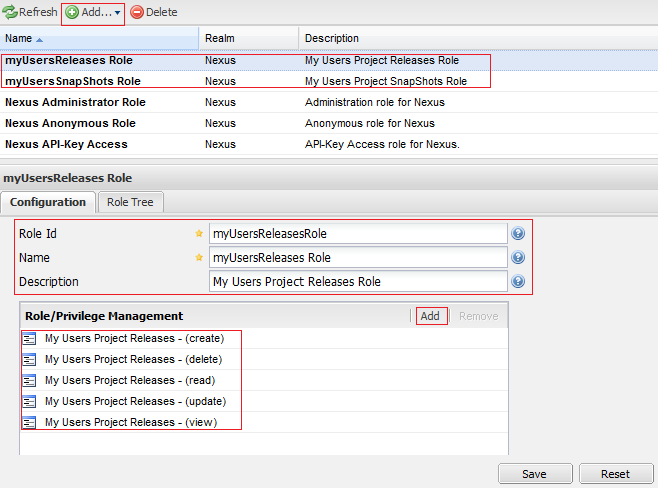
创建用户并分配角色
User-Role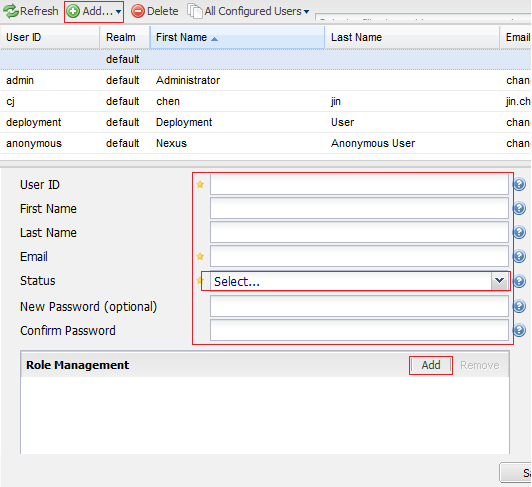
这里建立的Users:
发布项目到Nexus工厂
在项目的pom.xml中配置发布用的
Repository<!-- 项目发布管理--> <distributionManagement> <repository> <id>users-releases</id> <name>Users Project Release</name> <url>http://localhost:8081/nexus/content/repositories/myUsersReleases/</url> </repository> <snapshotRepository> <id>users-snapshots</id> <name>Users Project Snapshots</name> <url>http://localhost:8081/nexus/content/repositories/myUersSnapShots/</url> </snapshotRepository> </distributionManagement>在本地仓库的settting.xml中设置用户访问Repository所需的
username和password(E:\maven\setting.xml)<servers> <server> <id>users-releases</id> <!-- 要访问的工厂的Id--> <username>cj</username> <password>123</password> </server> <server> <id>users-snapshots</id> <!-- 要访问的工厂Id--> <username>cj</username> <password>123</password> </server> </servers>
引入第三方Jar包
安装第三方jar文件到本地仓库
  mvn install:install-file
 -Dfile=E:\libs\myLibs\db-drivers\oracle.jar
 -DgroupId=oracle
 -DartifactId=oracle
 -Dversion=10.2
 -Dpackaging=jar
 -DgeneratePom=true
发布第三方jar到nexus私有仓库
mvn deploy:deploy-file -Dfile=E:\libs\myLibs\db-drivers\oracle.jar -DgroupId=oracle -DartifactId=oracle -Dversion=10.2 -Dpackaging=jar -Durl=http://localhost:8081/nexus/content/repositories/thirdparty/ -DrepositoryId=thirdparty注意:jar所在目录路径不能含有空格,点号,中文等非ascii字符 eg:
 deploy:deploy-file
 -Dfile=E:\libs\myLibs\db-drivers\sqljdbc4.jar
 -DgroupId=sqljdbc -DartifactId=sqljdbc -Dversion=2008
 -Dpackaging=jar
 -Durl=http://localhost:8081/nexus/content/repositories/thirdparty/
 -DrepositoryId=thirdparty
配置setting.xml中仓库的
username和password(使用nexus下的3rd party 仓库,即thirdparty)<server> <id>thirdparty</id> <username>deployment</username> <password>deployment123</password> </server>使用:项目pom.xml中添加jar包依赖
 <dependency>
     <groupId>oracle</groupId>
     <artifactId>oracle</artifactId>
     <version>10.2</version>
 </dependency>
 <dependency>
     <groupId>sqljdbc</groupId>
     <artifactId>sqljdbc</artifactId>
     <version>2008</version>
 </dependency>
Maven 介绍
依赖&聚合&继承
依赖
- 依赖的传递性(基于scope为Compile)
B->A,A->C => B->C (模块B依赖于A,A依赖于C,则B自动依赖于C) - 依赖传递的冲突问题,例如:
=>推出:a->b1.0,c->b1.1,d->a,c ,f->d,c (例如d的pom.xml中 : <d>a</d> <d>c</d>)- d使用b1.0:根据d的pom,d使用pom中先写的那个依赖版本
- f使用b1.1:依赖路径长短不一致,则选择依赖路径最小的那个依赖版本
- 精确的控制依赖包:
- 排除依赖包(通过依赖的排除功能进行控制 exclusions)
<dependency> <groupId>com.cj.user</groupId> <artifactId>user-log</artifactId> <exclusions> <exclusion> <groupId>log4j<groupId> <artifactId>log4j<artifactId> </exclusion> </exclusions> </dependency> - 也可直接加入所需的某依赖包,根据最短路径原则,会选择直接加入的依赖版本
- 排除依赖包(通过依赖的排除功能进行控制 exclusions)
- 依赖的传递性(基于scope为Compile)
聚合:将所有统一聚合编译
- 在一个总的pom文件进行编写运行,自动完成所包含的所有模块的编译测试等功能
<packaging>打包方式设为pom<project xmlns="http://maven.apache.org/POM/4.0.0" xmlns:xsi="http://www.w3.org/2001/XMLSchema-instance" xsi:schemaLocation="http://maven.apache.org/POM/4.0.0 http://maven.apache.org/xsd/maven-4.0.0.xsd"> <modelVersion>4.0.0</modelVersion> <groupId>com.cj.user</groupId> <artifactId>user-aggregation</artifactId> <version>0.0.1-SNAPSHOT</version> <packaging>pom</packaging> <modules> <module>../user-core</module> <module>../user-log</module> <module>../user-dao</module> <module>../user-service</module> </modules> </project>
继承:将多个模块中重复和常用的部分放入一个pom.xml中,其他模块继承此pom
父模块user-parent/pom.xml:
<groupId>com.cj.user</groupId>
<artifactId>user-parent</artifactId>
<version>0.0.1-SNAPSHOT</version>
<packaging>pom</packaging>

<!-- 项目发布管理-->
<distributionManagement>
  <repository>
      <id>users-releases</id>
      <name>Users Project Release</name>
      <url>http://localhost:8081/nexus/content/repositories/myUsersReleases/</url>
  </repository>
  <snapshotRepository>
      <id>users-snapshots</id>
      <name>Users Project Snapshots</name>
      <url>http://localhost:8081/nexus/content/repositories/myUersSnapShots/</url>
  </snapshotRepository>
</distributionManagement>

<!—将聚合功能也放入此pom.xml中,则user-aggregation可省去不用-->
<modules>
  <module>../user-core</module>
  <module>../user-log</module>
  <module>../user-dao</module>
  <module>../user-service</module>
</modules>

<!—添加属性-->
<properties>
  <project.build.sourceEncoding>UTF-8</project.build.sourceEncoding>
  <junit.version>4.10</junit.version>
</properties>

<!-- 通过dependencyManagement 管理依赖,
若不加<dependencyManagement>,则子类会全部继承<dependencies>下的依赖包,会导致子模块引入一些不需要的依赖包-->
<dependencyManagement>
  <dependencies>
      <dependency>
          <groupId>junit</groupId>
          <artifactId>junit</artifactId>
          <version>${junit.version}</version> <!—使用属性junit.version-->
          <scope>test</scope>
      </dependency>
      <dependency> <!—添加子模块包-->
          <groupId>${project.groupId}</groupId> <!-- maven常用属性,即项目的groupId:com.cj.user -->
          <artifactId>user-core</artifactId>
          <version>0.0.1-SNAPSHOT</version> <!—可以使用${project.version}-->
      </dependency>
  </dependencies>
</dependencyManagement>

<!—添加管理插件-->
<build>
  <pluginManagement>
      <plugins>
          <plugin>
              <groupId>org.apache.maven.plugins</groupId>
               <artifactId>maven-help-plugin</artifactId>
              <version>2.1.1</version>
          </plugin>
          <plugin>
              <groupId>org.apache.maven.plugins</groupId>
               <artifactId>maven-source-plugin</artifactId>
               <version>2.2.1</version>
               <executions>
                    <execution>
                      <phase>package</phase>
                      <goals><goal>jar-no-fork</goal></goals>
                    </execution>
              </executions>
          </plugin>
      </plugins>
  </pluginManagement>
</build>
子模块user-core/pom.xml:
<parent>
  <groupId>com.cj.user</groupId>
  <artifactId>user-parent</artifactId>
  <version>0.0.1-SNAPSHOT</version>
  <relativePath>../user-parent/pom.xml</relativePath>
</parent>
<artifactId>user-core</artifactId>
<name>user-core</name>

<dependencies>
  <dependency> <!-- 不需要在加入<version>信息,从父pom.xml中继承得到具体版本信息-->
      <groupId>junit</groupId>
      <artifactId>junit</artifactId>
  </dependency>
</dependencies>

<build>
  <plugins>
      <plugin> <!-- 引用父pom.xml中设置的插件 -->
          <groupId>org.apache.maven.plugins</groupId>
          <artifactId>maven-help-plugin</artifactId>
      </plugin>
      <plugin>
           <groupId>org.apache.maven.plugins</groupId>
           <artifactId>maven-source-plugin</artifactId>
      </plugin>
  </plugins>
</build>
生命周期
clean清理,包含以下三个阶段/流程:pre-clean准备清理:执行一些需要在clean之前完成的工作clean清理:移除所有上一次构建生成的文件post-clean清理后:执行一些需要在clean之后立刻完成的工作
compile 编译,包含以下阶段:
validate验证generate-sources生成源文件process-sources处理源文件generate-resources生成资源文件process-resources处理资源文件(复制并处理,至目标目录,准备打包)compile编译源代码process-classes处理执行classes文件generate-test-sources生成测试源文件process-test-sources处理测试源文件generate-test-resources生成测试资源文件process-test-resources复制并处理资源文件,至目标测试目录。test-compile编译测试源代码。process-test-classes处理执行测试classes文件test使用合适的单元测试框架运行测试。这些测试代码不会被打包或部prepare-package预备打包package接受编译好的代码,打包成可发布的格式,如 JARpre-integration-testintegration-testpost-integration-testverifyinstall将包安装至本地仓库,以让其它项目依赖。deploy将最终的包复制到远程的仓库,以让其它开发人员与项目共享。
site 制作发布站点
- pre-site 执行一些需要在生成站点文档之前完成的工作
- site 生成项目的站点文档
- post-site 执行一些需要在生成站点文档之后完成的工作,并且为部署做准备
- site-deploy 将生成的站点文档部署到特定的服务器上
三套生命周期,互不关联,例如:
- 执行
mvn test则会从validate一直执行到test - 执行
mvn package则会从validate一直执行到package
插件
参考http://maven.apache.org/plugins/index.html
插件是maven的核心,对Maven而言,所有的操作都是基于插件来执行完成的,例如 :
- 执行
mvn clean, 实际是执行maven-clean-plugin:2.4.1:clean(maven-clean-plugin是插件,2.4.1是插件版本,clean即为插件目标) - 执行
mvn test,实际执行:- maven-resources-plugin:2.5:resources
- maven-compiler-plugin:2.3.2:compile
- maven-resources-plugin:2.5:testResources
- maven-compiler-plugin:2.3.2:testCompile
- maven-surefire-plugin:2.10:test
为了让一个插件中可以实现众多的类似功能,maven为插件开发设定不同的目标
- 一个插件中有可能有多个目标
- 其实生命周期中的重要的每个阶段都是由插件的一个具体目标来执行的
PS:
- 执行时所需插件,会自动下载到本地仓库中(存放位置:
E:\maven\myRepository\org\apache\maven\plugins) - 一般中央仓库中已含所需的插件,特殊情况下才手动开发自己所需的特定的插件(apache提供的插件帮助文档比较完整)
- Goal Prefix:前缀,方便快速找到使用插件
- eg:
maven-compiler-plugin插件的Goal Prefix为compiler,则可直接使用mvn compiler,maven会自动根据此前缀找到对应的插件
- eg:
举例: 在pom.xml中配置插件(这里未使用继承)
<build>
    <plugins>
        <!-- 在package之后运行maven-source-plugin插件的jar-no-fork目标,即执行mvn clean package后,会自动执行source:jar-no-fork -->
        <plugin>
            <groupId>org.apache.maven.plugins</groupId>
            <artifactId>maven-source-plugin</artifactId>
            <version>2.2.1</version>
             <executions>
                 <execution>
                      <phase>package</phase> <!-- @phase绑定在package之后执行-->
                      <goals><goal>jar-no-fork</goal></goals> <!-- @goal 目标 -->
                </execution>
            </executions>
        </plugin>
    </plugins>
</build>
通过maven下载jar包源码和javadoc
使用Maven命令下载 (需先进入到相应的pom.xml目录下)
- 尝试下载源码:
mvn dependency:sources - 尝试下载javadocs:
mvn dependency:resolve -Dclassifier=javadoc - 使用参数:
mvn dependency:sources -DdownloadSources=true -DdownloadJavadocs=true - 只要下载某个jar包的源代码或javadocs(配置pom.xml)
<dependency>
<groupId>com.sun.xml.ws</groupId>
<artifactId>jaxws-rt</artifactId>
<version>2.2.8-b13912</version>
<classifier>sources</classifier>
<classifier>javadoc</classifier>
</dependency>
- 尝试下载源码:
所有统一下载:通过配置文件添加(D:\maven\settings.xml) :
 <profiles>
 <profile>
     <id>downloadSources</id>
     <properties>
         <downloadSources>true</downloadSources>
         <downloadJavadocs>true</downloadJavadocs>
     </properties>
 </profile>
 </profiles>

 <activeProfiles>
   <activeProfile>downloadSources</activeProfile>
 </activeProfiles>
在Eclipse中构建的项目统一下载:
Window > Preferences > Maven and checking the "Download Artifact Sources" and "Download Artifact JavaDoc" options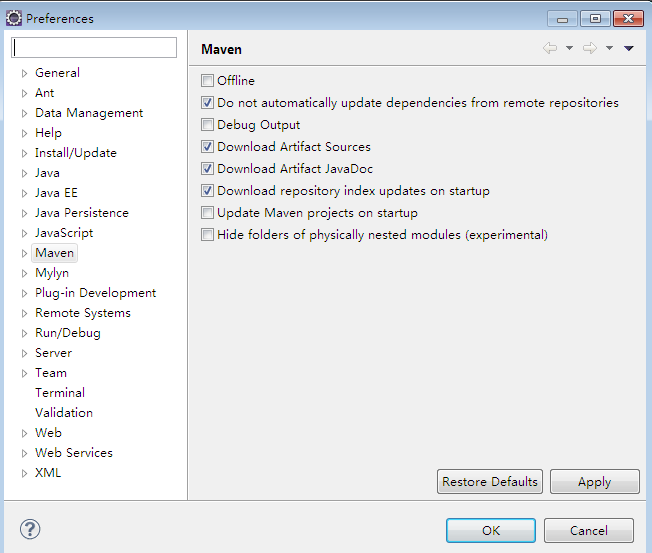
Maven 常用插件
测试
- 测试类需放于
src/test/java下 - 默认命名规则三种:
**/*Test,**/Test*,**/*TestCase,其他都不会执行测试操作 可使用
maven-surefire-plugin插件进行特定配置配置项目的pom.xml
<!-- 编译插件 --> <plugin> <groupId>org.apache.maven.plugins</groupId> <artifactId>maven-compiler-plugin</artifactId> <configuration> <source>1.6</source> <target>1.6</target> <!-- 编译跳过测试类,则测试类中有错误也不会报错 <skip>true</skip>--> </configuration> </plugin> <!-- 测试插件 --> <plugin> <groupId>org.apache.maven.plugins</groupId> <artifactId>maven-surefire-plugin</artifactId> <version>2.12.4</version> <configuration> <!-- 默认会执行:**/*Test,**/Test*,**/*TestCase 但使用include后则不会再包含默认的测试类,只会包含include中指定的测试类 --> <includes> <include>**/*Test.java</include> </includes> <!-- 运行时会跳过测试,不建议使用 <skip>true</skip> --> </configuration> </plugin>- 动态测试:在运行时手动指定测试类
mvn test -Dtest=HelloWorldmvn test -Dtest=Test*- 注意: 在配置surefire插件时如果指定版本号之后,动态测试会抛出异常
- 动态跳过测试:
mvn xxx -DskipTests(eg:mvn clean package -DskipTests) - 扩展:
- 测试报告,运行测试后,会在
target/surefire-reports/产生测试报告- 使用的是
surefire-report插件(surefire-report:report) - 两种格式:txt, 基于junit(可以junit的方式打开)
- 使用的是
- 测试覆盖率报告(cobertura插件),运行cobertura:cobertura
- 测试报告,运行测试后,会在
web发布
web发布使用的插件2种:
jetty (小型)
- 配置pom.xml
<plugin> <groupId>org.mortbay.jetty</groupId> <artifactId>jetty-maven-plugin</artifactId> <configuration> <scanIntervalSeconds>10</scanIntervalSeconds> <stopKey>foo</stopKey> <stopPort>9999</stopPort> <webApp> <contextPath>/MyEbike</contextPath> </webApp> <connectors> <connector implementation="org.eclipse.jetty.server.nio.SelectChannelConnector"> <port>9090</port> <maxIdleTime>60000</maxIdleTime> </connector> </connectors> </configuration> </plugin> - 可执行
jetty:start,jetty:run,jetty:stop
- 配置pom.xml
cargo(tomcat,jetty,jboss,...)
方式一:基于standalone方式:发布到独立空间中
<plugin>
  <groupId>org.codehaus.cargo</groupId>
  <artifactId>cargo-maven2-plugin</artifactId>
  <configuration>

      <!-- 配置Tomcat在本地的路径 -->
      <container>
          <containerId>tomcat7x</containerId>
          <home>D:\Soft\tomcat7</home>
      </container>

      <!-- 配置容器信息 -->
      <!--
      statndalone:独立运行,会在特定的目录加载相应的web项目,不会加载tomcat中原有的项目;
      home:希望加载路径的目录
      properties:可以设置相应的端口的配置
       -->
       <configuration>
          <type>standalone</type>
          <home>${project.build.directory}/tomcat7</home>
          <properties>
              <cargo.servlet.port>7676</cargo.servlet.port>
          </properties>
      </configuration>
  </configuration>
</plugin>
方式二:基于existing方式:发布到tomcat容器中(webapps下)
<plugin> <groupId>org.codehaus.cargo</groupId> <artifactId>cargo-maven2-plugin</artifactId> <configuration> <!-- 配置Tomcat在本地的路径 --> <container> <containerId>tomcat7x</containerId> <home>D:\Soft\tomcat7</home> </container> <!-- 配置容器信息 --> <!-- existing:会把项目发布到系统的Tomcat中的webapps中 home设置为系统的tomcat目录 --> <configuration> <type>existing</type> <home>D:\Soft\tomcat7</home> </configuration> </configuration> </plugin>- 可执行
cargo:start,cargo:run,cargo:stop
site发布
配置项目的pom.xml (在reporting中配置具体要生成的报告数据):
<reporting> <plugins> <!-- 生成基本站点 Generate standard project reports. --> <plugin> <groupId>org.apache.maven.plugins</groupId> <artifactId>maven-project-info-reports-plugin</artifactId> <version>2.6</version> <reportSets> <reportSet> <!-- 确定要生成哪些页面 --> <reports> <report>dependencies</report> <report>project-team</report> <report>mailing-list</report> <report>index</report> <report>issue-tracking</report> <report>license</report> <report>scm</report> </reports> </reportSet> </reportSets> </plugin> <!-- 生成测试报告 Generate a report based on the results of unit tests.--> <plugin> <groupId>org.apache.maven.plugins</groupId> <artifactId>maven-surefire-report-plugin</artifactId> <version>2.12.4</version> </plugin> <!-- 加入JavaDoc --> <plugin> <groupId>org.apache.maven.plugins</groupId> <artifactId>maven-javadoc-plugin</artifactId> <version>2.9</version> </plugin> <!-- 加入SourceXef,即生成源代码文档 --> <plugin> <groupId>org.apache.maven.plugins</groupId> <artifactId>maven-jxr-plugin</artifactId> <version>2.3</version> </plugin> <!-- 加入PMD,Generate a PMD report. --> <plugin> <groupId>org.apache.maven.plugins</groupId> <artifactId>maven-pmd-plugin</artifactId> <version>2.7.1</version> </plugin> <!-- 生成测试覆盖率报告(默认已有,可直接执行 cobertura:cobertura)--> <plugin> <groupId>org.codehaus.mojo</groupId> <artifactId>cobertura-maven-plugin</artifactId> <version>2.5.2</version> <configuration> <formats> <format>html</format> <format>xml</format> </formats> </configuration> </plugin> </plugins> </reporting>- 执行
mvn:site生成站点 ,会生成在target/site目录下
Maven 插件开发
- 创建一个mojo的maven项目(pom.xml中
为maven-plugin) New Maven Project->选择maven-archetype-mojo<groupId>org.konghao.maven</groupId> <artifactId>maven-hello-plugin</artifactId> <packaging>maven-plugin</packaging> <version>0.0.1-SNAPSHOT</version> <name>maven-hello-plugin Maven Mojo</name> <url>http://maven.apache.org</url> 编写一个继承自
AbstractMojo的类,并实现自己的execute方法(注释中不要使用中文)- 在类上加注释,定义相应的属性标志:目标
@goal,绑定周期@phase/** * Goal which touches a timestamp file. * @goal show * @phase test */ public class StatusFileMojo extends AbstractMojo {...} - 在成员变量上加注释:
@parameter表示通过configuration来配置,expression表示默认的表达式/** * @parameter expression="${project.build.directory}" * @required */ private File dir; /** * @paramter alias=d */ private boolean isDir=true; /** * @parameter */ private String[] files; - 实现execute方法
public void execute() throws MojoExecutionException, MojoFailureException {...} - 常用的Mojo标志:@goal,@phase,@parameter,@required,...
- 在类上加注释,定义相应的属性标志:目标
发布插件
clean install在某项目中使用已发布的插件
 <plugin>
     <groupId>xxxx</groupId>
     <artifactId>xxxx</artifactId>
     <version>xxxx</version>
     <executions>
         <!-- 默认绑定的生命周期在插件代码总使用@phase test定义-->
         <execution>
             <goals><goal>show<goal></goals>
             <phase>compile<phase>
         </execution>
     </execution>
     <configuration>
         <!-- 使用@parameter修饰的值-->
         <dir>D:/webservice</dir>
         <d>false</d>
         <files>
             <file>doc</file>
         <files>
     </configuration>
 </plugin>
运行插件:使用GAV全称调用 ( groupId:artifactId:版本:目标 -X)
- 若在setting.xml中配置了
<pluginGroup>xxx<pluginGroup>(插件的groupId),则可直接使用插件名称hello(插件artifactId的中间单词)运行,即hello:show
- 若在setting.xml中配置了