Starter
Git 是一个分布式版本控制系统
特点:
- 分布式
- 版本控制上保存完整文件而不是修改内容
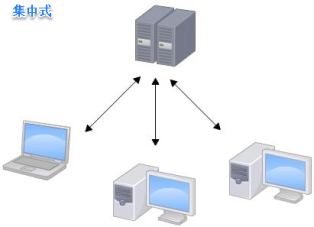
集中式vs分布式:
集中式:
- 版本库是集中存放在中央服务器,必须联网才能工作
- 若集中式版本控制系统的中央服务器要是出了问题,所有人都没法干活了
- eg:SVN,ClearCase
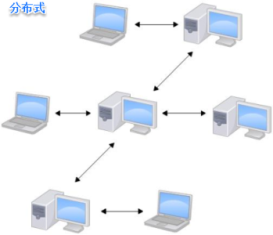
分布式:
- 每个人的电脑上都是一个完整的版本库,不需要联网就能工作(通常也有一台充当“中央服务器”的电脑,但这个服务器的作用仅仅是用来方便“交换”大家的修改,没有它大家也一样干活)
- 某一个人的电脑坏掉了不要紧,随便从其他人那里复制一个就可以了
- eg:Git,BitKeeper,Mercurial,Bazaar
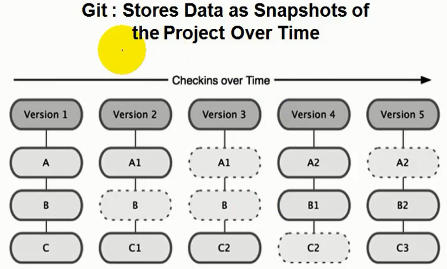
文件版本控制对比:
保存修改部分:f1,Diff.f (f2=f1+Diff.f)
- 节省磁盘空间,但加大计算量
- eg: SVN

保存全部:f1,f2
- 牺牲磁盘开销换取性能
- eg: Git
Git安装配置
安装:
Linux
- 方式1:
yum install git - 方式2:Git官网下载源码,解压,依次输入:
./config,make,sudo make install这几个命令安装
- 方式1:
Windows
- Git 官网下载安装
- 使用运行 "Git"->"Git Bash" ( 根目录在:
C:\Users\[username],ssh文件在:C:\Users\[username]\.ssh)
Mac
- 方式1:通过homebrew安装Git
- 方式2:从AppStore安装Xcode(Xcode集成了Git),运行Xcode,选择菜单
Xcode->Preferences->Downloads,选择Command Line Tools,点Install即可完成安装 - 方式2:Git官网下载安装
配置
Git的设置文件为
.gitconfig(全局),.git/config(项目):- 在用户主目录下的为全局配置文件
- 在项目根目录下的为当前项目的配置文件
使用
git config命令进行配置(注:加上--global,则表示全局配置;不加则表示当前项目配置)# 显示当前的Git配置 $ git config --list $ git config --list --global # 编辑Git配置文件 $ git config -e $ git config -e --global # 让Git显示颜色 $ git config color.ui true # 配置命令别名 $ git config alias.st status # 执行 git st 实际执行 git status $ git config alias.unstage 'reset HEAD' # 执行 git unstage test.py 实际执行 git reset HEAD test.py $ git config alias.lg "log --color --graph --pretty=format:'%Cred%h%Creset -%C(yellow)%d%Creset %s %Cgreen(%cr) %C(bold blue)<%an>%Creset' --abbrev-commit"注:Git是分布式版本控制系统,所以每个机器都必须自报家门:你的名字和Email地址
  # 设置提交代码时的用户信息(当前项目)
  $ git config user.name "Tom"
  $ git config user.email "tom@example.com"

  # 设置提交代码时的用户信息(全局)
  $ git config --global user.name "Tom"
  $ git config --global user.email "tom@example.com"

  # 查看全局配置文件
  $ cat ~/.gitconfig
  ...
  [user]
  name = Tom
  email = tom@example.com"
  ...
忽略特殊文件配置
.gitignore.gitignore放置在项目根目录下(即Workspace),本身也会被版本管理- 把要忽略的文件写入文件,Git就会自动忽略这些文件
  .DS_Store
  Thumbs.db
  db.json
  *.log
  node_modules/
  public/
  .deploy*/
  test*
  package-lock.json
Git 远程仓库
Git是分布式版本控制系统,同一个Git仓库,可以分布到不同的机器上 实际情况一般是找一台电脑充当服务器的角色,每天24小时开机,每个人从这个“服务器”仓库克隆一份到自己的电脑上,并且各自把各自的提交推送到服务器仓库里,也从服务器仓库中拉取别人的提交
搭建Git服务器:
- 安装git
yum install git - 创建一个git账户
adduser git - 创建证书(公钥)并导入:
/home/git/.ssh/authorized_keys/id_rsa.pub - 初始化git仓库:
$ git init --bare sample.git # 创建一个裸仓库,无工作区,服务器上的Git仓库通常都以.git结尾 $ chown -r git:git sample.git # owner改为git用户 - 创建的git用户禁用shell登录(但仍可通过ssh使用git),修改
/etc/passwd文件# git:x:1001:1001:,,,:/home/git:/bin/bash git:x:1001:1001:,,,:/home/git:/usr/bin/git-shell # 为git用户指定的git-shell每次一登录就会自动退出,达到禁用shell登录的目的 - 克隆远程仓库
$ git clone git@server:/srv/sample.git - 管理公钥,可使用Citosis; 管理权限,可使用Gitolite
现成的Git服务器Github (还有其他,例如:bitbucket,gitee)
- 提供Git仓库托管服务的,只要注册一个GitHub账号,就可以免费获得Git远程仓库
- 还是一个开源协作社区,既可以让别人参与你的开源项目,也可以参与别人的开源项目
- 在GitHub上免费托管的Git仓库,任何人都可以看到(但只有你自己才能改)
- 不想让别人看到Git库:出钱让GitHub把公开的仓库变成私有的(或者自己动手搭一个Git服务器)
- 应用举例:参与一个开源项目,比如人气极高的bootstrap项目,访问它的项目主页
- 可直接clone到本地:
git clone https://github.com/twbs/bootstrap - 可点
Fork克隆一份到自己账户中,然后clone到本地:git clone git@github.com:cj/bootstrap.git,之后的修改即可往自己账户推送(如果希望原作者能接受你的修改,可以在GitHub上发起一个pull request -- Gitlab里面叫做Merge Request,等待他的同意)
- 可直接clone到本地:
SSH Key: 本地Git仓库和GitHub仓库之间的传输是通过SSH加密的,GitHub需要识别出你推送的提交确实是你推送的,而不是别人冒充的,所以需要在GitHub中配置自己的公钥。设置步骤:
在本地创建SSH Key:
$ ssh-keygen -t rsa -C "youremail@example.com"- 会在在用户主目录的
.ssh目录下生成SSH Key秘钥对- 公钥
id_rsa.pub(公钥=锁), 可以放心地告诉任何人 - 私钥
id_rsa(私钥=钥匙),不能泄露出去
- 公钥
- 注:TortoiseGit SSH 需使用putty key generator工具转换下使用
- 会在在用户主目录的
登陆GitHub,设置SSH key:
Account settings->SSH Keys页面Add SSH Key-> 填上任意Title,在Key文本框里粘贴在本地创建的公钥id_rsa.pub内容
测试公钥:
 # ssh git@[git服务器地址]
 $ ssh git@github.com
 PTY allocation request failed on channel 0
 Hi chenjin-zero! You've successfully authenticated, but GitHub does not provide shell access.
 Connection to github.com closed.
Hello world
# 1. 新建一个目录,将其初始化为Git代码库
> git init hello
Initialized empty Git repository in D:/Space/hello/.git/

# 2. 新建一个文件,并查看当前git版本库状态
> cd hello
> vi 1.txt
Hello
> git status
On branch master
No commits yet
Untracked files:(use "git add <file>..." to include in what will be committed)
        1.txt
nothing added to commit but untracked files present (use "git add" to track)

# 3. 添加该文件到暂存区,查看当前git版本库状态
> git add 1.txt
> git status
On branch master
No commits yet
Changes to be committed:
  (use "git rm --cached <file>..." to unstage)
        new file:   1.txt

# 4. 提交(文件从暂存区提交到仓库区),查看提交日志
> git commit -m "commit 1.txt:hello"
[master (root-commit) fce12e6] commit 1.txt:hello
 1 file changed, 1 insertion(+)
 create mode 100644 1.txt
> git log
commit fce12e6529331f3b60b7ebd26b5d3296d37989ca (HEAD -> master)
Author: tom <tom@example.com>
Date:   Sun May 28 14:04:16 2017 +0800
    commit 1.txt:hello

# 5. 添加远程仓库,上传本地仓库所有分支代码到远程仓库的对应分支上(先在GitHub上新建一个Repository:hello)
> git remote add origin git@github.com:sixDegree/hello.git
> git push -u origin master
基本使用
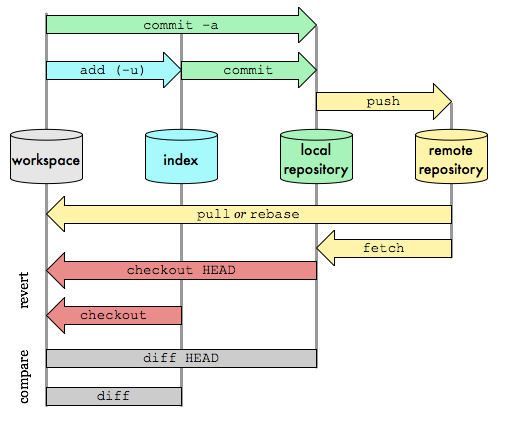
- Workspace:工作区
./ - Index/Stage:暂存区
./.git/index - Local Repository:仓库区(本地仓库)
./.git/objects/ - Remote Repository:远程仓库(eg:Github)
Workspace & Stage
将Workspace改动文件添加到Stage:
git add$ git add [file1] [file2] ... # 指定文件 $ git add [dir] # 指定目录(包括其下的子目录) $ git add . # 所有 $ git add -p # 添加前询问(对于同一个文件的多处变化,都会要求确认,可以实现分次提交) # eg: > git add -p diff --git a/1.txt b/1.txt index 5ab2f8a..5e1c309 100644 --- a/1.txt +++ b/1.txt @@ -1 +1 @@ -Hello \ No newline at end of file +Hello World \ No newline at end of file Stage this hunk [y,n,q,a,d,e,?]? y删除Stage上的文件:
git rm$ git rm [file1] [file2] ... # 同时删除Workspace中的文件 $ git rm --cached [file] # 保留Workspace中的文件重命名文件,并同步到Stage:
git mv$ git mv [file-original] [file-renamed]丢弃Workspace的修改:
git checkout,git clean,git reset --hard# 检出 # 恢复Stage的内容到Workspace $ git checkout [file] $ git checkout . # 恢复commit的内容到Stage和Workspace $ git checkout [commit] [file] # 清空暂存区,将某次commit内容恢复到Stage和workspace $ git reset --hard [commit] $ git clean -df # git clean 参数: # -n :显示将要删除的文件和目录 # -f :删除文件 # -df :删除文件和目录 # 结合使用: $ git checkout . && git clean -df查看Workspace/Stage的变更文件
 $ git status                     # 显示变更文件( Workspace & Stage)
 $ git blame [file]                # 显示指定文件最近修改信息(何人何时修改内容)

 # eg:
 $ git blame 1.txt
 0cca4885 (chenjin.zero 2017-5-28 17:41:33 +0800 1) Hello world

 $ vi 1.txt
 Hello world!

 $ git status
 On branch master
 Changes not staged for commit:
   (use "git add <file>..." to update what will be committed)
   (use "git checkout -- <file>..." to discard changes in working directory)
         modified:   1.txt
 no changes added to commit (use "git add" and/or "git commit -a")

 $ git blame 1.txt
 00000000 (Not Committed Yet 2017-5-28 17:56:18 +0800 1) Hello world!
暂存Workspace & Stage:
git stash$ git stash # 存储当前状态,之后可切换分支 $ git stash list # 查看储存状态列表 $ git stash apply xxx # xxx为储存状态的名字,恢复到之前存储的工作状态 $ git stash drop xxx # xxx删除暂存 $ git stash pop # 恢复最新保存的工作状态,并从stash list中删除示例:
- 初始化
 $ git init git-demo
 $ cd git-demo
workspace -> stage -> repository,git status信息
 # wokspace:新添文件1.txt (red: untracked)
 $ vi 1.txt
 Hello
 $ git status --short
 ?? 1.txt

 # workspace -> stage (green: tracked Add)
 $ git add 1.txt
 $ git status
  A  1.txt

 # stage -> repository (clean)
 $ git commit -m "add 1.txt:Hello"
 $ git status
 On branch master
 nothing to commit, working directory clean

 # workspace: 修改文件1.txt (red: untracked Modified)
 $ vi 1.txt
 Hello World
 $ git status --short
  M 1.txt

 # workspace -> stage (green: tracked Modified)
 $ git add 1.txt
 $ git status --short
  M 1.txt

 # stage -> repository (clean)
 $ git commit -m "update 1.txt:Hello World"
 $ git status
 On branch master
 nothing to commit, working directory clean
checkout file: workspace <- stage(clean)
 $ git status
 On branch master
 nothing to commit, working directory clean
 $ vi 1.txt
 Bye

 $ git checkout 1.txt         # 相当于从最新commit中取出1.txt恢复到workspace
 $ cat 1.txt
 Hello World
checkout file: workspace <- stage(green: tracked Modified)
 $ vi 1.txt
 Bye
 $ git add 1.txt
 $ git status --short
  M 1.txt

 $ git checkout 1.txt         # doesn't work: current 1.txt in workspace and stage are same
 $ cat 1.txt
 Bye
checkout commit file: workspace & stage(green: tracked Modified) <- commit
 $ git log --pretty=oneline
 fb90565e34d81cb049d3959152f606ef011930cb update 1.txt:Hello World
 f719e07e6a4ac4422a76602fea0f6456becbf81d add 1.txt:Hello

 $ vi 2.txt
 Keep
 $ git add 2.txt
 $ git status --short
  M 1.txt
  A 2.txt

 $ cat 1.txt
 Bye
 $ git checkout fb90565 1.txt    # 从某个commit中取出1.txt恢复到workspace
 $ cat 1.txt
 Hello World
 $ git status                    # Note
  A 2.txt
注意:尽量不要使用
git checkout [commit],会有HEAD detached问题$ cat 1.txt Bye $ git checkout fb90565 # 会进入‘detached HEAD’ status,创建了一个临时的branch M 1.txt A 2.txt Note: checking out 'fb90565'. You are in 'detached HEAD' state. You can look around, make experimental changes and commit them, and you can discard any commits you make in this state without impacting any branches by performing another checkout. If you want to create a new branch to retain commits you create, you may do so (now or later) by using -b with the checkout command again. Example: git checkout -b <new-branch-name> HEAD is now at fb90565... update 1.txt:Hello World $ git status HEAD detached at fb90565 nothing to commit, working direct $ git branch -v # 当前进入了一个临时的branch * (HEAD detached at fb90565) fb90565 update 1.txt:Hello World master fb90565 update 1.txt:Hello World $ cat 1.txt # 1.txt的内容没有恢复到Hello World Bye # 修正问题:切换回maste主分支(workspace和stage还和checkout前一样,没有改变) $ git checkout master Switched to branch 'master' $ git branch -v * master fb90565 update 1.txt:Hello World
- 初始化
Local Repository
提交代码(Stage提交到local Repository)
 $ git commit [file1] [file2] ... -m [message]
 $ git commit -m [message]
 $ git commit -v                                # 提交时显示所有diff信息

 # 追加替代上次提交
 $ git commit --amend -m [message]
 $ git commit --amend [file1] [file2] ...

 # git add . + git commit
 $ git commit -a    -m [message]
列出当前分支的提交历史
 # 显示从最近到最远的提交日志(从当前分支`HEAD`指向的版本开始,到最早的commit记录)
 $ git log
 $ git log -3                    # 列出过去3次commit的记录
 $ git log --pretty=oneline        # 每个commit显示一行(commit_id commit_message)
 $ git log --grep xxx            # 对commit_message进行过滤
 $ git log --stat                # 附加显示变更的文件
 $ git log --follow [file]        # 追踪某个文件的commit历史 (也可使用git whatchanged [file])
 $ git log -p [file]                # 附加显示某个文件commit的diff内容

 $ git shortlog                    # 列出commit_message(按提交用户分组显示)
 $ git reflog                    # 列出当前分支的每一次命令
查看某次提交的具体内容(包括commit信息,文件修改对比)
 $ git show [commit]                        # 显示某次提交的元数据和内容变化
 $ git show [commit]:[filename]            # 显示某次提交的某个文件的内容
 $ git show --name-only [commit]            # 只显示变化的元数据,文件信息
版本穿梭切换(恢复到某一次提交版本):
git reset$ git reset [--mixed/--soft/--hard] [commit] [file]--mixed: 默认方式,清空暂存区,将某次commit内容恢复到Stage(Workspace不变)--soft:不清空暂存区,将某次commit内容恢复到Stage(Workspace不变)--hard:清空暂存区,将某次commit内容恢复到Stage和workspace[commit]: SHA1值,可用git log查看到看到,也可用HEAD表达(HEAD表示当前版本,HEAD^即为上一版本,HEAD^^为上上一个版本,HEAD~100为往上第100个版本)
撤销(回滚到某次commit之前):
git revert$ git revert [commit]- 用一个新commit来消除一个历史提交所做的任何修改:会提交一个新的版本,将需要revert的版本的内容反向修改回去
- 版本会递增,不影响之前提交的内容
- 撤销后,可能会造成代码冲突,需要手动修改后提交代码
示例:
初始化,提交2次变更
 $ git init git-demo
 $ cd git-demo

 $ vi 1.txt
 Hello
 $ git add 1.txt
 $ git commit -m "add 1.txt:Hello"

 $ vi 2.txt
 World
 $ git add 2.txt
 $ git commit -m "add 2.txt:World"
查看提交记录
 $ git log --pretty=oneline
 49a932721eb24308b131cb62db697a85a3b1a456 add 2.txt:World
 7fa871802e26f696a30df2af3fafbc64ddefbf1c add 1.txt:Hello

 $ git shortlog
 sixDegree (2):
       add 1.txt:Hello
       add 2.txt:World

 $ git reflog
 49a9327 HEAD@{0}: commit: add 2.txt:World
 7fa8718 HEAD@{1}: commit (initial): add 1.txt:Hello

 $ git show 7fa8718
 ommit 7fa871802e26f696a30df2af3fafbc64ddefbf1c
 Author: sixDegree <chenjin.zero@163.com>
 Date:   Wed Oct 31 22:26:43 2018 +0800

     add 1.txt:Hello

 diff --git a/1.txt b/1.txt
 new file mode 100644
 index 0000000..e965047
 --- /dev/null
 +++ b/1.txt
 @@ -0,0 +1 @@
 +Hello
reset
 $ git reset --hard 7fa8718
 HEAD is now at 7fa8718 add 1.txt:Hello
 $ ls            # 重置回commit-1 的状态:只有1.txt
 1.txt
 $ git log --pretty=oneline
 7fa871802e26f696a30df2af3fafbc64ddefbf1c add 1.txt:Hello

 $ git reset --hard 49a9327
 HEAD is now at 49a9327 add 2.txt:World
 $ ls
 1.txt    2.txt
 $ git log --pretty=oneline
 49a932721eb24308b131cb62db697a85a3b1a456 add 2.txt:World
 7fa871802e26f696a30df2af3fafbc64ddefbf1c add 1.txt:Hello

 $ git reflog
 49a9327 HEAD@{0}: reset: moving to 49a9327
 7fa8718 HEAD@{1}: reset: moving to 7fa8718
 49a9327 HEAD@{2}: commit: add 2.txt:World
 7fa8718 HEAD@{3}: commit (initial): add 1.txt:Hello
revert
 $ git revert 7fa8718
 [master 536ba3b] Revert "add 1.txt:Hello"
  1 file changed, 1 deletion(-)
  delete mode 100644 1.txt
 $ ls        # 反向commit-1的操作:原本commit-1创建的1.txt不见了,但commit-2创建的2.txt依然保留着
 2.txt

 $ git log --pretty=oneline
 536ba3b5e47a57e4cbf3c6b49f30b5a3deaaae3f Revert "add 1.txt:Hello"
 49a932721eb24308b131cb62db697a85a3b1a456 add 2.txt:World
 7fa871802e26f696a30df2af3fafbc64ddefbf1c add 1.txt:Hello

 $ git reflog
 536ba3b HEAD@{0}: revert: Revert "add 1.txt:Hello"
 49a9327 HEAD@{1}: reset: moving to 49a9327
 7fa8718 HEAD@{2}: reset: moving to 7fa8718
 49a9327 HEAD@{3}: commit: add 2.txt:World
 7fa8718 HEAD@{4}: commit (initial): add 1.txt:Hello
git reset vs. git revert
git reset重置- 修改HEAD的位置,将HEAD指向的位置改变为之前存在的某个版本(HEAD是向后移动的)
- workspace不会叠加目标版本后面的提交,即目标版本后的提交无效了
- reset后,
git log最新的commit记录(HEAD指向)为回退到的那个目标版本(但仍可使用git reflog找到之后的commit记录并reset到某个commit) - 一般操作流程:
  $ git reset --hard [commit]
  $ git push -f        # 本地库HEAD指向的版本比远程库的要旧,需使用-f强制推送
git revert回滚- 创建一个新的版本(反向目标版本的操作),将HEAD指针是指向这个新生成的版本(用一次新的commit来回滚之前的commit, HEAD是一直向前的)
- workspace会保留目标版本之后的提交,即目标版本后的提交依然有效
- revert后,
git log最新的commit记录(HEAD指向)为一个新的commit - 一般操作流程(revert后可能会造成代码冲突,需要手动修改后提交代码):
  $ git revert [commit]
  $ vi [file]
  $ git add [file]
  $ git commit [file]
  $ git push
Remote Repository
查看远程库:
git remote$ git remote -v # 显示所有远程仓库(参数-v显示详细信息) $ git remote show [remote] # 显示某个远程仓库的信息 # eg: $ git remote show origin $ git remote show origin * remote origin Fetch URL: git@gitee.com:sixDegree/git-demo.git Push URL: git@gitee.com:sixDegree/git-demo.git HEAD branch: master Remote branch: master tracked Local branch configured for 'git pull': master merges with remote master Local ref configured for 'git push': master pushes to master (up to date)添加/删除/重命名远程仓库:
 $ git remote add [name] [url]
 $ git remote remove [name]
 $ git remote rename [old] [new]
从远程抓取到本地:
 $ git clone [url]                    # 克隆远程版本库到本地新目录(一般初始化时使用)
 $ git fetch [remote]                # 下载远程仓库的所有变动
 $ git pull [remote] [branch]        # 取回远程仓库的变化,并与本地分支合并(=git fetch + merge to local)
推送本地仓库内容到远程仓库:
 $ git push                                             # 默认推送本地的master分支,到远程仓库的master分支
 $ git push [remote] [local-branch]                    # 推送指定分支到远程仓库
 $ git push [remote] [local-branch]:[remote-branch]     # 推送指定分支到远程仓库的某个分支
 $ git push [remote] --force                            # 强行推送,即使有冲突
 $ git push [remote] --all                            # 推送所有分支

 # eg:
 $ git push origin test:master        # 推送本地test分支到远程master分支
 $ git push origin test:test            # 推送本地test分支到远程test分支
 $ git push origin :test             # 删除远程的test分支(本地的会保留)
 $ git push -u origin master         # -u参数,推送并关联远程分支(之后就可不加参数直接使用git push了)
 $ git push -f                        # -f参数,表示强制推送
示例:
 $ git init git-demo
 $ cd git-demo
 $ git remote add origin https://github.com/sixDegree/git-demo.git
 $ git push -u origin master

 $ vi README.txt
 This is for git demo.
 $ git add .
 $ git commit -m "first commit"
 $ git push
对比变更
$ git diff [file]                                # workspace vs stage
$ git diff --cached                                # stage vs latest commit

$ git diff [commit]                                # workspace vs commit
$ git diff [commit-1]...[commit-n]                # commit1 vs commit2 vs commitN
分支 & 标签
分支:
- 使用git的每次提交,Git都会自动把它们串成一条时间线,这条时间线就是一个分支
- HEAD指针:指向当前分支(只有一个分支的情况下指向master分支),每次提交后 HEAD 随着分支一起向前移动,使用
git checkout命令切换到本地其他分支(即修改HEAD指针指向) - Git 中的分支实际上仅是一个包含所指对象校验和(SHA-1)的文件,与项目复杂度无关,可以在几毫秒的时间内完成分支的创建和切换
标签:
- 版本库的快照,指向commit
- vs branch: 分支可以移动,标签不能移动
本地分支
列出分支(当前分支前面会标一个*号)
 $ git branch                                            # 列出所有本地分支
 $ git branch -v                                            # 会列出各个分支最后一个提交对象的信息(show hash and subject)
 $ git branch -vv                                        # 还会显示跟踪分支(即从哪个远程分支检出的)
 $ git branch --merged/--no-merged                        # 筛选出已经(或尚未)与当前分支合并的分支(即可以列出当前分支的直接上游)
新建分支
$ git branch [branch] [start-point] # 新建分支(start-point可省略),注:还在原分支切换分支
 $ git checkout [branch]                          # 切换到指定分支 (git checkout - 表示切换到上一个分支)
 $ git checkout -b [branch] [start point]         # 新建并切换分支 (= git branch [branch] [start-point] + git checkout [branch])
合并分支:
merge$ git merge [branch] # 合并某个分支到当前分支,如果可能,Git会用使用Fast forward模式 $ git merge --no-ff -m "xxxx" [branch] # 使用--no-ff禁用fast forward- Fast forward: 如果顺着一个分支走下去可以到达另一个分支,不存在任何需要解决的分歧,Git会简单地把HEAD指针右移,这种合并过程即为Fast forward
- Fast forward的merge方式:不会产生新的commit,从commit历史记录上看不出曾经做过merge
C2 hotfix / C0---C1 master => C0---C1---C2 hotfix/master - 非fast forward的merge方式:会产生一个新的commit,从commit历史记录上可以看出曾经做过merge
               C3 topic                            C3 topic
              /                                   /        \
  C0---C1---C2---C4 master    =>      C0---C1---C2---C4---C5 master
分支变基(得到一个更加简洁的提交历史):
rebase$ git rebase [upstream] [branch] --onto [newbase] $ git rebase --continue/skip/abort/quit # 当rebase时遇到conflict,可执行的操作 C3 topic / C0---C1---C2---C4 master => C0---C1---C2---C4---C3' topic/master- 变基rebase:将某段变化连同HEAD重演到一个新的分支上(之后分支和目标分支的HEAD,都会指向目标分支的最新commit上,两条线连同根基并成了一条线)
- 过程:取出branch与upstream分支共同祖先后的变化,生成一组补丁,以newbase分支的最后一个提交对象为新的出发点,重演(逐个应用之前准备好的补丁),生成新的合并提交对象,从而改写 branch的提交历史,使它成为 newbase 分支的直接下游
- 结果:rebase后产生的commit与merge三方合并产生的commit,都会得到相同的快照内容,只是提交历史不同:rebase能产生一个更为整洁的提交历史,仿佛所有修改都是在一根线上先后进行的,尽管实际上它们曾经是并行发生的
- 注:执行上,rebase是将修改按次序重演一遍,而merge是把最终结果合在一起
git rebase server client --onto master: 取出 client 分支,找出 client 分支和 server 分支的共同祖先之后的变化,然后把它们在 master 上重演一遍git rebase master server: 取出server分支在主分支 master后的变化,重演在主分支 master 上 (server 分支变基到 master,不用手工切换到 server 分支后再执行)git rebase -i [after-this-commit]: 以交互式的方式(可以将选取的多个commit合并为一个commit再继续),选取需要commit重演进当前分支(跟git cherry-pick类似)
择优挑选:
cherry-pick$ git cherry-pick [commit1] [commit2] ... # 选择几个commit,重演进当前分支删除分支(对于已经merge了,或者不再需要的branch,可以删除)
$ git branch -d [branch] # 删除分支注:在合并branch时,若发生conflict,需手动修正后重新
git add->git commit -m示例: merge vs rebase
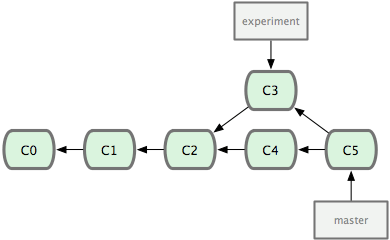
merge# P1.1: create branch $ git commit -m "C2" $ git checkout -b experiment $ git commit -m "C3" # P1.2: back to master and new commit $ git checkout master $ git commit -m "C4" # P2: merge $ git checkout master $ git merge experiment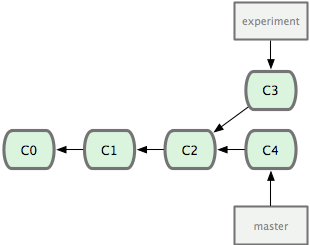 =>
=> 
rebase# P1.1: create branch $ git commit -m "C2" $ git checkout -b experiment $ git commit -m "C3" # P1.2: back to master and new commit $ git checkout master $ git commit -m "C4" # P2: rebase $ git checkout experiment $ git rebase master # P3: merge (fast-forwad) $ git checkout master $ git merge experiment
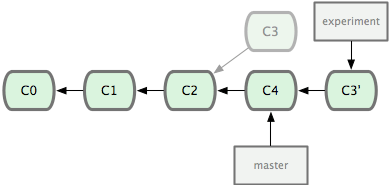 =>
=> 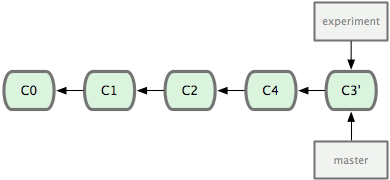
合并完,可以删除不再需要的branch
$ git branch -d experiment
示例: 解决合并冲突 (解决冲突后,再提交,才算完成合并)
# 步骤:
# 1. git merge feature1     # fail
# 2. vim readme.txt            # 手动编辑
# 3. git add readme.txt        # 标记已解决冲突
# 4. git commit -m 'xxxxx'     # 提交

# 1.执行merge,发现发生合并冲突
$ git merge feature1
Auto-merging readme.txt
CONFLICT (content): Merge conflict in readme.txt
Automatic merge failed; fix conflicts and then commit the result.

# 2.git status 查看冲突的文件
$ git status
 On branch master
 Your branch is ahead of 'origin/master' by 2 commits.

 Unmerged paths:
   (use "git add/rm <file>..." as appropriate to mark resolution)#
       both modified:      readme.txt#
no changes added to commit (use "git add" and/or "git commit -a")

# 3.查看冲突文件的内容
$ cat readme.txt
Git is a distributed version control system.
Git is free software distributed under the GPL.
Git has a mutable index called stage.
Git tracks changes of files.
<<<<<<< HEAD
Creating a new branch is quick & simple.
=======Creating a new branch is quick AND simple.
>>>>>>> feature1

# 4.手动修改冲突文件内容
$ vi readme.txt

# 5.再提交
$ git add readme.txt
$ git commit -m "conflict fixed"
[master 59bc1cb] conflict fixed

# 6.删除feature1分支
$ git branch -d feature1
Deleted branch feature1 (was 75a857c).

# 7. 查看分支合并图:
$ git log --graph --pretty=oneline --abbrev-commit
*   59bc1cb conflict fixed
|\
| * 75a857c AND simple
* | 400b400 & simple
|/
* fec145a branch test
...
远程分支
Refer Git 分支 - 远程分支
远程分支(remote branch):
- 无法移动的本地分支, 是对远程仓库中的分支的索引,像是书签,标识上次连接远程仓库时上面各分支的位置,只有在 Git 进行网络交互时才会更新。
- 本地用
远程仓库名/分支名表示远程分支,是一个不可修改的指针 - eg:
origin/master
跟踪分支:
- 从一个远程跟踪分支检出一个本地分支时创建的分支(有时也叫做 “上游分支”),且始于远程分支相同的位置
- 是与远程分支建立了关联关系的本地分支(在跟踪分支上输入
git pull,Git 能自动地识别去哪个服务器上抓取、合并到哪个分支) 注:
- 当克隆一个仓库时(
git clone [url]),本地会自动地创建一个跟踪origin/master的master分支 抓取新的远程跟踪分支时(
git fetch [remote]),本地不会自动创建对应的跟踪分支(即不会生出一份可编辑的副本,只会有一个不可修改的远程分支指针),如果想要在自己的分支上工作,可创建一个,eg:$ git fetch origin # 创建用于工作的本地分支,并且起点位于 origin/serverfix $ git checkout -b serverfix origin/serverfix Branch serverfix set up to track remote branch serverfix from origin. Switched to a new branch 'serverfix' # 也可以使用 --track简化创建: $ git checkout --track origin/serverfix Branch serverfix set up to track remote branch serverfix from origin. Switched to a new branch 'serverfix' # 也可创建一个不同名字的本地分支: $ git checkout -b sf origin/serverfix # 这样本地分支 sf 会自动从 origin/serverfix 拉取 Branch sf set up to track remote branch serverfix from origin. Switched to a new branch 'sf' # 也可使用git branch: $ git branch -u sf origin/serverfix Branch sf set up to track remote branch serverfix from origin
- 当克隆一个仓库时(
常用命令:
 # 列出分支
 $ git branch -r                                                # 列出所有远程分支
 $ git branch -a                                                # 列出所有本地分支和远程分支

 # 创建跟踪分支(与指定的远程分支建立追踪关系)
 $ git checkout -b [branch] [remote/branch]                    # 新建一个本地跟踪分支并切换
 $ git checkout --track [remote/branch]                        # 上面那种的简写方式
 $ git branch -u/--set-upstream-to [branch] [remote/branch]    # 重置本地与分支远程分支关系

 # 拉取
 # 下载远程仓库的变化,并与本地分支合并
 # =git fetch + git merge (如果使用--rebase,则使用git rebase代替git merge)
 $ git pull [remote] [branch]

 # 推送分支到远程
 # 可使用-u参数保存与远程分支的关联,以后直接使用git push;
 # 如果合并有冲突,则手动解决冲突后,提交再推送
 $ git push [remote/branch] [branch]
 $ git push [remote] [local-branch]:[remote-branch]

 # 删除远程分支
 $ git branch -dr [remote/branch]
 $ git push [remote] --delete [remote-branch]
 $ git push [remote] :[remote-branch]
注:本地的分支并不会自动与远程仓库同步,必须显式地推送/拉取
标签
版本库的快照,指向commit(vs branch: 分支可以移动,标签不能移动)
查看标签:
 $ git tag                                        # 列出所有tag
 $ git show [tag]                                # 查看tag信息
创建标签(注:tag名不能重复):
 $ git tag [tag]                                 # 在当前commit创建一个tag
 $ git tag [tag] [commit]                         # 在指定commit创建一个tag
 $ git tag -a [tag] -m "blablabla..." [commit]     # 指定标签信息:-a指定标签名,-m指定说明文字
 $ git tag -s [tag] -m "blablabla..." [commit]     # 用PGP签名标签: -s用私钥签名一个标签
删除标签:
 $ git tag -d [tag]                                # 删除本地tag
 $ git push origin :refs/tags/[tagName]            # 删除远程tag
推送标签到远程仓库:
 $ git push [remote] [tag]                        # 推送指定tag
 $ git push [remote] --tags                         # 推送所有tag
示例:
 # 1. 创建标签(轻量级,一个指向commit的指针 -> 不会产生新的object)
 $ git tag v1.0

 $ git tag                                           # 列出标签
 v1.0
 $ git show v1.0                                      # 查看标签信息
 commit 82805fdf505a56eb0164917a0a91c0b2b138f3b0
 Author: Cj <chenjin.zero@163.com>
 Date:   Tue Jul 28 10:17:46 2015 +0800
     First Commit
 diff --git a/hello.txt b/hello.txt
 new file mode 100644
 index 0000000..1d3d0f2
 --- /dev/null
 +++ b/hello.txt
 @@ -0,0 +1 @@
 +Hello,world!

 # 2. 删除本地标签
 $ git tag -d v1.0
 Deleted tag 'v1.0' (was 82805fd)

 # 3. 创建标签(重量级,一个包含tag信息的object -> 会产生新的object)
 $ git tag -a v1.1 -m "First Version Released"

 $ git tag                                             # 列出标签
 v1.1
 $ git show v1.1                                        # 查看标签信息
 tag v1.1
 Tagger: Cj <chenjin.zero@163.com>
 Date:   Wed Jul 29 11:18:45 2015 +0800
 First Version Released
 commit 82805fdf505a56eb0164917a0a91c0b2b138f3b0
 Author: Cj <chenjin.zero@163.com>
 Date:   Tue Jul 28 10:17:46 2015 +0800
     First Commit
 diff --git a/hello.txt b/hello.txt
 new file mode 100644
 index 0000000..1d3d0f2
 --- /dev/null
 +++ b/hello.txt
 @@ -0,0 +1 @@
 +Hello,world!
Git原理
版本库
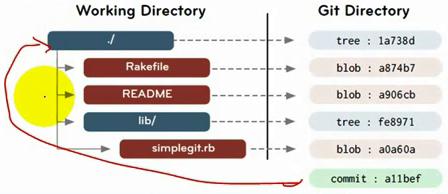
Git 版本库,有三个区域:
- Workspace: 工作区 `./`
- Index/Staging: 暂存区
./.git/index - Repository(local): 本地仓库
./.git/objects/
> git init gitDemo                                 # 1.初始化一个Git仓库(把这个目录变成 Git可以管理的仓库)
Initialized empty Git repository in /home/jinc/demo/gitDemo/.git/

> cd gitDemo
> vi hello.txt
Hello,world!

> git add hello.txt                               # 2.将文件加入Stage暂存
> git commit -m 'First Commit'                    # 3.将Stage中数据提交当前分支
[master (root-commit) 82805fd] First Commit
 1 files changed, 1 insertions(+), 0 deletions(-)
 create mode 100644 hello.txt

> ls -al                                                          # Workspace 工作区
total 4
drwxr-xr-x+ 1 512291 mkgroup 0 Jul 28 09:33 .
drwxr-xr-x+ 1 512291 mkgroup 0 Jul 28 09:33 ..
drwxr-xr-x+ 1 512291 mkgroup 0 Jul 28 09:33 .git                  # 隐藏目录,git版本库

> ls -al .git
total 17
drwxr-xr-x+ 1 512291 mkgroup   0 Jul 28 09:58 .
drwxr-xr-x+ 1 512291 mkgroup   0 Jul 28 09:55 ..
-rw-r--r--  1 512291 mkgroup  13 Jul 28 09:58 COMMIT_EDITMSG
-rw-r--r--  1 512291 mkgroup 111 Jul 28 09:33 config
-rw-r--r--  1 512291 mkgroup  73 Jul 28 09:33 description
-rw-r--r--  1 512291 mkgroup  23 Jul 28 09:33 HEAD
drwxr-xr-x+ 1 512291 mkgroup   0 Jul 28 09:33 hooks
-rw-r--r--  1 512291 mkgroup 104 Jul 28 09:55 index              # Index/Stage 暂存区
drwxr-xr-x+ 1 512291 mkgroup   0 Jul 28 09:33 info
drwxr-xr-x+ 1 512291 mkgroup   0 Jul 28 09:58 logs
drwxr-xr-x+ 1 512291 mkgroup   0 Jul 28 09:58 objects            # Repostory(local) 本地仓库
drwxr-xr-x+ 1 512291 mkgroup   0 Jul 28 09:33 refs

> cat .git/HEAD           # 指向当前分支,默认分支master
ref: refs/heads/master

> ls -al .git/objects     # 存放git对象
total 4
drwxr-xr-x+ 1 512291 mkgroup 0 Jul 28 09:58 .
drwxr-xr-x+ 1 512291 mkgroup 0 Jul 28 10:08 ..
drwxr-xr-x+ 1 512291 mkgroup 0 Jul 28 09:55 1d
drwxr-xr-x+ 1 512291 mkgroup 0 Jul 28 09:58 82
drwxr-xr-x+ 1 512291 mkgroup 0 Jul 28 09:58 ab
drwxr-xr-x+ 1 512291 mkgroup 0 Jul 28 09:33 info
drwxr-xr-x+ 1 512291 mkgroup 0 Jul 28 09:33 pack

> ls -al .git/refs        # 存放git引用
total 4
drwxr-xr-x+ 1 512291 mkgroup 0 Jul 28 10:17 .
drwxr-xr-x+ 1 512291 mkgroup 0 Jul 28 10:23 ..
drwxr-xr-x+ 1 512291 mkgroup 0 Jul 28 10:17 heads
drwxr-xr-x+ 1 512291 mkgroup 0 Jul 28 10:17 tags
文件系统
- 文件组成:
- 文件内容:bit -> byte -> file
- 文件元信息(metadata): name,size,content,...
- 两块分开保存(注:若文件内容不变,修改了文件名,则版本库中只保存一份,因为文件内容和文件名是分离的)
- 文件标识:
- Hash (Fixed Length): 使用sha1,20byte 160bit
2^160(md5: 已被破解,不再使用) - 文件有任何改变,hash(sha1)值就会改变,目前还未发现两份不同的file有相同的hash(sha1)
- Hash (Fixed Length): 使用sha1,20byte 160bit
数据类型
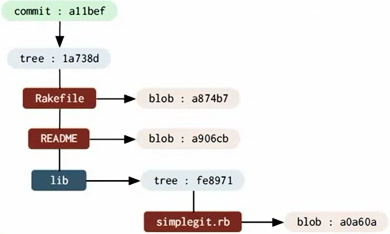
Object 对象:
- 每个对象包括type,size,content等属性,固定不变
- 存放在
.git/objects目录下 - 有三种类型type:
- blob : 叶子,实际文件,存储内容
- tree : 树,一般为目录
- commit : 指向树,包含当时的meta-information(eg: timestamp,author,parent,message,...)
- content depends on what type of object it is
Reference 引用/指针:
- 指向Object,可变换
- 存放在
.git/refs目录下 - eg: HEAD,Brancehes
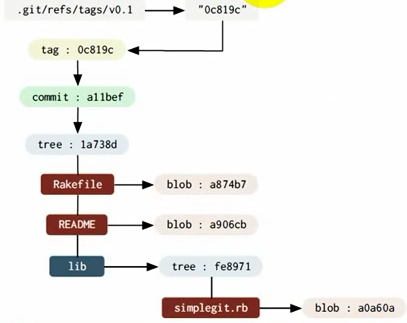
特例: tag标签
- 版本库快照,指向某个commit的指针,固定不变
- 一般给某个特定的commit打标签,作为某个特殊的发布
- 存放在
.git/refs/tags目录下 - 可以是轻量级的也可是重量级的:
- 轻量级 : 指针,
.git/objects/下不会产生一个新的Object,eg:git tag xxx - 重量级 : 对象,
.git/objects/下产生一个新的Object,eg:git tag -a milestone1.0 -m 'xxx'
- 轻量级 : 指针,
关系: DAG 单向无环图

示例
$ cd gitDemo
$ git hash-object hello.txt                                # 获取文件的hash值
1d3d0f25e47840190434177e99cf75afcda262f2

$ find .git/objects/ -type f                            # 列出local reposotory所有文件
.git/objects/1d/3d0f25e47840190434177e99cf75afcda262f2    # 与文件的hash值对应,为方便索引,取前两位作为文件夹
.git/objects/82/805fdf505a56eb0164917a0a91c0b2b138f3b0
.git/objects/ab/a8b81f043fed11b665b990aa5f291439db5374

# 文件未改变,hash值不会改变,只一份,不会产生副本
# 文件内容与文件名分离
# 1d/3d... -> blob 只保存文件内容
# 82/80... -> commit
# ab/a8... -> tree

# 1. 1d3d... : blob 只保存文件内容
$ git cat-file -t 1d3d                                   # 查看hash值对应文件的git type
blob
$ git show 1d3d                                          # 显示hash值对应文件的信息
Hello,world!

# 2. 8280... : commit
$ git cat-file -t 8280
commit
$ git show 8280
commit 82805fdf505a56eb0164917a0a91c0b2b138f3b0
Author: Cj <chenjin.zero@163.com>
Date:   Tue Jul 28 10:17:46 2015 +0800
    First Commit
diff --git a/hello.txt b/hello.txt
new file mode 100644
index 0000000..1d3d0f2
--- /dev/null
+++ b/hello.txt
@@ -0,0 +1 @@
+Hello,world!

$ git show -s --pretty=raw 8280                            # 显示hash值对应对象的原数据
commit 82805fdf505a56eb0164917a0a91c0b2b138f3b0
tree aba8b81f043fed11b665b990aa5f291439db5374
author Cj <chenjin.zero@163.com> 1438049866 +0800
committer Cj <chenjin.zero@163.com> 1438049866 +0800
    First Commit

$ cat .git/HEAD                                         # 查看当前指向的分支
ref: refs/heads/master
$ cat .git/refs/heads/master
82805fdf505a56eb0164917a0a91c0b2b138f3b0                # hash值对应对象为commit类型

# 3. aba8... : tree
$ git cat-file -t aba8tree$ git show aba8tree aba8
hello.txt
$ git ls-tree aba8                                      # 判断hash值对应对象类型是否为tree
100644 blob 1d3d0f25e47840190434177e99cf75afcda262f2    hello.txt
$ git ls-tree 1d3d
fatal: not a tree object
# 4. 创建一个轻量级标签( 指向commit的指针 -> 不会产生新的object)
$ git tag v1.0                                      # 创建标签
$ git show v1.0                                      # 查看标签信息
commit 82805fdf505a56eb0164917a0a91c0b2b138f3b0
Author: Cj <chenjin.zero@163.com>
Date:   Tue Jul 28 10:17:46 2015 +0800
    First Commit
diff --git a/hello.txt b/hello.txt
new file mode 100644
index 0000000..1d3d0f2
--- /dev/null
+++ b/hello.txt
@@ -0,0 +1 @@
+Hello,world!

$ cat .git/refs/tags/v1.0
82805fdf505a56eb0164917a0a91c0b2b138f3b0
$ git cat-file -t 8280
commit


# 5.创建一个重量级标签(一个包含tag信息的object -> 会产生新的object)
$ git tag -a v1.1 -m "First Version Released"$ git tag
v1.1
$ git show v1.1tag v1.1
Tagger: Cj <chenjin.zero@163.com>
Date:   Wed Jul 29 11:18:45 2015 +0800
First Version Released
commit 82805fdf505a56eb0164917a0a91c0b2b138f3b0
Author: Cj <chenjin.zero@163.com>
Date:   Tue Jul 28 10:17:46 2015 +0800
    First Commit
diff --git a/hello.txt b/hello.txt
new file mode 100644
index 0000000..1d3d0f2
--- /dev/null
+++ b/hello.txt
@@ -0,0 +1 @@
+Hello,world!

$ cat .git/refs/tags/v1.1
f303eb516e25a2c1f97595ce15260c25e62e70d4
$ git cat-file -t f303
tag
规范工作流程
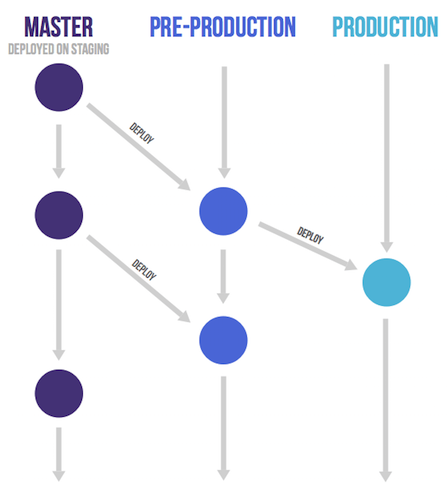
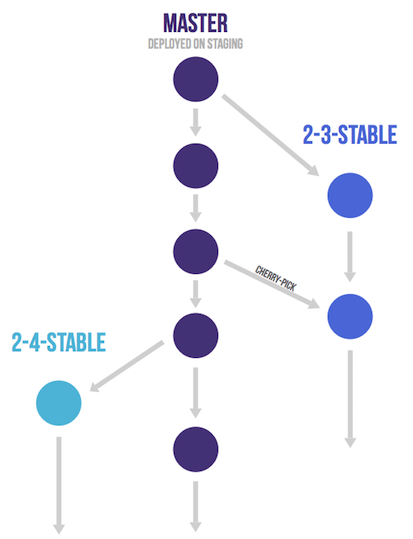
Gitlab Flow
Git flow 与 Github flow 的综合
原则:
- 上游优先(upsteam first):
- "上游"向"下游"发展:只有上游分支采纳的代码变化,才能应用到其他分支
- 只有一个主分支master,是所有其他分支的最"上游"
- 持续发布:在master分支以外,再建立不同的环境分支;以后变更从master拉出新分支,完成后并到master,再cherry-pick到下游
- 版本发布:每一个稳定版本,都要从master分支拉出一个分支;以后只有修补bug,才允许将代码合并到这些分支
规范流程
推荐 ThoughtBot 的Git使用规范流程
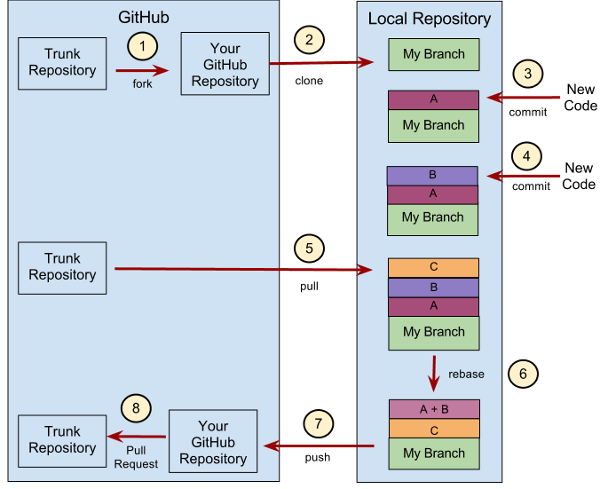
具体可参考:ruanyf/Git 使用规范流程
Reference
Pro Git book 廖雪峰/Git教程 青玉伏案的博客/Git知识总览 ruanyf/Git 原理入门 ruanyf/常用 Git 命令清单 ruanyf/Git 工作流程 ruanyf/Git 使用规范流程 ruanyf/Git 远程操作详解 rebase