Starter
React:
- 声明式开发(操作Data,自动根据Data构建Dom,注:JQuery是命令式开发,直接操作Dom)
- 可以与其他框架并存
- 组件化 (Component)
- 单向数据流(子组件可使用父组件传递过来的值,但子组件不能直接改变这个值)
- 视图层框架(对于大型项目,组件间传值时,可借助其他数据层框架,如redux,flux)
- 函数式编程(更方便前端自动化测试)
React Fiber:
- React Version >16(eg:16.4)
- 底层核心算法改良,引入优先级,分片等概念
注:
- React: UI
- Redux: State
- Router: route
- babel: JavaScript compiler (ES6->ES5)
- webpack: A module bundler
- ESLint: 语法规则和代码风格的检查工具
开发环境搭建
方式一:直接引入
.js文件方式二:使用脚手架工具,eg: grunt,gulp,webpack => 官方提供:
create-react-app$ npm install -g create-react-app $ create-react-app todolist # or use `npx create-react-app todolist` if npm 5.2.0+ $ cd todoList $ npm start # or use `yarn start`其它工具平台:
- Rekit (React专属IDE和工具集, 基于最佳实践生成代码和管理项目)
- 以feature方式组织代码
- 拆分component,action,reducer
- 拆分route配置
- 通过代码自动生成保持代码一致性:文件夹结构,文件名,变量名,代码逻辑的一致性
- 集成单元测试,单元测试覆盖率
- 可视化关系,图表
- codesandbox (online)
- Rekit (React专属IDE和工具集, 基于最佳实践生成代码和管理项目)
开发调试工具
ESLint
- 代码格式检查,使用
.eslintrc进行规则配置 - 例如配置使用
airbnb的javascript代码风格
- 代码格式检查,使用
Prettier
- 代码格式化神器,使用
.prettierrc进行规则配置 - 保证更容易写出风格一直的代码(保存时会自动格式化修正)
- 代码格式化神器,使用
Chrom 插件
- React DevTool: 可以React组件树的方式观察组件结构,props,state
- 离线下载安装 Issue:
程序包无效:"CRX_HEADER_INVALID"=> 将下载的react-developer-tools.ctx重命名为react-developer-tools.zip压缩包再拖拽到chrome://extensions/即可
- 离线下载安装 Issue:
- Redux DevTool: 可监控查看Redux中store,action等,可自动生成测试
- React DevTool: 可以React组件树的方式观察组件结构,props,state
打包和部署
npm run build: 打包create-react-app创建的项目到项目的build文件夹下- webpack
- 编译ES6语法特性,编译JSX
- 整合资源,如图片,Less/Sass
- 优化代码体积
- 注意:
- 设置nodejs环境为production
- 禁用开发时的专用代码,如logger
- 设置应用根路径
JSX
JSX:在JS文件中直接写HTML或自定义的组件标签(不用字符串包裹) 是
HTML和JavaScript的混合,当遇到<时,当作HTML解析,遇到{时,当作JS解析{}内可使用表达式 本质: 不是模版引擎,而是语法糖
// JSX: 动态创建组件的语法糖
const name = "Hello"
const element = <h1>Hello,{name}</h1>;

// 等价于:
const name = "Hello"
const element = React.createElement('h1',null,'Hello,',name); // (tag,attrs,child1,child2,...)
使用:
import
 // 使用JSX语法,必需引入:
 import React from 'react';
添加注释:
 <div>
     { /* 块注释 */ }
     {
       // 行注释
     }
 </div>
表达式:
 // JSX本身也是表达式
 const element = <h1>Hello,World!</h1>;

 // 属性中使用表达式
 <MyComponent foo = {1+2+3+4} />

 // 延展属性
 const props = {firstName: 'Ben',lastName: 'Hector'};
 const greeting = <Greeting {...props} />;

 // 表达式作子元素
 const element = <li>{props.msg}</li>;
标签上添加css class,不能使用
class(关键字冲突),需使用className<input className="input" />光标自动聚焦,不能使用
for(关键字冲突),需使用htmlFor<!-- 点击此label时,光标自动聚焦到input --> <label htmlFor="insertArea">Input</label> <input id="insertArea"/>dangerouslySetInnerHTML
直接添加
{}的内容会自动转义,eg: 内容为<h1>Hello</h1>=> 会转换为字符串显示return ( <ul> { this.state.list.map((item,index)=>{ return <li key={index} onClick={this.handleItemDelete.bind(this,index)} >{item}</li> }) } </ul> )使用
dangerouslySetInnerHTML添加的内容不转义,eg: 内容为<h1>Hello</h1>=> 会直接作为HTML渲染显示return( <ul> { this.state.list.map((item,index)=>{ return <li key={index} onClick={this.handleItemDelete.bind(this,index)} // 配置dangerouslySetInnerHTML属性等于一个json对象:`{__html:item}` dangerouslySetInnerHTML={{__html:item}} ></li> }) } </ul> )
约定:
- React认为小写的tag是原生Dom节点,如
div - 大写字母开头为自定义组件
- JSX标记可以直接使用属性语法,如
<menu.Item />
Component
React以组件方式考虑UI的构建:
- 一般不提供其它操作方法,而是某种状态机,可理解为一个纯函数
- 单向数据绑定
    props       +       state           =>      View
(外部传来的属性)       (内部维护的状态)
- 响应式设计:通过监听Data(即组件的
status属性)操作,而传统方式是通过Dom操作 - 父子组件通讯:通过组件的
props属性- 父组件:子组件标签上添加标签属性
- 子组件:通过
props属性获取调用时设置的标签属性 - 注:子组件可使用父组件传递过来的值,但子组件不能直接改变这个值(单向数据流)
- 使用原则:
- 何时创建组件:单一职责原则
- 每一个组件只做一件事
- 如果组件变得复杂,则应拆分成小组件
- 数据状态管理:DRY原则
- 能计算得到的状态就不要单独存储
- 组件尽量无状态,所需数据通过
props获取
- 何时创建组件:单一职责原则
自定义组件
import React,{ Component } from 'react';

// 等价于:
import React from 'react'
const Component=React.Component

// 自定义组件
class App extends Component{
    render(){
        // JSX
        return <div>Hello world</div>;
    }
}

export default App;
注:
- 首字母必需大些
- render返回的内容必需整体包含在一个大的元素中
state
组件中的state属性不允许直接做任何改变(即Immutable不可变数据),需通过setState方法
handleItemDelete(index,event){
    const lst=[...this.state.list]
    lst.splice(index,1)
    this.setState({
        list:lst      // list: this.state.list.splice(index,1) -- not recommend
    })
}
props
props: 接收从父组件传递过来的属性defaultProps: 给组件设置默认属性值propTypes: 对接收的属性进行校验(不通过时,console会有个warning)
import PropTypes from 'prop-types'

// Typechecking with PropTypes
TodoItem.propTypes = {
    item: PropTypes.string.isRequired
    ,index: PropTypes.oneOfType([PropTypes.number,PropTypes.string])
    ,deleteItem: PropTypes.func
}

TodoItem.defaultProps={
    item: 'Hello World'
}
Sample: TodoList
import React,{Component,Fragment} from 'react';
import './style.css'

class TodoList extends Component{

    constructor(props){
        super(props);
        this.state={
            inputValue:'',
            list:[
                'Learn English'
                ,'Learn React'
            ]
        }
    }

    render(){
        return (
            <Fragment>
                <label htmlFor="insertArea">Input</label> {/*点击此label时,光标自动聚焦到input*/}
                <input id="insertArea"
                    className="input"
                    value={this.state.inputValue}
                    onChange={this.handleInputChange.bind(this)} // bind this: TodoList inst!!
                /><button onClick={this.handleBtnClick.bind(this)}>Submit</button>
                <ul>
                    {
                        this.state.list.map((item,index)=>{
                            // return <li key={index}
                            //     onClick={this.handleItemDelete.bind(this,index)}
                            //     >{item}</li>
                            return <li key={index}
                                onClick={this.handleItemDelete.bind(this,index)}
                                dangerouslySetInnerHTML={{__html:item}}
                                ></li>

                        })
                    }
                </ul>
            </Fragment>
        )
    }

    handleInputChange(event){
        // console.log(event.target) // event.target = dom: input
        // console.log(this)         // undefined !! ,need to bind when call
        // this.state.inputValue=event.target.value // need to use setState!!
        this.setState({
            inputValue:event.target.value
        })

    }

    handleBtnClick(event){
        this.setState({
            list:[...this.state.list,this.state.inputValue]
            ,inputValue:''
        })
    }

    handleItemDelete(index,event){
        const lst=[...this.state.list]
        lst.splice(index,1)
        this.setState({
            list:lst      // list: this.state.list.splice(index,1) -- not recommend
        })
    }
}

export default TodoList;
组件拆分:父子组件
注:可通过组件的props属性实现父子组件通讯
TodoList.js:
import TodoItem from './TodoItem'render(){ return ( <Fragment> <label htmlFor="insertArea">Input</label> {/*点击此label时,光标自动聚焦到input*/} <input id="insertArea" className="input" value={this.state.inputValue} onChange={this.handleInputChange.bind(this)} // bind this: TodoList inst!! /><button onClick={this.handleBtnClick.bind(this)}>Submit</button> <ul> { this.state.list.map((item,index)=>{ // return <li key={index} // onClick={this.handleItemDelete.bind(this,index)} // >{item}</li> // return <li key={index} // onClick={this.handleItemDelete.bind(this,index)} // dangerouslySetInnerHTML={{__html:item}} // ></li> return <TodoItem key={index} item={item} index={index} deleteItem={this.handleItemDelete.bind(this)} //onClick={this.handleItemDelete.bind(this,index)} /> }) } </ul> </Fragment> ) }TodoItem.js:
 import React,{Component} from 'react'

 class TodoItem extends Component{

     constructor(props){
         super(props);
         this.handleClick=this.handleClick.bind(this) // recommend! 节约性能
     }

     render(){
         return <li onClick={this.handleClick}>{this.props.item}</li>
     }

     handleClick(){
         // 调用传过来的父组件方法修改父组件status(即仍然是使用父组件的方法维护父组件状态)
         // console.log(this.props);
         this.props.deleteItem(this.props.index)
     }

 }

 export default TodoItem
组件拆分: UI & Container
拆分成UI组件和Container组件:
- UI组件负责渲染部分 => 无状态组件(一个只有render函数的组件) => 可直接用一个函数定义, 性能高
- Container组件负责逻辑部分
Sample:
AntTodoList.js : Container组件
 import React,{ Component } from 'react';
 import store from './store/index'
 import * as actionCreator from './store/actionCreator'
 import TodoListUI from './TodoListUI'

 class AntdTodoList extends Component {
     render(){
         return <TodoListUI
                     inputValue={this.state.inputValue}
                     handleInputChange={this.handleInputChange}
                     handleBtnClick={this.handleBtnClick}
                     list={this.state.list}
                     handleItemDelete={this.handleItemDelete}
                 />
     }

     // 其他不变 ....
 }
TodoListUI.js : UI组件
 import React,{ Component } from 'react';
 import 'antd/dist/antd.css';
 import { Input,Button,List,Icon } from 'antd';

 /*
 class TodoListUI extends Component{
     render(){
         return (
             <div style={{margin:'20px auto',maxWidth:'600px'}}>
                 <div style={{padding:'20px 0px',textAlign:'center'}}>
                     <h2>TodoList(with Antd UI):</h2>
                     <Input
                         placeholder='Enter todo item here'
                         style={{width:'500px',marginRight:'10px'}}
                         value={this.props.inputValue}
                         onChange={this.props.handleInputChange}
                     />
                     <Button type="primary" onClick={this.props.handleBtnClick}>Submit</Button>
                 </div>
                 <List
                   bordered
                   dataSource={this.props.list}
                   renderItem={(item,index) => (
                     <List.Item
                         actions={[
                             <Icon
                                 type="delete" theme="filled"
                                 // onClick={this.props.handleItemDelete.bind(this,index)}
                                 onClick={()=>{
                                     // console.log("del:",index,this.props.list[index])
                                     this.props.handleItemDelete(index)
                                 }}
                             />
                         ]}
                     >
                         {item}
                     </List.Item>
                   )}
                 />
             </div>
         )
     }
 }*/

 // 无状态组件(一个只有render函数的组件) => 可直接用一个函数定义, 性能高
 const TodoListUI = (props)=>{
     return (
         <div style={{margin:'20px auto',maxWidth:'600px'}}>
             <div style={{padding:'20px 0px',textAlign:'center'}}>
                 <h2>TodoList(with Antd UI):</h2>
                 <Input
                     placeholder='Enter todo item here'
                     style={{width:'500px',marginRight:'10px'}}
                     value={props.inputValue}
                     onChange={props.handleInputChange}
                 />
                 <Button type="primary" onClick={props.handleBtnClick}>Submit</Button>
             </div>
             <List
               bordered
               dataSource={props.list}
               renderItem={(item,index) => (
                 <List.Item
                     actions={[
                         <Icon
                             type="delete" theme="filled"
                             onClick={()=>{
                                 // console.log("del:",index,props.list[index])
                                 props.handleItemDelete(index)
                             }}
                         />
                     ]}
                 >
                     {item}
                 </List.Item>
               )}
             />
         </div>
     )
 }

 export default TodoListUI;
受控 & 非受控组件
(主要针对表单)
- 受控组件:表单元素状态由使用者维护
<input type="text" value={this.state.value} onChange={ evt => this.setState({value:evt.target.value})} /> - 非受控组件:表单元素状态由DOM自身维护
  <input
      type="text"
      ref={ node => this.input=node }
  />
组件复用(设计模式)
高阶组件(HOC): 一个函数,接收组件作为参数,返回新的组件
  export default function withTimer(WrappedComponent) {
    return class extends Component {
      state = { time: new Date() };
      componentDidMount() {
        this.timerID = setInterval(() => this.tick(), 1000);
      }

      componentWillUnmount() {
        clearInterval(this.timerID);
      }

      tick() {
        this.setState({
          time: new Date()
        });
      }
      render() {
        return <WrappedComponent time={this.state.time} {...this.props} />;
      }
    };
  }
class App extends Component { render(){ return ( <div> <h1>Hello World!</h1> // 使用withTimer封装后,可直接使用传递进来的time属性 <h2>{this.props.time.toLocaleString()}</h2> </div> ) } } export default withTimer(App); // 返回封装后的新组件函数作为子组件:外部使用一个函数作为组件的children => 组件如何render内容,由调用方决定
  class MyComponent extends Component{
      render(){
          return (
              // 传进来的children是个函数
              <ul>{this.props.children('Susan')}</ul>
          )
      }
  }
<MyComponent>{ (name) => (<li>{name}</li>) }</MyComponent>注:是一种设计模式,自己可实现更多场景的组件复用
高阶
this
- this : 一般指向该方法运行时所在的环境 ES6 this
- 注:在箭头函数中,
this指向是固定的,为定义时所在的对象,不是使用时所在的对象(因为箭头函数没有自己的this,只能使用外层代码块的this)
render(){
    return <input id="insertArea"
            className="input"
            value={this.state.inputValue}
            onChange={this.handleInputChange.bind(this)} // bind this: TodoList inst!!
}

handleInputChange(event){
    // console.log(event.target) // event.target = dom: input
    // console.log(this)         // undefined !! ,need to bind when call
    // this.state.inputValue=event.target.value // need to use setState!!
    this.setState({
        inputValue:event.target.value
    })
}
=> 优化:
constructor(props){
    super(props);
    this.state={
        inputValue:'',
        list:[]
    };
    this.handleInputChange=this.handleInputChange.bind(this) // 在这里bind this: TodoList inst!! 性能更优

}

render(){
    return <input id="insertArea"
            className="input"
            value={this.state.inputValue}
            onChange={this.handleInputChange} // constructor时已经绑定好了,可直接使用
}
ref
可用于直接定位到真实Dom(但不推荐直接操作Dom)
render(){
    return (
        <Fragment>
            <label htmlFor="insertArea">Input</label> {/*点击此label时,光标自动聚焦到input*/}
            <input id="insertArea"
                className="input"
                value={this.state.inputValue}
                onChange={this.handleInputChange.bind(this)} // bind this: TodoList inst!!
                ref={(input)=>{this.input=input}}
            />
            <button onClick={this.handleBtnClick.bind(this)}>Submit</button>
            <ul ref={(ul)=>{this.ul=ul}}>
                {this.getTodoItem()}
            </ul>
        </Fragment>
    )
}

handleInputChange(event){
    // 异步函数式:
    // const val=event.target.value
    const val=this.input.value //  使用了ref后,也可这样定位到input dom节点 - 不推荐
    this.setState(
        ()=>({inputValue:val})
    );
}

handleBtnClick(event){
    this.setState(
        (preState)=>({      // preState = this.state
            list:[...preState.list,preState.inputValue]
            ,inputValue:''
        }),()=>{ // callback func
            // 使用了ref后,可直接定位到ul dom节点,对dom进行操作 - 不推荐
            console.log(this.ul.querySelectorAll('li').length)
        }
    );
}
Fragment
Fragment占位符,本质也是个组件
Sample:
import React,{Component} from 'react';

class TodoList extends Component{

    render(){
        return (
            <div>
                <input/><button>Submit</button>
                <ul>
                    <li>Learn English</li>
                    <li>Learn React</li>
                </ul>
            </div>
        )
    }
}

export default TodoList;
=> 将返回的<div>标签插入到目标节点
import React,{Component,Fragment} from 'react';

class TodoList extends Component{

    render(){
        return (
            <Fragment>
                <input/><button>Submit</button>
                <ul>
                    <li>Learn English</li>
                    <li>Learn React</li>
                </ul>
            </Fragment>
        )
    }
}

export default TodoList;
=> 将Fragment下的内容插入到目标节点
结构化赋值
import React,{Component} from 'react'

class TodoItem extends Component{

    constructor(props){
        super(props);
        this.handleClick=this.handleClick.bind(this) // recommend! 节约性能
    }

    render(){
        // return <li onClick={this.handleClick}>{this.props.item}</li>

        const {item} = this.props;  // 等同于 const item = this.props.item
        return <li onClick={this.handleClick}>{item}</li>

    }

    handleClick(){
        // console.log(this.props);
        // this.props.deleteItem(this.props.index);

        const {deleteItem,index}=this.props;
        deleteItem(index);
    }

}

export default TodoItem
函数式编程
handleInputChange(event){
    // console.log(event.target);                 // event.target = dom: input
    // console.log(this);                         // undefined !! , need to bind when call
    // this.state.inputValue=event.target.value;  // need to use setState!!

    // 1. 老式写法:
    // this.setState({
    //     inputValue:event.target.value
    // });

    // 2. 函数式:
    // this.setState(()=>{
    //     return {
    //         inputValue:event.target.value
    //     }
    // });

    // 3. 异步函数式:
    const val=event.target.value
    this.setState(
        ()=>({inputValue:val})
    );
}
handleBtnClick(event){
    // this.setState({
    //     list:[...this.state.list,this.state.inputValue]
    //     ,inputValue:''
    // })

    this.setState(
        (preState)=>({      // preState = this.state
            list:[...preState.list,preState.inputValue]
            ,inputValue:''
        })
    );
}
handleItemDelete(index,event){
    // const lst=[...this.state.list]
    // lst.splice(index,1)
    // this.setState({
    //     list:lst      // list: this.state.list.splice(index,1) -- not recommend
    // });

    this.setState(
        (preState)=>{
            const list=[...preState.list]
            list.splice(index,1)
            return {list}   // 等同:return {list:list}
        }
    );
}
Immutable data
不可变数据

Instead of updating the node, Freezer creates a new data tree starting from the top. The nodes in the update path are new, but the rest are reused
为何需要不可变数据:性能优化, 易于调试和跟踪, 易于推测
- 所有的变化都是由action触发,action触发在旧的state上,形成一个新的state,新旧state是两个不同的对象,这样很容易知道state发生了变化
- (不需要进行深层次的遍历和比较值,只需比较两个state的引用是否一致,即可知道是否发生了变化)
如何操作不可变数据:
原生写法:
{...},Object.assignconst state = {filter:'completed',todos:['Learn React']}; // {}写法 const newState = {...state,todos:[...state.todos,'Learn English']}; // Object.assign写法 const newState2 = object.assign({},state,{todos:[...state.todos,'Learn English']});- 使用工具类: immutability-helper
  import update from 'immutability-helper';
  const state = {filter:'completed',todos:['Learn React']};
  const newState = update(state,{todos:{$push:['Learn English']}})
使用工具类: immer
import produce from 'immer'; const state = {filter:'completed',todos:['Learn React']}; const newState = produce(state,draftState => { draftState.todos.push('Learn English') })- 使用工具类: immutable-js (install:
yarn add immutable)fromJS(jsObj): 将一个JS对象变成一个immutable(不可变)对象immuObj.toJS(): 将一个immutable对象转换回JS对象immuObj.get(fieldName): 获取immutable对象里的数据immuObj.set(fieldName,value)/immuObj.merge({k:v,k,v}): 根据原始值和新值,返回一个全新的immutable对象
Sample:使用immutable-js维护redux store中的state对象
src/common/header/store/reducer.js:
 import * as actionType from './actionType';
 import { fromJS } from 'immutable';

 // const defaultState={
 //     focused: false
 // };
 const defaultState = fromJS({               // 将一个JS对象变成一个immutable(不可变)对象
     focused: false,
     list: []                                // Note: 这里list也会转变为immutable(不可变)对象,更新数据时要注意
 })

 export default (state=defaultState,action)=>{
     if (action.type==actionType.HeaderSearchFocus){
         // return { focused:true}
         return state.set('focused',true)  // immutable对象的set方法,会根据原始值和新值,返回一个全新的对象
     }
     if (action.type==actionType.HeaderSearchBlur){
         // return {focused:false}
         return state.set('focused',false) // 同 return state.merge({focused:false}), merge方式合并多个更新值,再返回新的对象
     }
     return state;
 }
src/common/header/index.js
 const mapStateToProps=(state)=>{
     return {
         // focused: state.focused
         // focused: state.header.focused
         focused: state.header.get('focused') // Note:这里state.header是一个immutable对象
     }
 }
PureComponent
PureComponent + immutable.js
提供了一个具有浅比较的shouldComponentUpdate方法 => 对props和state进行浅比较,不变则不重新渲染 => 更具性能
// import React, { Component } from 'react';
import React, { PureComponent } from 'react';

// class Home extends Component{
//     shouldComponentUpdate(nextProps,nextState){
//         if(nextProps.title!==this.props.title){
//             return true
//         }
//         return false
//     }
//     return (
//         <div>Home</div>
//     )
// }

class Home extends PureComponent{
    return (
        <div>Home</div>
    )
}

const mapStateToProps=(state)=>{
    return {
        title: state.home.title
    }
}

export default connect(mapStateToProps,null)(Home);
Context API
- React 16.3公布的新特性(实际早就存在且应用了,如redux)
- 可用于解决组件间通讯问题
- when to use context
使用:
React.createContextconst MyContext = React.createContext(defaultValue);Context.Provider<MyContext.Provider value={/* some value */}>Context.Consumer<MyContext.Consumer> {value => /* render something based on the context value */} </MyContext.Consumer>
Sample:
const TheamContext = React.createContext('light');

class App extends Component{
    render(){
        <ThemeContext.Provider value='dark'>
            <ThemedButton/>
        </ThemeContext.Provider>
    }
}

class ThemedButton extends Component{
    render(){
        <ThemeContext.Consumer>
            { (theme) => (<button>{theme}</button>) }
        </ThemeContext.Consumer>
    }
}
=> <button>dark</button>
Virtual Dom
- JSX的运行基础,本质为JS对象(eg:
[tag,props,children]),用来描述真实Dom JSX=>React.createElement=>虚拟Dom=>真实Dom// JSX: <div id='abc'><span>Hello World</span></div> // 等价于: span=React.createElement('span',{},'Hello World') div=React.createElement('div',{'id':'abc'},span)- 虚拟DOM树,计算
Diff:- 两个假设前提:
- 组件的DOM结构是相对稳定的
- 类型相同的兄弟节点可以被唯一标识
Diff算法:- 广度优先分层比较新旧虚拟Dom树
- 节点的key属性,作为唯一标识,用于定位比较新旧虚拟Dom树节点
- 同层,节点顺序变化,则交换位置
- 同层,节点类型变化,则删除该节点和其子节点,重新创建
- 总体平均算法复杂度可达到:
O(n)
- 两个假设前提:
- 优点:
- 性能提升
- 减少了真实Dom的创建和对比,使用虚拟Dom(即JS对象)创建和对比损耗小的多
- 逐(同)层比对发现节点类型不同时,则不会再往下比对,直接废弃掉,用重新生成的替换掉它,减少比对
setState是异步的,可方便将多次间隔短的setState合并到一次,减少虚拟Dom比对的次数
- 使得跨端应用得以实现,eg:
- React: 虚拟Dom -> 浏览器真实Dom
- React Native: 虚拟Dom -> 原生应用的组件
- 性能提升
- 注:节点通过key定位比对,所以尽量保证用稳定的值作为key,不推荐使用index作为key
引入虚拟Dom性能提升分析
- 不使用
Virtual Dom的处理过程:- 数据 state + 模版 jsx => 生成真实Dom,渲染显示
- 数据 state 发生改变
- 数据 state + 模版 jsx => 生成真实Dom,替换原来的Dom,渲染显示
- => 缺陷:
- 第一次生成了一个完整的Dom片段
- 第二次生成了一个完整的Dom片段
- 第二次的Dom替换第一次的Dom
- -> 耗性能
- => 改良:
- 第一次:数据 + 模版 => 生成真实Dom
- 第二次:数据 + 模版 => 生成真实Dom,不直接替换原始Dom,而是和原来的Dom进行
Diff比对,找出变化元素,替换变化元素 - -> 性能提升不明显
- => 进一步,引入
Virtual Dom, eg:- 真实Dom:
<div id='abc'><span>Hello World</span></div> - 虚拟Dom(本质是JS对象):
['div',{'id':'abc'},['span',{},'Hello World']] - 第一次:数据 + 模版 => 生成虚拟Dom,用虚拟Dom的结构生成真实Dom
- 第二次:数据 + 模版 => 生成新的虚拟Dom,与原来的虚拟Dom进行
Diff比对,找出变化部分,改变真实Dom对应的内容 - -> 极大的提升了性能:减少了真实Dom的创建和对比,而使用虚拟Dom(即JS对象)创建和对比损耗小的多
- 真实Dom:
组件生命周期
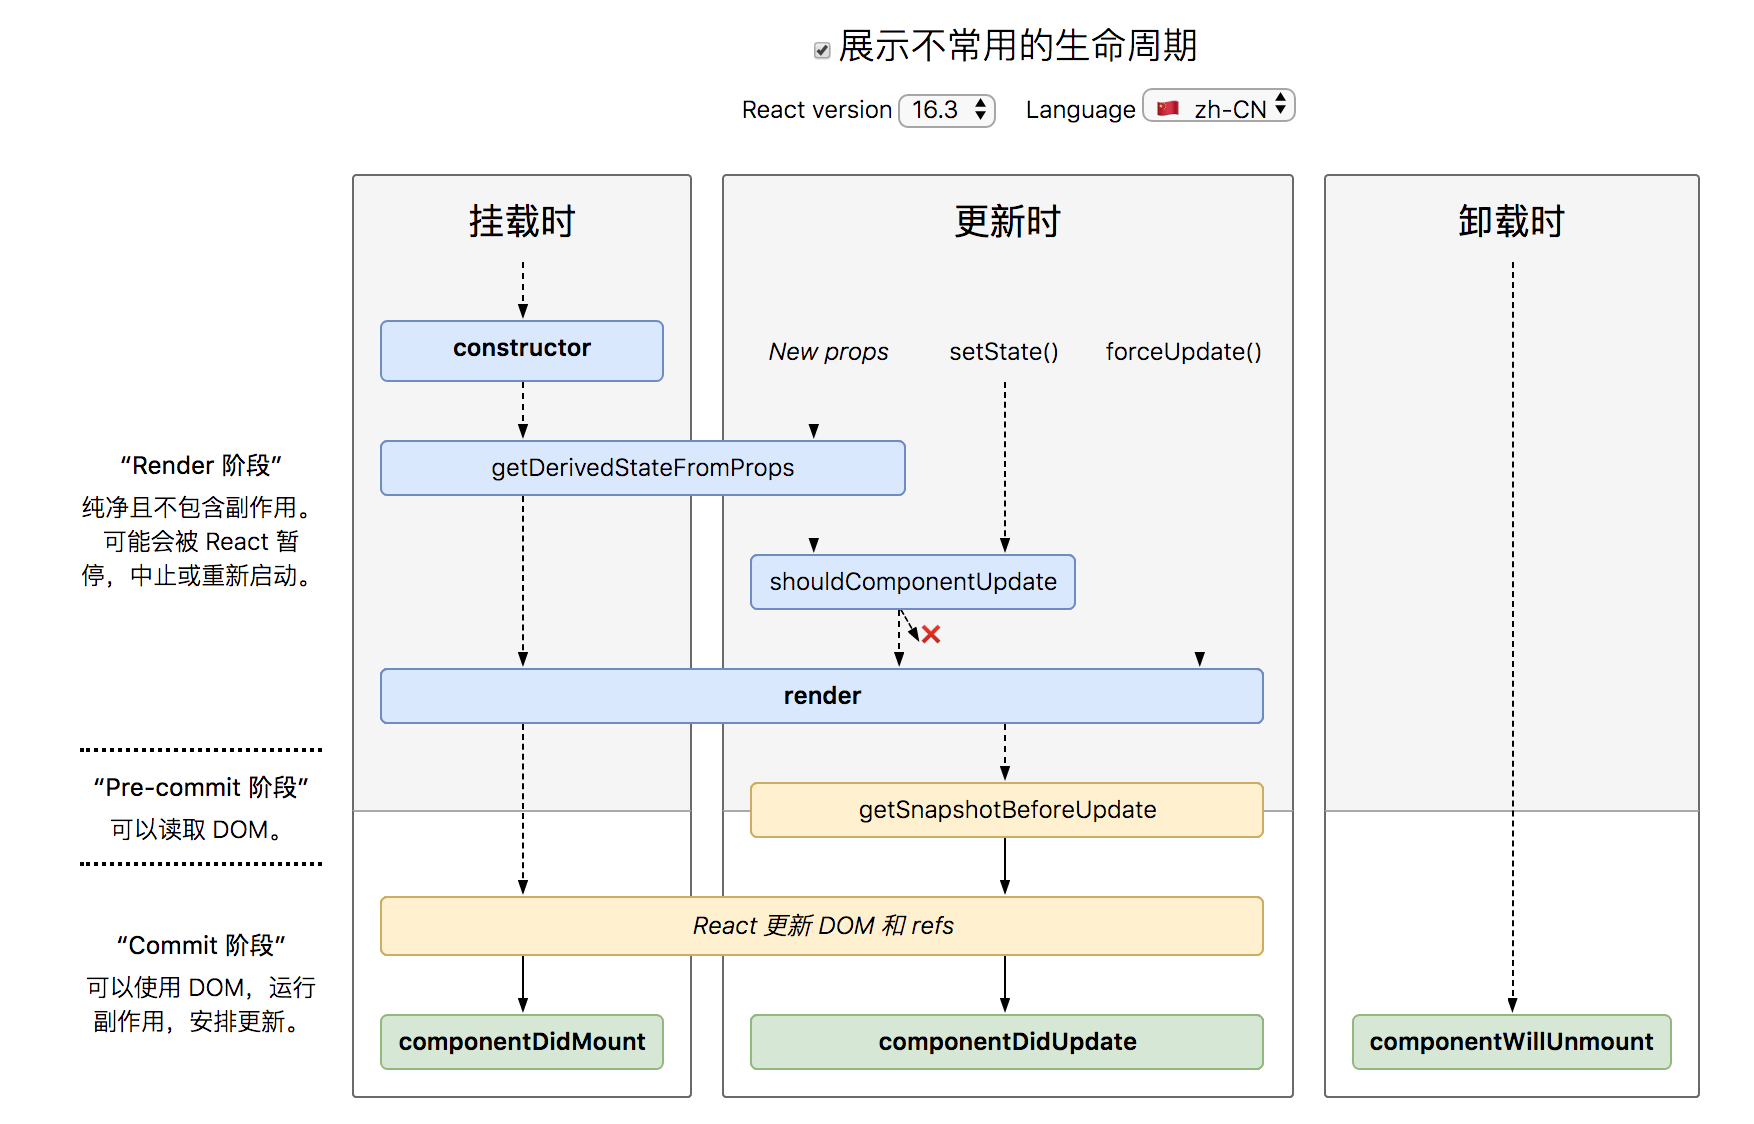 (source: http://projects.wojtekmaj.pl/react-lifecycle-methods-diagram/)
react-async-component-lifecycle-hooks: 在某一时刻,组件会自动调用执行的函数
Mounting生命周期:
constructor()- 用于初始化内部状态(Initialization: setup props and states)
- 唯一可以直接修改state的地方(其他地方一般需使用
this.setState方法)
componentDidMount()- 组件创建渲染完成后调用
- 只执行一次
- 典型场景:获取外部资源
componentWillUnMount()- 组件移除时被调用
- 典型场景:资源释放
Updation生命周期
static getDerivedStateFromProps(props, state)- React 16.3新引入,取代原
componentWillReceiveProps应用场景 - 用于从props获取值给state
- 尽量不要使用:维护两者状态一致性会增加复杂度
- 典型场景:表单控件获取默认值
- React 16.3新引入,取代原
shouldComponentUpdate(nextProps, nextState)=> return true/false- 决定
Virtual Dom是否要重绘(是否继续执行后面的Updation生命周期) - 一般可由
PureComponent自动实现 - 典型场景:性能优化
- 决定
render()getSnapshotBeforeUpdate(prevProps, prevState)=> 返回值会传递给componentDidUpdate- React 16.3新引入,取代原
componentWillUpdate应用场景 - 在组件state已更新,React更新DOM和refs前被调用
- 典型场景:获取更新前DOM状态
- React 16.3新引入,取代原
componentDidUpdate(prevProps, prevState, snapshot)- React更新DOM和refs完成后调用
- 典型场景:页面需要根据props变化重新获取数据
Sample:
- props change (父组件重新render时,传递给子组件的属性发生了变化,触发子组件Updation周期):
getDerivedStateFromPropsshouldComponentUpdate-> return true/false to continuerendergetSnapshotBeforeUpdate- React 更新 DOM 和 refs
componentDidUpdate
- states change(组件state发生改变,触发组件Updation周期):
shouldComponentUpdate-> return true/false to continuerendergetSnapshotBeforeUpdate- React 更新 DOM 和 refs
componentDidUpdate
样式
CSS3过渡动画
import React,{Component,Fragment} from 'react'
import './style.css'

class ToggleButton extends Component{
    constructor(props){
        super(props)
        this.state={
            show:false
        }
        this.handleToggleBtnClick=this.handleToggleBtnClick.bind(this)
    }
    render(){
        return (
            <Fragment>
                <div className={this.state.show?'hideArea':'showArea'}>Hello World</div>
                <button onClick={this.handleToggleBtnClick}>Toggle</button>
            </Fragment>
        )
    }
    handleToggleBtnClick(){
        this.setState(
            (preState)=>({
                show:!preState.show
            })
        );
    }
}

export default ToggleButton
.hideArea{
    opacity: 0;
    color: red;
    transition: all 1s ease-in;
}

.showArea{
    opacity: 1;
    color: green;
    transition: all 1s ease-in;
}
or
.hideArea{
    /*opacity: 0;
    color: red;
    transition: all 1s ease-in;*/
    animation: hide-item 2s ease-in forwards;
}

.showArea{
    /*opacity: 1;
    color: green;
    transition: all 1s ease-in;*/
    animation: show-item 2s ease-in forwards;
}

@keyframes hide-item{
    0% {
        opacity: 1;
        color: red;
    }
    50% {
        opacity: 0.5;
        color: green;
    }
    100% {
        opacity: 0;
        color: blue;
    }
}

@keyframes show-item{
    0% {
        opacity: 0;
        color: blue;
    }
    50% {
        opacity: 0.5;
        color: green;
    }
    100% {
        opacity: 1;
        color: red;
    }
}
react-transition-group
使用第三方模块react-transition-group,方便实现更复杂动画
install:
 # npm
 $ npm install react-transition-group --save

 # yarn
 $ yarn add react-transition-group
CSSTransaction
 import React,{Component,Fragment} from 'react'
 import { CSSTransition } from 'react-transition-group'
 import './style.css'

 class ToggleButtonCSSTransition extends Component{

     constructor(props){
         super(props)
         this.state={
             show:true
         }
         this.handleToggleBtnClick=this.handleToggleBtnClick.bind(this)
     }

     render(){
         return (
             <Fragment>
                 <button onClick={this.handleToggleBtnClick}>CSSTransition</button>
                 <CSSTransition
                     in={this.state.show}
                     timeout={1000}
                     classNames='node'   // note: It's `classNames`,not `className`, for css style class prefix
                     appear={true}        // also use the animation when first load
                     unmountOnExit       // if set,the dom will be removed when hide
                     onEntered={(el)=>{el.style.color='blue'}} // hock func, trigger when enter finished
                 >
                     <div>Hello World</div>
                 </CSSTransition>
             </Fragment>
         )
     }

     handleToggleBtnClick(){
         this.setState(
             (preState)=>({
                 show:!preState.show
             })
         );
     }
 }

 export default ToggleButtonCSSTransition
TransactionGroup (for batch components)
 import React,{Component,Fragment} from 'react'
 import { CSSTransition,TransitionGroup } from 'react-transition-group'
 import './style.css'

 class ToggleButtonTransitionGroup extends Component{

     constructor(props){
         super(props)
         this.state={
             list:['Hello']
         }
         this.handleToggleBtnClick=this.handleToggleBtnClick.bind(this)
     }

     render(){
         return (
             <Fragment>
                 <button onClick={this.handleToggleBtnClick}>TransitionGroup</button>
                 <TransitionGroup>
                     {
                         this.state.list.map((item,index)=>{
                             return (
                                 <CSSTransition key={index}
                                     timeout={1000}
                                     classNames='node'
                                     appear={true}
                                     onEntered={(el)=>{el.style.color='blue'}}
                                 >
                                     <div>{item}</div>
                                 </CSSTransition>
                             )
                         })
                     }
                 </TransitionGroup>
             </Fragment>
         )
     }

     handleToggleBtnClick(){
         this.setState(
             (preState)=>({
                 list:[...preState.list,"item"]
             })
         );
     }
 }

 export default ToggleButtonTransitionGroup
css style class:
 /* enter & appear lifecycle*/
 .node-enter,.node-appear {
     opacity: 0;
 }
 .node-enter-active,.node-appear-active{
     opacity: 1;
     transition: opacity 1s ease-in;
 }
 .node-enter-done,.node-appear-done {
     opacity: 1;
 }

 /* exit lifecycle*/
 .node-exit{
     opacity: 1;
 }
 .node-exit-active{
     opacity: 0;
     transition: opacity 1s ease-in;
 }
 .node-exit-done {
     opacity: 0;
 }
styled-components
不管是哪个子组件,直接import一个css文件,
该文件中的样式会作用于所有组件,即是一个全局的样式,无法区分区别
=> styled-components库:css模块化(css => js)
install: yarn add styled-components
Sample: 全局Style
style.js
 import { createGlobalStyle } from 'styled-components';

 // 全局样式
 const GlobalStyle = createGlobalStyle`
     // reset.css: 让各标签的默认样式在所有浏览器上的显示统一
     html, body, div, span, applet, object, iframe,
     h1, h2, h3, h4, h5, h6, p, blockquote, pre,
     a, abbr, acronym, address, big, cite, code,
     del, dfn, em, img, ins, kbd, q, s, samp,
     small, strike, strong, sub, sup, tt, var,
     b, u, i, center,
     dl, dt, dd, ol, ul, li,
     fieldset, form, label, legend,
     table, caption, tbody, tfoot, thead, tr, th, td,
     article, aside, canvas, details, embed,
     figure, figcaption, footer, header, hgroup,
     menu, nav, output, ruby, section, summary,
     time, mark, audio, video {
         margin: 0;
         padding: 0;
         border: 0;
         font-size: 100%;
         font: inherit;
         vertical-align: baseline;
     }
     /* HTML5 display-role reset for older browsers */
     article, aside, details, figcaption, figure,
     footer, header, hgroup, menu, nav, section {
         display: block;
     }
     body {
         line-height: 1;
     }
     ol, ul {
         list-style: none;
     }
     blockquote, q {
         quotes: none;
     }
     blockquote:before, blockquote:after,
     q:before, q:after {
         content: '';
         content: none;
     }
     table {
         border-collapse: collapse;
         border-spacing: 0;
     }
 `;
 export { GlobalStyle }
App.js
 import React, { Fragment } from 'react';
 import { GlobalStyle } from './style.js';

 function App() {
   return (
     <Fragment>
         <GlobalStyle/>
         <div> Hello World </div>
     </Fragment>
   );
 }

 export default App;
Sample:局部style
style.js
 import styled from 'styled-components';
 import logoPic from '../../statics/logo.png'  // import pic!

 export const HeaderWrapper = styled.div`
     height: 58px;
     border-bottom: 1px solid #f0f0f0;
 `

 // export const Logo = styled.a.attrs({ href:'/' })`
 export const Logo = styled.a`
     position: absolute;
     top: 0;
     left: 0;
     display: block;
     width: 100px;
     height: 56px;
     background: url(${logoPic});    // use imported pic !
     background-size: contain;
 `

 export const NavItem = styled.div`
     line-height: 56px;
     padding: 0 15px;
     font-size: 17px;

     &.left{
         float: left;
     }

     &.active{
         color: #ea6f5a;
     }
 `
SimpleHeader.js:
 import React from 'react';
 import { HeaderWrapper,Logo,NavItem} from './style';
 const SimpleHeader=(props)=>{
     return (
         <HeaderWrapper>
             <Logo href='/'/>
                 <NavItem className="right">登陆</NavItem>
                 <NavItem className="right">注册</NavItem>
         </HeaderWrapper>
     )
 };
 export default SimpleHeader;
iconfont
素材下载:阿里
使用styled-components + iconfont:
全局样式IconGlobalStyle: src/statics/iconfont/icon.js
 import { createGlobalStyle } from 'styled-components';

 const IconGlobalStyle = createGlobalStyle`
   @font-face {font-family: "iconfont";
     /* Note: 更新路径 */
     src: url('./iconfont.eot?t=1566970427492'); /* IE9 */
     src: url('./iconfont.eot?t=1566970427492#iefix') format('embedded-opentype'), /* IE6-IE8 */
     url('data:application/x-font-woff2;charset=utf-8;base64,d09GMgABAAAAAAR4AAsAAAAACVAAAAQsAAEAAAAAAAAAAAAAAAAAAAAAAAAAAAAAHEIGVgCDMgqFaIUsATYCJAMUCwwABCAFhG0HTxs/CMieA25rTF6pQqUmQ7qib3Y+H2JT/x0HLTummpp7ks1pcmQ0QkeY2VezifsXsfBQ3f5te5NlgQR6wAF+gaIoSjALwJIwcMixXU7QlltiNehs8L+LS9PU8YDVtbOIZSIe0Fq6FcoEsBWgWKyVLx2/U2nA//rC9sPYTcRhXA8EwNikImN9ay9kIrCJAMihe1TIMS2xpJCQEWE5xxaQGxK5uVHYDbjd/X3yoYYMCKQE2Nm517lR+cZ+btA1oTWYRVHg9WcGIJ0EUEAqQARy5lp9qB9NRTFjvqgSwMgEQl/T8j8v+9wITShckZzBf3gAQQlEIC2AdCiHr4yJ8HksRoDA5/kIUPi8DAEBPjf4N0YqcesZoBlwFkhllLF9zqBEFV14uDIMME+WxynkZWKW37Q90XK6Fr/8Njl69OolzKGgJNbGM0+fo9ResXZdwZYjwxOuo0eXY8fWI0fmw4cnCbN9dpyd89BLb0q2v7R23c1JfS+u+WQEsw/tZV5l+oz7bOyRiU71Y+VmgAVbz27aS9Y6HGvdP17a984LWDPl5k2ELFcA40tQ7nmO9W3KOXq4Z6UO4ds5Xt+UcP7LTZl5zxHH84cyjh6uMU2x23laTm12dm1Gvv2WWFIza2Z0T9ydUTk5UXc+9bTzsXGVD61b99Zrba3fv/ba98KFpyrr6kQdG0ufpieOJyE8deKEiIpsVvR0is2mLBeeflpYBkVP+w66jMosfuHUGNvEkdu3R3pMxijn7aOxXms4kFh7gA8P1aMD5R19QnW/Xn5M/IegtaUwg0hV6UaSXR82W2mpLL48x2HtmjTun8lxP8XZQP/YAL1pNn6ig2LYCt9NW3bDtj7npDF/9Ix8SKla/EnX9JEVZo3gZiNj1pR1DOUflt8w6dRyZ0LpW8miN+qa+L//+KJ31MNDsd+3DEl30CYgVK6jlUDoPAUQgp6n836yVdgul1bNHVH6m6xc3b4Tt+SUuO4QIupJ8afIUJv3S/Fq1ommAOikoldjrp4rUVXAi+H/PRU/knO0s/3Ix9XOBwjZuBAE4aYBJYtFi/hUkChyIYysApgUDScrxjBRpAwBkOxaBoiRXgfBcOuAGmkPWsSfAcl430GYkUGBsceYcyriQ2c1Jlct7o7sXxqpu4yAhgwW8wq7uWehTzWjApdo52ZQD0RmpWcmEw08wM0+9gQXebItS4vUTMMfWc/cjPt8RuSgaQxwl5U+37IGizMytLxnSncZfjA1TJzKwrlF6rdUJJ2LIUCjzS0s9fPdOI+FfFRmSU2D1o4zBemTR8qSLrMGukEaqFVzLvODFvHIZrFo/DqNyeAXqZ41cz4YNUQazF82gHOxpJvfIjyoWAbXSKsrTR9f7r/GYwAMWCyFQCgRiUTCoOz8ziC3MrNyCpimBjxudUCni4QqVVqwUPf5AA==') format('woff2'),
     url('./iconfont.woff?t=1566970427492') format('woff'),
     url('./iconfont.ttf?t=1566970427492') format('truetype'), /* chrome, firefox, opera, Safari, Android, iOS 4.2+ */
     url('./iconfont.svg?t=1566970427492#iconfont') format('svg'); /* iOS 4.1- */
   }

   .iconfont {
     font-family: "iconfont" !important;
     font-size: 16px;
     font-style: normal;
     -webkit-font-smoothing: antialiased;
     -moz-osx-font-smoothing: grayscale;
   }
 `

 export { IconGlobalStyle }
App.js导入IconGlobalStyle
 import React, { Fragment } from 'react';
 import { IconGlobalStyle } from './statics/iconfont/icon.js'
 function App() {
   return (
     <Fragment>
         <IconGlobalStyle/>
         <SimpleHeader/>
     </Fragment>
   );
 }
 export default App;
SimpleHeader.js使用icon
import React from 'react'; const SimpleHeader=(props)=>{ return ( <div> <a href="#"><span className="iconfont"></span>写文章</a> </div> ) }; export default SimpleHeader;
UI组件库
- AntD(Ant Design): React UI 组件库 => recommend!
- Material UI
- Semantic UI
Sample:AntD
yarn add antd
import React,{ Component } from 'react';

import 'antd/dist/antd.css';
import { Input,Button,List,Icon } from 'antd';

class AntdTodoList extends Component {
    render(){
        return (
            <div style={{margin:'20px auto',maxWidth:'600px'}}>
                <div style={{padding:'20px 0px',textAlign:'center'}}>
                    <h2>TodoList(with Antd UI):</h2>
                    <Input
                        placeholder='Enter todo item here'
                        style={{width:'500px',marginRight:'10px'}}
                    />
                    <Button type="primary"}>Submit</Button>
                </div>
                <List
                  bordered
                  dataSource={this.state.list}
                  renderItem={(item,index) => (
                    <List.Item>{item}</List.Item>
                  )}
                />
            </div>
        )
    }
}
Redux
独立于UI框架的通用JS状态管理框架,即数据层框架
不依赖于React,可单独使用:
React: 本身实际上只是个视图层框架; Redux = Reducer + Flux
Flux架构(单项数据流):
Action -> Store -> View
  ^                 |
  |_________________|
Redux特性:
- 所有状态放在唯一的一个Store中(Single Source of Truth)
- 可预测性(state & action => new state)
- 纯函数更新Store(reducer函数)

使用
- 安装:
yarn add redux - Chrome 辅助调试插件:redux Devtools
- 设计理念
- 将组件中的数据都放到一个公用的存储区Store存储管理
- 当某个组件改变数据,其他组件会感知到Store中数据的变化,从而进行更新,以此实现组件间的数据传递问题
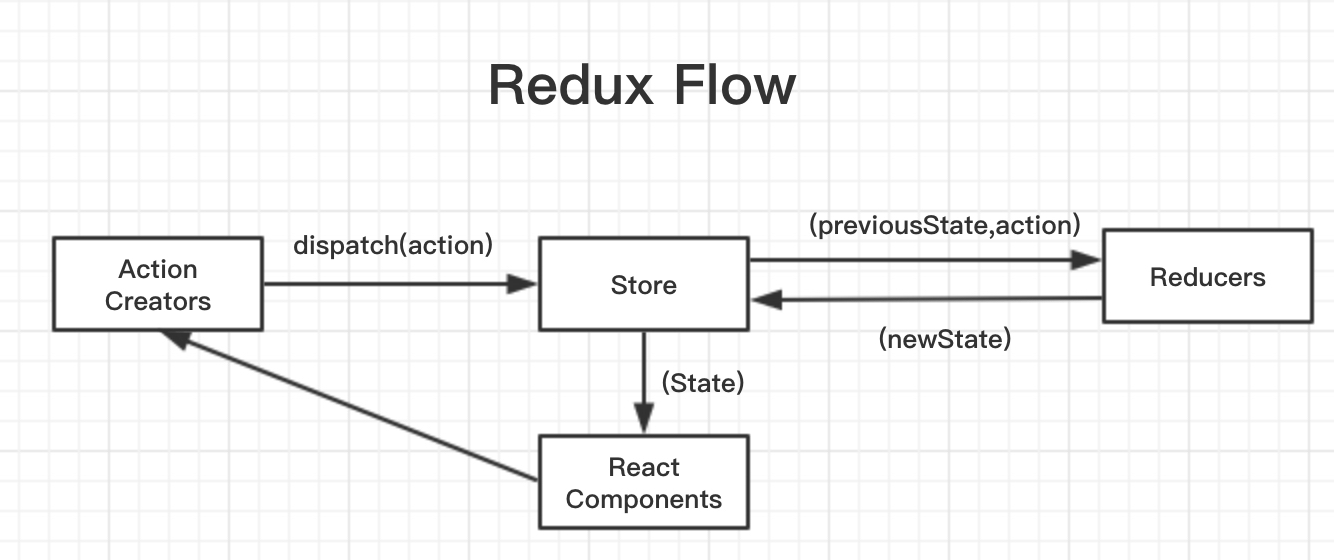
- 核心API:
- 创建 store:
import { createStore } from 'redux';export default createStore(reducer)
- 创建reducer:
export default (state=defaultState,action) => { /* ... */ return state}
- 组件中使用:
- 获取store中数据:
store.getState() - 派发action给store:
store.dispatch(action) - 订阅store的改变,触发回调函数:
store.subscribe(callbackFunc)
- 获取store中数据:
- 创建 store:
- 注意:
- 整个应用
store是唯一的 - 只有
store能改变自己的内容(即state),reducer只是返回一个state给store,最终由store来更新 reducer必须是一个纯函数(确定的输入输出,即没有跟时间有关的操作/异步操作等;且不会有任何副作用,如不会对接收的参数做修改)
- 整个应用
Sample:TodoList
Store (store/index.js)
 import { createStore } from 'redux';
 import reducer from './reducer';

 const store = createStore(reducer);

 export default store;
Reducer (store/reducer.js)
 const defaultState={
     inputValue: '',
     list: []
 }
 export default (state=defaultState,action) => {
     // console.log(state,action)
     if (action.type === 'change_input_value'){
         /*
             reducer可以接收state,但不可以修改state,所以深拷贝了一份
             将新的state返回给Store,由Store更新Store中的state
         */
         const newState = JSON.parse(JSON.stringify(state));
         newState.inputValue = action.value;
         return newState;
     }
     if (action.type === 'submit_input_value'){
         const newState = JSON.parse(JSON.stringify(state));
         newState.list.push(newState.inputValue);
         newState.inputValue='';
         return newState
     }
     if (action.type === 'delete_list_item'){
         const newState = JSON.parse(JSON.stringify(state));
         newState.list.splice(action.value,1);
         return newState
     }
     return state;
 }
Component (AntdTodoList.js)
 import React,{ Component } from 'react';
 import 'antd/dist/antd.css';
 import { Input,Button,List,Icon } from 'antd';
 import store from './store/index'

 class AntdTodoList extends Component {
     constructor(props){
         super(props);
         this.state=store.getState();

         // this.handleInputChange=this.handleInputChange.bind(this);
         // this.handleBtnClick=this.handleBtnClick.bind(this);
         this.handleStoreChange=this.handleStoreChange.bind(this);
         store.subscribe(this.handleStoreChange);
     }
     render(){
         return (
             <div style={{margin:'20px auto',maxWidth:'600px'}}>
                 <div style={{padding:'20px 0px',textAlign:'center'}}>
                     <h2>TodoList(with Antd UI):</h2>
                     <Input
                         placeholder='Enter todo item here'
                         style={{width:'500px',marginRight:'10px'}}
                         value={this.state.inputValue}
                         onChange={this.handleInputChange}
                     />
                     <Button type="primary" onClick={this.handleBtnClick}>Submit</Button>
                 </div>
                 <List
                   bordered
                   dataSource={this.state.list}
                   renderItem={(item,index) => (
                     <List.Item
                         actions={[
                             <Icon type="delete" theme="filled"
                             onClick={this.handleItemDelete.bind(this,index)}/>
                         ]}
                     >
                         {item}
                     </List.Item>
                   )}
                 />
             </div>
         )
     }
     handleInputChange(e){
         // console.log(e.target.value)
         const action = {
             type: 'change_input_value',
             value: e.target.value
         }
         store.dispatch(action)
     }
     handleBtnClick(){
         const action = {
             type: 'submit_input_value'
         }
         store.dispatch(action)
     }
     handleItemDelete(index){
         // console.log(index)
         const action = {
             type: 'delete_list_item',
             value: index
         }
         store.dispatch(action)
     }
     handleStoreChange(){
         // console.log('store state changed')
         this.setState(store.getState())
     }
 }

 export default AntdTodoList;
Sample改进:封装action
src/actionCreator.js 统一创建action
 import * as actionType from './actionType'

 const changeInputValueAction = (value) => ({
     // type: "change_input_value",
     type: actionType.ChangeInputValue,
     value: value
 });
 const submitInputValueAction = () => ({
     // type: "submit_input_value"
     type: actionType.SubmitInputValue
 });
 const deleteListItemAction = (value) => ({
     // type: "delete_list_item",
     type: actionType.DeleteListItem,
     value: value
 });
 export {changeInputValueAction,submitInputValueAction,deleteListItemAction}
src/actionType.js
 const ChangeInputValue="change_input_value";
 const SubmitInputValue="submit_input_value";
 const DeleteListItem="delete_list_item";
 export {ChangeInputValue,SubmitInputValue,DeleteListItem}
Reducer update: src/reducer.js
 import * as actionType from './actionType'

 const defaultState={
     inputValue: '',
     list: []
 }

 export default (state=defaultState,action) => {
     //if (action.type === 'change_input_value'){
     if (action.type === actionType.ChangeInputValue){
             const newState = JSON.parse(JSON.stringify(state));
             newState.inputValue = action.value;
             return newState;
         }
         // if (action.type === 'submit_input_value'){
         if (action.type === actionType.SubmitInputValue){
             const newState = JSON.parse(JSON.stringify(state));
             newState.list.push(newState.inputValue);
             newState.inputValue='';
             return newState
         }
         // if (action.type === 'delete_list_item'){
         if (action.type === actionType.DeleteListItem){
             const newState = JSON.parse(JSON.stringify(state));
             newState.list.splice(action.value,1);
             return newState
         }
         return state;
     }
Component update: AntdTodoList.js
 handleInputChange(e){
     // console.log(e.target.value)

     // const action = {
     //     type: 'change_input_value',
     //     value: e.target.value
     // }

     const action = actionCreator.changeInputValueAction(e.target.value)
     store.dispatch(action)
 }

 handleBtnClick(){
     // const action = {
     //     type: 'submit_input_value'
     // }
     const action = actionCreator.submitInputValueAction()
     store.dispatch(action)
 }

 handleItemDelete(index){
     // console.log(index)

     // const action = {
     //     type: 'delete_list_item',
     //     value: index
     // }
     const action = actionCreator.deleteListItemAction(index)
     store.dispatch(action)
 }
Reducer拆分组合
使用redux的combineReducers:组合多个reducer,形成一个组合的state
(注:dispatch一个action时,所有reducer都会收到)
Sample:
src/common/header/store/reducer.js:
 const defaultState={
     focused: false
 };

 export default (state=defaultState,action)=>{
     if (action.type=='HeaderSearchFocus'){
         return { focused:true}
     }
     if (action.type=='HeaderSearchBlur'){
         return {focused:false}
     }
     return state;
 }
src/store/reducer.js:
 import { combineReducers } from 'redux';
 import headerReducer from '../common/header/store/reducer';

 export default combineReducers({
     header: headerReducer           // 组合多个reducer
 })
src/common/header/index.js:
 const mapStateToProps=(state)=>{
     return {
         // focused: state.focused
         focused: state.header.focused   // Note!
     }
 }
Redux中间件: Redux-thunk
- Redux中间件(Middleware):在action与store中间,对Dispatch做了一个升级封装
- 在dispatcher中截获action做特殊处理后,再发送出去
- 即截获action & 发出action
- redux-thunk:
- 将异步请求或复杂逻辑放到action中处理
- (原本action是一个具体对象,使用thunk后,action还可以是一个函数,然后在这个函数中发送异步请求 => 异步action)
- install:
yarn add redux-thunk
Sample:组件获取初始化数据(componentDidMount时触发)
不使用redux-thunk:直接发送异步请求,响应后再发送action给store通知进行后续处理
  // 1. src/actionCreator.js
  const initialListItemAction = (value) => ({
      type: actionType.InitialListItem,
      value: value
  })

  // 2. src/actionType.js
  const InitialListItem="initialListItem";
  export {ChangeInputValue,SubmitInputValue,DeleteListItem,InitialListItem}

  // 3. src/reducer.js
  // ...
  if (action.type === actionType.InitialListItem){
      const newState = JSON.parse(JSON.stringify(state));
      newState.list=action.value;
      return newState;
  }
  // ...

  // 4. AntdTodoList.js
  import axios from 'axios'
  // ...
  componentDidMount(){
      // axios.get('/todoItems.json').then((response)=>{
      axios.get('/api/todoItems.json').then((response)=>{
          const data = response.data;
          const action = actionCreator.initialListItemAction(data);
          store.dispatch(action)
      });
  }
使用redux-thunk: 发送异步action,响应后再发送一个action给store通知进行后续处理
  // 1. store中增加这个中间件: src/index.js
  import { createStore, applyMiddleware } from 'redux';
  import reducer from './reducer';
  import thunk from 'redux-thunk';

  const store = createStore(reducer,applyMiddleware(thunk));
  export default store;

  // 2. src/actionCreator.js
  import axios from 'axios'

  const initialListItemAction = (value) => ({
      type: actionType.InitialListItem,
      value: value
  })

  const getListItems = ()=>{
      return (dispatch)=>{
          // axios.get('/todoItems.json').then((response)=>{
          axios.get('/api/todoItems.json').then((response)=>{
              const data=response.data;
              // console.log(data);
              const action=initialListItem(data);
              dispatch(action);
          }).catch((err)=>{
              // console.log(err);
              const data=["Load Initial Items Fail!:"+err]
              const action=initialListItemAction(data);
              dispatch(action);
          })
      }
  }
  export {changeInputValueAction,submitInputValueAction,deleteListItemAction,
      initialListItemAction,getListItems}

  // 3. src/actionType.js & src/reducer.js 同上

  // 4. AntdTodoList.js
  componentDidMount(){
      // axios.get('/todoItems.json').then((response)=>{
      // axios.get('/api/todoItems.json').then((response)=>{
      //     const data = response.data;
      //     const action = actionCreator.initialListItemAction(data);
      //     store.dispatch(action)
      // });
      const action = actionCreator.getListItems();
      store.dispatch(action)
  }
注:
测试时,对于通过create-react-app创建启动的项目,可临时在项目的public目录下临时做个可访问数据,
例如:public/api/todoItems.json,可通过http://localhost:3000/api/todoItems.json直接访问文件内容
["Reading","Watching"]
也可使用Charles实现本地数据mock
Redux中间件: Redux-saga
- 也是做异步代码拆分的一个中间件,可代替
redux-thunk - 相较于
redux-thunk要复杂的多,有较多的API,可将异步代码完全的拆分到一个单独的文件中,在处理大型项目中,可能要优于redux-thunk(redux-thunk要简单的多,只是让action不仅仅是一个对象,还可以是一个函数) - install:
yarn add redux-saga
Sample:
store中增加这个中间件: src/index.js
 import { createStore, applyMiddleware } from 'redux';
 import reducer from './reducer';

 import createSagaMiddleware from 'redux-saga'
 import sagas from './sagas'

 const sagaMiddleware = createSagaMiddleware()
 const store = createStore(reducer,applyMiddleware(sagaMiddleware));
 sagaMiddleware.run(sagas)

 export default store;
src/sagas.js: 截获指定action,发送异步请求,有响应后再发送action给store通知处理 <= generator & yield (协程)
import { takeEvery,put } from 'redux-saga/effects' import * as actionType from './actionType' import * as actionCreator from './actionCreator' import axios from 'axios' // 注:必须是generator函数 function* mySaga() { yield takeEvery(actionType.GetSagaListItems, getListItems); } function* getListItems(){ console.log("saga: getListItems") try{ // const response = yield axios.get('/todoItems.json'); const response = yield axios.get('/api/todoItems.json'); const data = response.data; const action=actionCreator.initialListItemAction(data); yield put(action); }catch(err){ const data=["Load Initial Items Fail!:"+err] const action=actionCreator.initialListItemAction(data); yield put(action); } } export default mySaga;- AntTodoList.js : 发送一个action给store(会被中间件saga截获到处理)
 componentDidMount(){
     const action = actionCreator.getSagaListItems();
     store.dispatch(action)
 }
src/actionCreator.js
 const initialListItemAction = (value) => ({
     type: actionType.InitialListItem,
     value: value || []
 })
 const getSagaListItems=() => ({
     type: actionType.GetSagaListItems
 });

 export {changeInputValueAction,submitInputValueAction,deleteListItemAction,
     initialListItemAction, getSagaListItems}
src/actionType.js
 const GetSagaListItems="getSagaListItems";    // for redux-saga

 export {ChangeInputValue,SubmitInputValue,DeleteListItem,
         InitialListItem,GetSagaListItems}
React-redux
React中使用Redux
- 一个第三方模块(帮助在react中更加方便地使用redux),内部使用了
React的Context API Provider(使用Context.Provider): 将store提供给Provider下的所有组件connect(使用Context.Consumer): 连接作用,映射store信息给Component,工作原理:高阶组件,重新封装返回新的Component- (
Component+store=>new Component)
Sample:分离业务逻辑和组件
- 通过
react-redux的Provider传递store给Component - 将TodoList优化为UI Component
- 定义store的state和dispatch映射组件props的规则
- 通过
react-redux的connect, 获取store, 结合定义的连接规则,封装组件和业务逻辑,返回一个新的组件 - (
UI Component+mapStateToProps,mapDispatchToProps=>Container Component)
Provider提供器: 将store提供给Provider下的所有组件import { Provider } from 'react-redux' import store from './store/index' import TodoListRd from './TodoListRd' function App() { return ( {/* store和Provider做了关联,则Provider下的组件都有能力获取到store */} <Provider store={store}> <TodoListRd/> </Provider> ) }TodoList优化为UI Component
 import React,{Component} from 'react'
 import 'antd/dist/antd.css';
 import { Input,Button,List,Icon } from 'antd';

 // UI组件:
 const TodoListRd = (props)=>{
     const { inputValue, list, handleInputChange, handleBtnClick, handleItemDelete } = props;
     return (
         <div style={{margin:'20px auto',maxWidth:'600px'}}>
             <div style={{padding:'20px 0px',textAlign:'center'}}>
                 <h2>TodoList(with Antd UI):</h2>
                 <Input
                     placeholder='Enter todo item here'
                     style={{width:'500px',marginRight:'10px'}}
                     value={inputValue}
                     onChange={handleInputChange}
                 />
                 <Button type="primary" onClick={handleBtnClick}>Submit</Button>
             </div>
             <List
               bordered
               dataSource={list}
               renderItem={(item,index) => (
                 <List.Item
                     actions={[
                         <Icon
                             type="delete" theme="filled"
                             onClick={()=>{
                                 // console.log("del:",index,list[index])
                                 handleItemDelete(index)
                             }}
                         />
                     ]}
                 >
                     {item}
                 </List.Item>
               )}
             />
         </div>
     )
 }
定义连接规则,使用
connect将UI组件与业务逻辑相结合,返回一个Container组件import { connect } from 'react-redux' import * as actionCreator from './store/actionCreator' // 定义连接规则 // 规则1: Map store state to Component props (将store的state映射给组件的props) const mapStateToProps=(state)=>{ return { inputValue: state.inputValue, list: state.list } } // 规则2: Map store dispatch to Component props (将store的dispatch方法挂载给组件的props) const mapDispatchToProps=(dispatch)=>{ return { handleInputChange(e){ const action = actionCreator.changeInputValueAction(e.target.value) dispatch(action) }, handleBtnClick(){ const action = actionCreator.submitInputValueAction() dispatch(action) }, handleItemDelete(index){ const action = actionCreator.deleteListItemAction(index) dispatch(action) } } } // 使用connect将UI组件与业务逻辑相结合,返回一个Container组件 export default connect(mapStateToProps,mapDispatchToProps)(TodoList)
redux-immutable
- 统一数据格式
- install:
yarn add redux-immutable - 使用
redux-immutable中的combineReducers组合reducer => 将store的state变成immutable对象
Sample
src/store/index.js
 // import { combineReducers } from 'redux';
 import { combineReducers } from 'redux-immutable'; // 使用redux-immutable中的combineReducers,会将state封装成immutable对象

 // import headerReducer from '../common/header/store/reducer';
 import { reducer as headerReducer} from '../common/header/store';

 export default combineReducers({
     header: headerReducer
 })
src/common/header/index.js
 const mapStateToProps=(state)=>{
     return {
         // focused: state.focused
         // focused: state.header.focused
         // focused: state.header.get('focused')     // Note:这里state.header是一个immutable对象
         focused: state.get("header").get('focused') // Note: 这里state就是一个immutable对象,也可写成 state.getIn(['header','focused'])
     }
 }
组织Action和Reducer
标准方式:action和reducer分开
- 同类action放在一个文件,会无限扩展
- action和reducer分开,实现业务逻辑时需来回切换
- 系统有哪些action不够直观
新的方式:单个action和reducer放在同一个文件
- 以action命名 => 更直观
- 每个action文件都很小,只包括一个action和reducer => 不用在action和reducer间来回切换,易维护
Sample:Counter
reducer.js & actionCreator.js & store.js:
const store = createStore(reducer)创建store.getState()获取store中state数据.dispatch(action)将action分发给reducers.subscribe(callbackListener)监听store变化,触发回调函数// 1. reducer: const counter = (state={count:0},action)=>{ switch(action.type){ case "PLUS_ONE": return {count:state.count+1} case "MINUS_ONE": return {count:state.count-1} default: break; } return state; }; // 2. actionCreator,return an action obj function plusCnt(){ return { type: 'PLUS_ONE' } }; function minusOne(){ return { type: 'MINUS_ONE' } } // 3. store const store = createStore(counter) // usage sample: // store.subscribe( // ()=>{console.log(store.getState())} // ) // store.dispatch(plusOne())
改进:使用工具函数
combineReducers: 组合多个reducer,形成一个组合的state (注:dispatch一个action时,所有reducer都会收到)// reducer: import {combineReducers} from 'redux'; const counter = (state={count:0},action)=>{ switch(action.type){ case "PLUS_ONE": return {count:state.count+1} case "MINUS_ONE": return {count:state.count-1} default: break; } return state; }; const todos = (state={},action)=>{ return state; }; // store: // const store = createStore(counter) const store = createStore( combineReducers({ counter, todos }) ) // => state: { // counter: {count:1}, // todos:{} // }改进:使用工具函数
bindActionCreators: 重新封装actionCreator,自动调用dispatch// action: import {bindActionCreators} from 'redux'; // action creator function, return an action obj function plusOne(){ return { type: 'PLUS_ONE' } }; // bindActionCreators: ()=>{ store.dispatch(plusOne()) } plusOne = bindActionCreators(plusOne,store.dispatch); // previous usage: dispatch(plusOne()); // now could directly use: // plusOne();App.js & Counter.js: 使用
react-redux分离UI&逻辑// 1. App.js: import React,{Component} from 'react' import { Provider } from 'react-redux' import Counter from './Counter' export default class CounterSample extends Component { render() { return ( <Provider store={store}> <Counter /> </Provider> ); }// 2. Counter.js: import { connect } from 'react-redux'; class Counter extends Component{ render(){ const {count,plusOne,minusOne} = this.props; return ( <div> <div>{count}</div> <button onClick={plusOne}>Plus</button> <button onClick={minusOne}>Minus</button> </div> ) } } const mapStateToProps=(state)=>{ return { count: state.count } }; const mapDispatchToProps=(dispatch)=>{ // return { // plusOne // ,minusOne // } return bindActionCreators({ plusOne, minusOne }, dispatch); }; export default connect(mapStateToProps,mapDispatchToProps)(Counter);
使用新的组织方式组织action & reducer(一个action文件中包括一个action & reducer)
actions/counterPlusOne.js
 // action creator
 export const counterPlusOne = ()=>{
     return {
         type: 'COUNTER_PLUS_ONE'
     }
 };

 // reducer
 export const reducer = (state,action)=>{
     switch(action.type){
         case:'COUNTER_PLUS_ONE':
             return {count:state.count+1};
         default:
             return state;
     }
 }
actions/counterMinusOne.js
// action creator export const counterMinusOne = ()=>{ return { type: 'COUNTER_MINUS_ONE' } }; // reducer export const reducer = (state,action)=>{ switch(action.type){ case:'COUNTER_MINUS_ONE': return {count:state.count-1}; default: return state; } }- actions.js
export {counterPlusOne} from './counterPlusOne' export {counterMinusOne} from './counterMinusOne' - reducer.js
 export {reducer as counterPlusOneReducer} from './counterPlusOne'
 export {reducer as counterMinusOneReducer} from './counterMinusOne'
React Router
- install:
yarn add react-router-dom - 特性:
- 声明式的路由定义(React组件,可像Tag一样去定义使用)
- 动态路由(页面render时实时解析)
- 基于路由配置进行资源组织
- 实现业务逻辑的松耦合
- 易于扩展,重构和维护
- 路由层面实现Lazy Load
- 注:路由不只是页面切换,更是代码组织方式
- 单页应用也需要进行页面切换
- 通过URL可以定位到页面
- 更有语义的组织资源
- 应用:管理登录和授权(区分受保护路由和公开路由,访问未授权路由时重定向到登录页面)
路由
Link: 普通链接,不会出发浏览器刷新(用a标签的话,浏览器会刷新)<Link to='/home'>Home</Link>NavLink: 类似Link,但是会添加当前选中状态(多了一个css样式设置)<NavLink to="/faq" activeClassName="selected"> FAQs</NavLink>Prompt: 满足条件时提示用户是否里来当前页面<Prompt when={formIsHalfFilledOut} message="Are you sure you want to leave?" />Redirect: 重定向当前页面,例如:登录判断<Route exact path="/" render={()=>( loggedIn? (<Redirect to='/dashboard'/>):(<LoginPage/>) )} />Route: 路由配置的核心标记,路径匹配时显示对应组件(不排他,多个匹配,则显示多个)<Route exact path="/home" component={Home}/>Switch: 只显示第一个匹配的路由(排他,只显示第一个匹配的)<Switch> <Route exact path="/" component={Home}/> <Route exact path="/about" component={About}/> <Route exact path="/:user" component={User}/> <Route component={NoMatch}/> </Switch>
路由容器
BrowserRouter: 使用URL路径/xxxHashRouter: 使用Hash路由#xxxMemoryRouter: 内存路由, 不会反应到URL上
import React from 'react';
import {Route,Link} from 'react-router-dom';

import {BrowserRouter as Router} from 'react-router-dom';
// import {HashRouter as Router} from 'react-router-dom';
// import {MemoryRouter as Router} from 'react-router';     // 与dom无关

const RouterSample=(props)=>{
    return (
        <Router>
            <div>
                <ul id="menu">
                    <li><Link to='/home'>Home</Link></li>
                    <li><Link to='/hello'>Home</Link></li>
                    <li><Link to='/about'>Home</Link></li>
                </ur>
            </div>

            <div>
                <ul id="page-container">
                    <Route path="/home" component={Home}/>
                    <Route path="/hello" component={Hello}/>
                    <Route path="/about" component={About}/>
                </ur>
            </div>
        </Router>
    )
};
export default RouterSample;
参数传递
通过URL传递参数:
- rule:
<Route path="/topic/:id" component={Topic} />(More path rules) - trigger:
<Link to="/topic/15>Topic_15</Link> - get params(in the Topic Component):
this.props.match.params - 注:页面状态尽量通过URL参数传递
嵌套路由
嵌套路由:每个React组件都可以是路由容器,声明式语法可以很方便的定义嵌套路由
import { BrowserRouter as Router, Route, Link } from "react-router-dom";

const Category = (props)=> {
    return (
      <Router>
        <div>
          <ul id="menu">
            <li><Link to="/category/1">Category 1</Link></li>
            <li><Link to="/category/2">Category 2</Link></li>
            <li><Link to="/category/3">Category 3</Link></li>
          </ul>
          <div id="page-container">
            <Route path="/category/:id" component={SubCategory}/>
          </div>
        </div>
      </Router>
    )
};

const SubCategory = (props)=>{
    const categoryId=props.match.params.id
    return (
        <div>
            <h1>Category {categoryId}</h1>
            <ul id="menu">
              <li><Link to={`/category/${categoryId}/1`}>Sub Category 1</Link></li>
              <li><Link to={`/category/${categoryId}/2`}>Sub Category 2</Link></li>
            </ul>
            <div id="page-container-2">
              <Route path="/category/:id/:subId" component={Detail}/>
            </div>
          </div>
    )
}

const Detail = (props) => (
  <h1>Sub Category {props.match.params.subId} Detail</h1>
);

export default Category;
注:
// 没有使用exact精确匹配
// => Link `/category` 时     , 显示 Category
// => Link `/category/1` 时   , 显示 SubCategory
// => Link `/category/1/2` 时 , 显示Category,SubCategory,Detail
<Route path="/category/:id" component={SubCategory}/>
<Route path="/category/:id/:subId" component={Detail}/>
Sample
App:
 import React, { Fragment } from 'react';
 import { BrowserRouter, Route } from 'react-router-dom';
 import Header from './common/header';
 import Home from './pages/home';
 import Detail from './pages/detail';

 function App() {
   return (
     <Fragment>
         <Header/>
         {/*
         <BrowserRouter>
           <Route path='/' exact render={()=>(<div>Home</div>)}></Route>
           <Route path='/detail' exact render={()=>(<div>Detail</div>)}></Route>
         </BrowserRouter>
         */}
         <BrowserRouter>
           <Route path='/' exact component={Home}></Route>
           <Route path='/detail/:id' exact component={Detail}></Route>
         </BrowserRouter>
     </Fragment>
   );
 }

 export default App;
Home:
 import React from 'react';
 import {Link} from 'react-router-dom';

 const Home = (props) => {
     return (
         <div>
             <h1>Home</h1>
             {/*<a href="/detail">Detail</a>*/}
             <ul>
                 <li><Link to="/detail/1">Go Detail_1</Link></li>
                 <li><Link to="/detail/2">Go Detail_2</Link></li>
                 <li><Link to="/detail/3">Go Detail_3</Link></li>
             </ul>
         </div>
     )
 }

 export default Home;
Detail:
 import React from 'react';
 import { Link } from 'react-router-dom';

 const Detail=(props)=>{

     // console.log("props.match","eg: /details/1",props.match)  // props.match.params
     // console.log("props.location","eg: /details?id=1",props.location) // props.location.search

     return (
         <div>
             <h1>Detail:{props.match.params.id}</h1>
             {/*<a href="/">Home</a>*/}
             <Link to="/">Back Home</Link>
         </div>
     )
 }

 export default Detail;
More
react-loadable
react-loadable 异步加载组件
- 原本一个
bundle.js大包了所有组件,第一次加载会比较慢 react-loadable使用时再加载对应组件js =>1.chunk.js,2.chunk.js,...- install
yarn add react-loadable
Sample:
App:
 import React, { Fragment } from 'react';
 import { BrowserRouter, Route } from 'react-router-dom';
 import Header from './common/header';
 import Home from './pages/home';
 // import Detail from './pages/detail';
 import Detail from './pages/detail/loadable';  // 使用loadable.js封装的Detail组件

 function App() {
   return (
     <Fragment>
         <Header/>
         {/*
         <BrowserRouter>
           <Route path='/' exact render={()=>(<div>Home</div>)}></Route>
           <Route path='/detail' exact render={()=>(<div>Detail</div>)}></Route>
         </BrowserRouter>
         */}
         <BrowserRouter>
           <Route path='/' exact component={Home}></Route>
           <Route path='/detail/:id' exact component={Detail}></Route>
         </BrowserRouter>
     </Fragment>
   );
 }

 export default App;
Detail组件:
 import React from 'react';
 import { Link, withRouter } from 'react-router-dom';

 const Detail=(props)=>{
     return (
         <div>
             <h1>Detail:{props.match.params.id}</h1>
             {/*<a href="/">Home</a>*/}
             <Link to="/">Back Home</Link>
         </div>
     )
 }

 export default withRouter(Detail); // 使用withRouter,否则props.match无法获取到值
封装Detail组件:detail/loadable.js
 import React from 'react';
 import Loadable from 'react-loadable';

 const LoadableComponent = Loadable({
   loader: () => import('./'),           // import component: `Detail`
   loading: ()=> <div>Loading...</div>  // loading component
 });

 export default ()=>{ return (<LoadableComponent/>) } // 直接返回一个无状态组件
注:react-loadable会使用已经被重命名的react方法componentWillMount
Warning: componentWillMount has been renamed, and is not recommended for use. See https://fb.me/react-async-component-lifecycle-hooks for details.
- Move code with side effects to componentDidMount, and set initial state in the constructor.
- Rename componentWillMount to UNSAFE_componentWillMount to suppress this warning in non-strict mode. In React 17.x, only the UNSAFE_ name will work. To rename all deprecated lifecycles to their new names, you can run
npx react-codemod rename-unsafe-lifecyclesin your project source folder.
Please update the following components: LoadableComponent
Next.js 创建同构应用
同构应用
- 第一次发送请求,服务端渲染,返回页面给客户端呈现(客户端不需要再花时间执行js渲染页面)
- 后续仍由客户端执行操作
使用 Next.js 实现服务器端渲染(无缝同步到客户端)
- install:
npm install --save next react react-dom package.json: add cmd{ "scripts":{ "dev":"next", "build":"next build", "start":"next start" } }- run:
npm run dev - visit:
http://localhost:3000 - 注:
pages目录:- 每个文件对应页面路由导航,文件中可定义使用组件
- 页面也是标准的node模块,可使用其他React组件
- 页面会针对性打包,仅包含其引入的组件
- page具有特殊静态方法
getInitialProps
static目录: 映射静态文件
- install:
使用
next/link实现同构路由next/link定义的链接,点击时页面不会刷新prefetch属性: 预加载目标资源(但不会加载服务器端API数据)replace属性: 替换URL(配置后当前链接不会包含在浏览器的history中,即无法后退到当前页面)import Link from 'next/link'; export default ()=>( <div> <Link href='/hello'><a>Hello</a></Link> <Link href='/about' prefetch><a>About</a></Link> </div> )
使用
next/dynamic实现动态加载页面(Lazy Load)import dynamic from 'next/dynamic'; const DynamicHello = dynamic( import('../components/hello'),{loading:()=>(<p>...</p>)} ) export default () => ( <div> <Header/> <DynamicHello /> <p> Home Page </p> </div> )
单元测试工具
React让前端单元测试变的容易:
- React应用很少需要访问浏览器API
- 虚拟Dom可以再NodeJS环境运行和测试
- Redux隔离了状态管理,纯数据层单元测试
单元测试涉及的工具:
Jest: Facebook开源的JS单元测试框架JS Dom: NodeJS环境中模拟浏览器APIEnzyme: React组件渲染和测试(可直接在NodeJS环境中渲染虚拟Dom和测试)nock: 模拟HTTP请求sinon: 函数模拟和调用跟踪Istanbul: 单元测试覆盖率
Sample: Jest + Enzme
import React from 'react'
import { shallow } from 'enzyme'
import CommentItem from './commentItem'

describe('测试评论列表项组件', () => {
  // 这是mocha的玩法,jest可以直接兼容
  it('测试评论内容小于等于200时不出现展开收起按钮', () => {
    const propsData = {
      name: 'hj',
      content: '测试标题'
    }
    const item = shallow(<CommentItem {...propsData} />)
    // 这里的断言实际上和chai的expect是很像的
    expect(item.find('.btn-expand').length).toBe(0);
  })
  // 这是jest的玩法,推荐用这种
  test('两数相加结果为两个数字的和', () => {
    expect(3).toBe(3);
  });
}
拆分复杂度: 按领域模型(feature)组织代码
- 按业务逻辑拆分成高内聚松耦合的模块
- 按feature组织component,action,reducer
- 使用root loader加载feature下的各个资源
- 文件夹结构
- 按feature组织源文件
- 组件和样式文件同一级
- Redux单独文件夹
- 单元测试保持同样目录结构,放在tests文件夹
- 在每个feature中单独定义自己的路由
- 使用JSON定义顶层路由
- 解析JSON配置到React Router语法
Sample:
\src
    \commons
        configStore.js
        rootReducer.js              // combine all features reducers
        routeConfig.js
    \features
        \commons
        \home
            \redux
                actions.js          // export all below reducers
                reducer.js          // export all below actions
                constances.js       // export all below constances (use feature name as prefix,eg: HOME_xxx)
                counterPlusOne.js   // name as action, include one action,one reducer
                counterMinusOne.js
            index.js                // export all below components
            route.js
            style.css               // import all below css
            PageNotFound.js
            PageNotFound.css
            SidePanel.js
            SidePanel.css
            Counter.js
            Counter.css
        \about
        \article
    index.js
    logo.svg

\tests
    \features
        \commons
        \home
        \about
        \article